Create a customised invoice for a practitioner that includes their own header and footer information. This is useful if the practitioner is not an employee and/or is paid directly into their own bank account.
Video guide
Step 1 - Enable customised invoices
The step enables the use of custom invoices at a branch. Once enabled, customised invoices will be used for practitioners that have them, and the branch invoice will be used for practitioners who do not.
To enable customised invoices:
- Go to Zedmed's Management tab.
- Select Practice Setup > Branches.
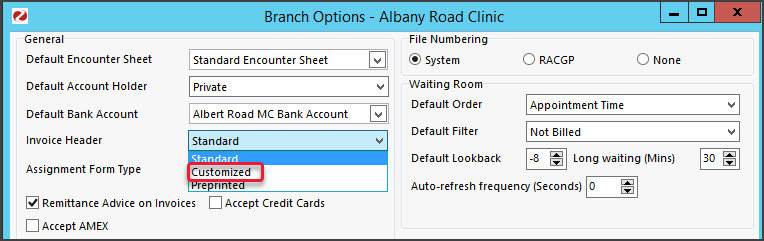
The Practice Details screen will open. - In the Name field, select the branch.
- Select the Options button.
The Branch Options screen will open. - Select Customized in the Invoice Header drop-down field.
- Select Close to save.
- Repeat the steps for each branch as shown in step 3.

Step 2 - Add each practitioner's customised text
This step defines the header and footer information for in the practitioner's invoice.
To customise an invoice:
- Go to Zedmed's Management tab.
- Select Practice Setup then Doctors > Find Treating Doctors.
The Find Doctor Detail screen will open. - In the Dr Code field, select the doctor's initials.
The doctor's profile will open. - Select Invoice Header.
The Invoice Heading Editor will open. - Enter in the header text.
What to enter
Because the default header is being replaced, ensure the invoice still contains the required information for a tax invoice.
How to enter the ext
• Use the editor's format and alignment options to set the font, size, position, etc.
• Use your keyboard's space bar to move text to the right (no tab).
• Test-adjust what is entered so the invoice displays and prints as intended.
- Select Invoice Footer.
The Invoice Footer Editor will open - Enter in the practitioner's footer text.
This will often be remittance advice and payment information. You should check the branch footer text for guidance.
Select Enable Custom Invoice Footer for this branch if you want the footer to be used on receipts and in the Account Inquiry screen - not just the original invoice.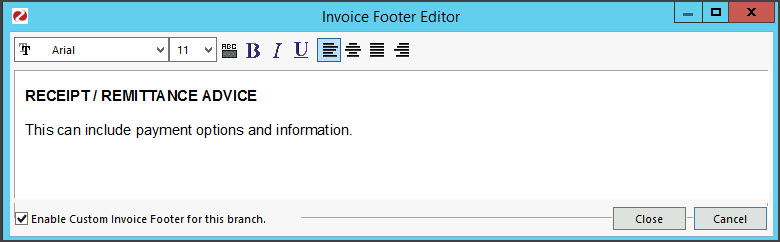
- Select Close to save and exit.


Step 3 - Add an invoice message (optional)
You can use the Invoice Message field to further customise an invoice for a branch. This is the yellow box on the lower part of the invoice and can contain information you want to stand out. It is not for a specific practitioner but it can be used to add important information.
To add an Invoice Message:
- Go to Zedmed's Management tab.
- Select Practice Setup > Branches
The Practice Details screen will open. - In the Name field, select the branch.
- Select the Options button.
- Select the Invoice Message button.
The Invoice Message field will open. - Enter the message you want to appear.
For example - 'TAX INVOICE' if this is not in your header. - Select Show on Invoice Reprint if you also want the Invoice Message to appear on invoice reprints.
Step 4 - Check the invoice
View and print a test invoice to ensure it displays as intended.
We recommend checking:
- The invoice information matches the selected practitioners (if you are setting up multiple practitioners ).
- The invoice is correct for each branch (if you have multiple branches).
- The invoice meets the requirements for a tax invoice (check with the accounting staff/specialist if you are unsure).
