Set up a branch for the practice. This includes enabling Medicare Online and checking the Waiting Room settings, and how to set up the new branch for the practice's doctors.
Additional branches are commonly used for:
- Multiple sites sharing one Zedmed database.
- Clinicians with multiple provider numbers working in multiple locations.
- Capturing Covid-19 vaccination data/pop-up clinics.
Add a branch to the practice
Follow these steps to set up a new branch in Zedmed then follow the directions at the end to activate the database and set up doctors and schedules.
To add a new branch:
- Go to Zedmed's Management tab.
- Select Practice Setup > Branches.
The Practice Details screen will open with the Branches tab selected. - Select Add New.
This will clear the existing fields so you can use them to create the new branch. - Fill in the mandatory Name, Code and Address fields.
Code is a 3-character code for the branch. This is your own code and you determine the format. It will be recorded against billing transactions, and when a Waiting Room is viewed for multiple branches, each patient's row includes the code. - Fill in the optional fields including:
- LSPN - This is the specimen collection point for radiology and pathology.
- SCP (Specimen Collection Point) - used for pathology provider claiming.
- Network HIP-0 - Fill in this field if your clinic has a NASH Certificate installed.
- If you use Zedmed Online Appointments, follow the steps in the Online Appointments setup guide.
Available Online and Can Cancel Online Appointments are for Online Appointments.
- If you use Carl Zeiss software to manage information from ophthalmological consultations:
- Select Use CARL ZEISS Forum.
- For the Path, enter the folder you created for Carl Zeiss. E.g C:\Zedmed\ForumAPI.
- Enter your Carl Zeiss credentials. When you attend an Appointment, an XML file will be created for Carl Zeiss in the folder you created (Patient_IdFamilyNameYYYYMMDD. This file contains a patient_id / patient file number.
- Select Options.
The Branch Options screen will open.
To view additional information, see the full Branch options article. - Under MA Online:
- Select Direct Bill and DVA a
- Select Patient Claims.
- Select ECLIPSE if the branch will be using ECLIPSE billing. To learn more, see the Set up ECLIPSE article.
- Under Waiting Room:
- Default Order - Determines the patients' order in the Waiting Room.
- Default Filter - Not Billed is the default, and means patients will be removed from the Waiting Room once they have been billed.
- Default Lookback - This setting determines how long an unbilled patient is shown in the Waiting Room for. We suggest entering 23 so you can see if there are any patients still waiting to be billed the next day.
- Long waiting - This setting determines how many minutes a patient will be in the Waiting Room before an alert icon appears in the Waiting column.
- Auto-refresh frequency - You need to refresh the Waiting Room to see patients that have been added or removed. This setting enables an automatic refresh at the chosen interval.
- Under SMS Setting.
If you use SMS, follow the steps in the SMS Setup article. - Select Close to save and exit.
You will return to the Practice Details screen.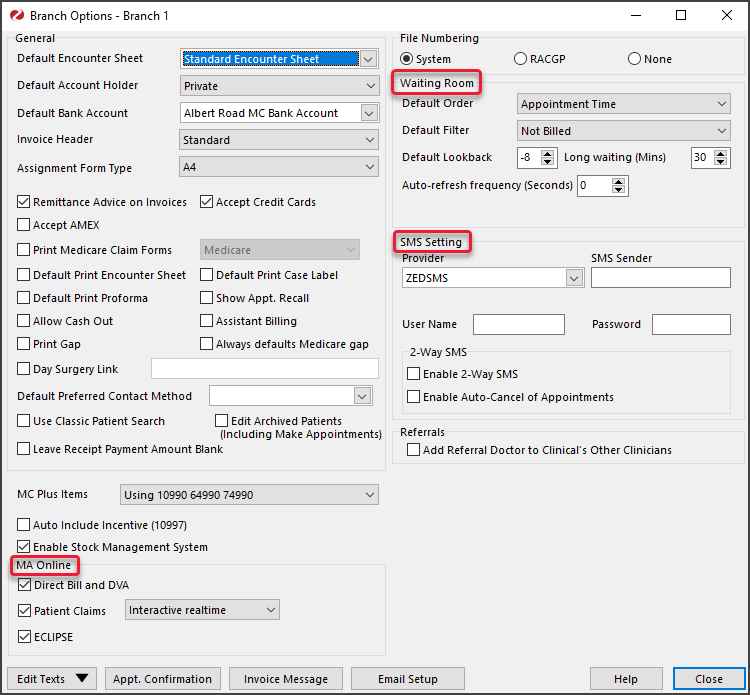
- Select Close to save and exit.
- Log out of Zedmed.
- Call Zedmed support to activate your database on 1300 933 000.
You can set up Doctors and Schedules for this branch after the database activations.
You may also want to Set up SMS.
Once a Branch is created in Zedmed, it cannot be deleted but it can be made unavailable.


Add a branch to a doctor
If a new branch is added to the practice, it needs to be set up for each doctor. You will also follow these steps if a doctor starts consulting at an existing branch they were not set up for.
To add a branch to a doctor:
- Go to Zedmed's Management tab.
- Select Practice Setup then Doctors > Find Treating Doctors.
The Find Doctor Detail screen will open. - In the Family Name field, enter the doctor's surname.
- Select Find from the bottom of the screen.
The Treating doctor selector will open, and display doctors with that Family Name. - Select the doctor then select Details.
The Doctor Details screen will open. The Branch drop-down box shows the doctor's current branches. - To add another branch, select the Another button.
The Branch Selector screen will open and list the available branches. - Select the branch you want to add.
- Select Close.
That branch will now appear in the drop-down list of branches.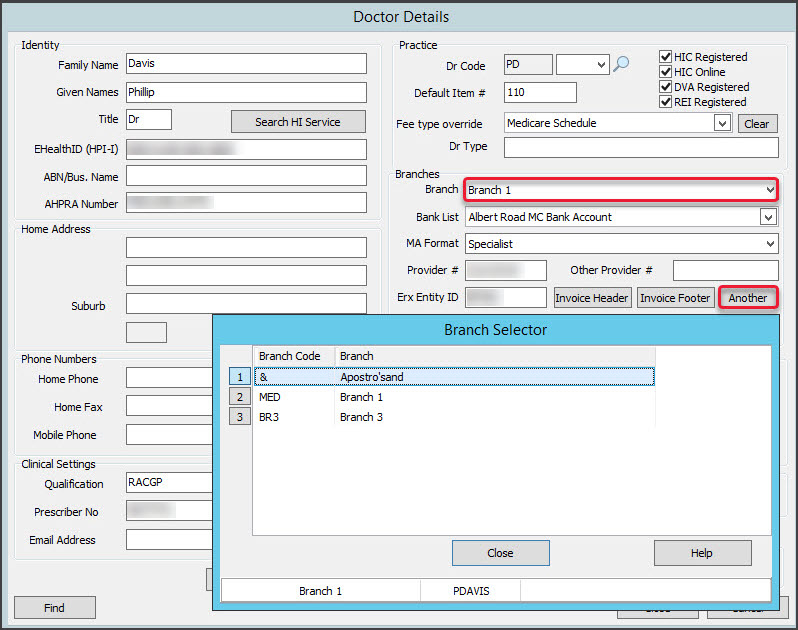
- Once the branch is added to the Branch drop-down list, fill in the following fields:
- Bank list is used to select the doctor's bank, which is set up in the Practice Details screen's Bank Accounts tab. It allows you to run financial reports just for the doctor's billing and exclude that billing from the practice's reports.
- MA Format is used to select the specialty the doctor is registered for at Medicare Australia. This is required for Medicare Billing and it must match the information Medicare has. When a doctor is registered with Medicare, they provide this information to get their Provider Number.
- Provider is the Doctor's Medicare number and is linked by Medicare to the Practice MinorID. Medicare uses this to link its payments to the doctors so it knows who the money should go to.
- Other Provider can be left blank.
- Erx Entity ID is entered by Zedmed. It links the doctor to Erx. You should never change or enter anything into this field.
To learn more, see the ePrescribing with eRx guide. - Invoice Header allows the doctor to have their own invoice header. The default header uses the clinic's details.
- Select Close to save and exit.
