Online Appointments (OLA) allow patients to make online bookings, which are added to Zedmed's Appointment Book. This guide explains how to process patients who have made their first online appointment, and need to have their OLA account reconciled with their patient record. This reconciliation only needs to be performed once.
Overview
New Patients
If there is no existing patient record to reconcile the online booking with, it will mean the patient is new and a patient record will need to be created. Reconciliations should always be made where possible, and new patients should only be added when it has been confirmed there is no existing record. If this is not done, you will have duplicate records that will need to be merged.
Identifying Online Appointments
Bookings made via Online Appointments will show in the Zedmed Appointment Book with a cloud icon. If it's the patient's first online booking and their booking has not been reconciled with a patient record, the cloud icon will have a + symbol on it.
You only have to do the reconciliation once. After the patient's Online Appointment information has been reconciled with their patient record, all subsequent Online Appointments can be processed the same as any other appointment.


Reconciliation workflows
You can reconcile patients individually from the Appointment Book (right-click > Reconcile) or you can reconcile all outstanding patients from the Online Patient Reconciliation screen (Utilities tab> Online Patient Reconciliation -or- click on the Notification).
If you expect a lot of initial reconciliations as patients start using Online Appointments, we recommend having staff check for first-time online bookings and reconcile them using the Online Patient Reconciliation screen to save time when Attending.
If you try to Attend a first-time online booking without reconciling the, a message will advise they need to be reconciled.

Reconciliation mistakes
You cannot reverse the reconciliation of a patient's OLA account with the wrong patient record. For this reason, care should be taken and attention paid to birth dates. If there is any doubt, wait for the patient to arrive before performing the reconciliation .
Important: If an OLA account is reconciled with the wrong patient record:
- Zedmed support should be contacted to reverse the reconciliation.
- Any demographic information that was merged must be manually corrected.
- If clinical information is recorded, you can remove the information on the same day. If it is not the same day, information will need to be commented and, if required, Zedmed can provide assistance.
Reconciling all outstanding patients
Patients' Online Appointment information can be reconciled to their patient records using the Online Patient Reconciliation screen, which lists all the patients who have made their first online appointment but have not been reconciled.
The Online Patient Reconciliation screen is accessed via Zedmed's Utilities tab, and it will also open if you select a yellow Notifications message for unreconciled bookings.
To reconcile outstanding patient records:
- Select the Zedmed Utilities tab.
- Select Online Patient Reconciliation.
The Online Patient Reconciliation screen will open, and list all patients that need to be reconciled.
To remove a patient without reconciling them:
a) Select the patient.
b) Select Delete Patient.
c) Confirm at the prompt.
If the patient has an appointment, you will be prompted to cancel the appointment before deleting the patient.
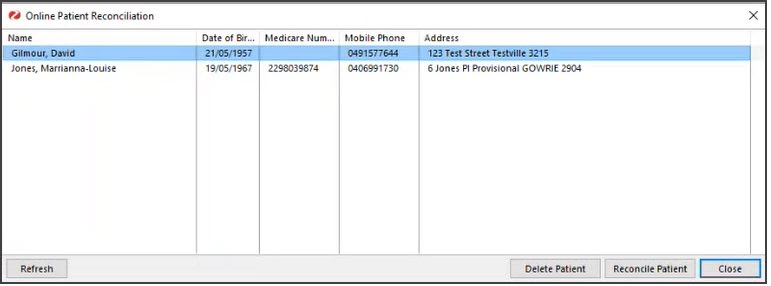
- Select the first patient.
- Select the Reconcile Patient button.
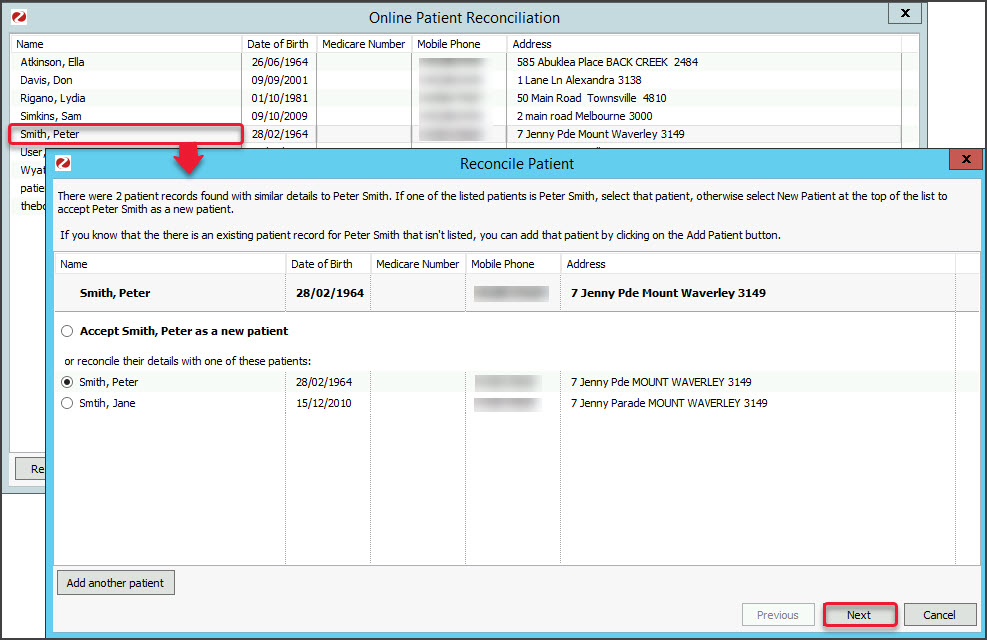
The Reconcile Patient screen will open.
The OLA details provided by the patient are shown in bold. All patient records with matching details are listed below them. - Look for a matching patient record, and continue with one of the following 3 options:
-
If there is a matching patient:
Proceed to step 6 and reconcile to the existing patient record. -
If no matching patients are shown, and it is a NEW patient
Create a new patient record. To do this, leave the Accept <patient name> as a new patient selected and click Next, then Finish. This creates a new patient record using the information provided in the OLA form and ends the workflow. -
If no matching patients are shown, but it is NOT a NEW patient
Select Add another patient and search for the patient. When you select them, they will be added to the list of matching patient records to reconcile, as explained in step 6.
-
If there is a matching patient:
- Select the matching patient as shown in the screenshot below.
- Check they have the same birth date.
- Check the other demographics.
If in doubt, do the reconciliation when the patient arrives. Attending them will open the reconciliation screen.
- Select Next.
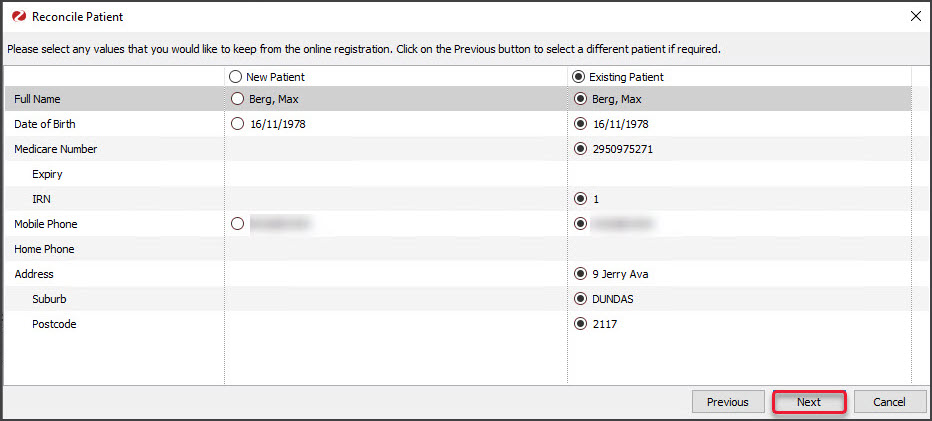
 The Reconcile Patient screen (below) compares the information provided in OLA with the information in the patient's record.
 - Use the radio button next to each demographic to select the information that should be included in the reconciled record.
- Existing Patient will be selected by default with all demographics selections below it.
- You can select specific items under New Patient to update the Existing Patient record. E.g. to change the address.
- New Patient is used to easily select all the new information and apply it to the record. It does not create a new patient.
- Select Next.
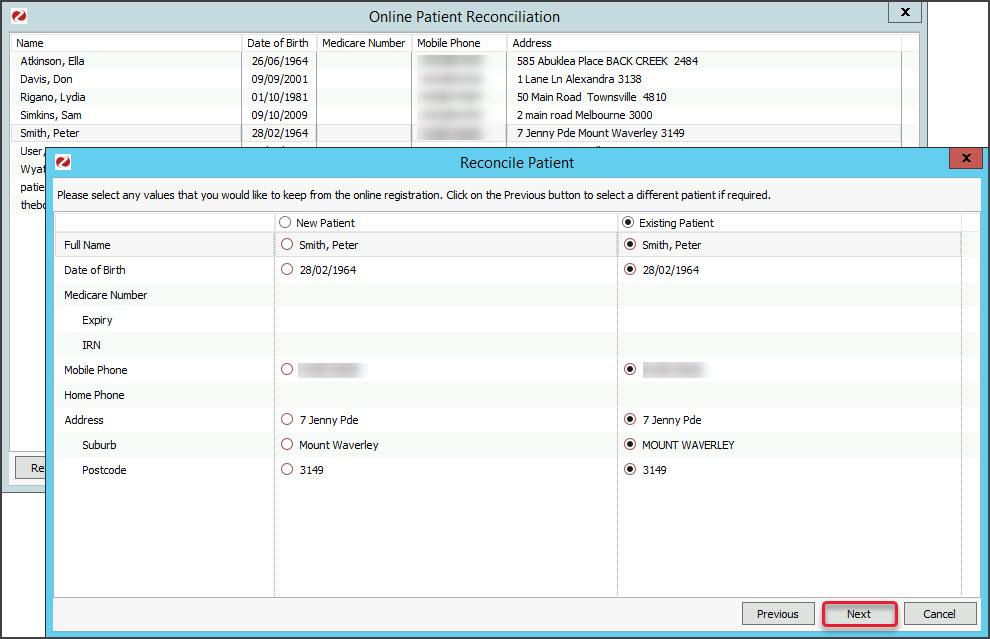
- Confirm the information and select Finish.
• The patient will disappear from the Online Patient Reconciliation screen.
• Any updates to the patient's record will be made.
• The + symbol will be removed from the Appointment Book entry.
Reception will now be able to Attend the patient. - Repeat these steps for the next patient.

 The Reconcile Patient screen (below) compares the information provided in OLA with the information in the patient's record.
Reconciling patients from Appointment Book
If a booking in the Appointment Book has a + symbol on the cloud icon, it's a first-time online appointment and the patient's OLA information must be reconciled to their patient record before they can be attended.
To reconcile a first-time online booking:
- Right-click the patient's booking and select Reconcile.
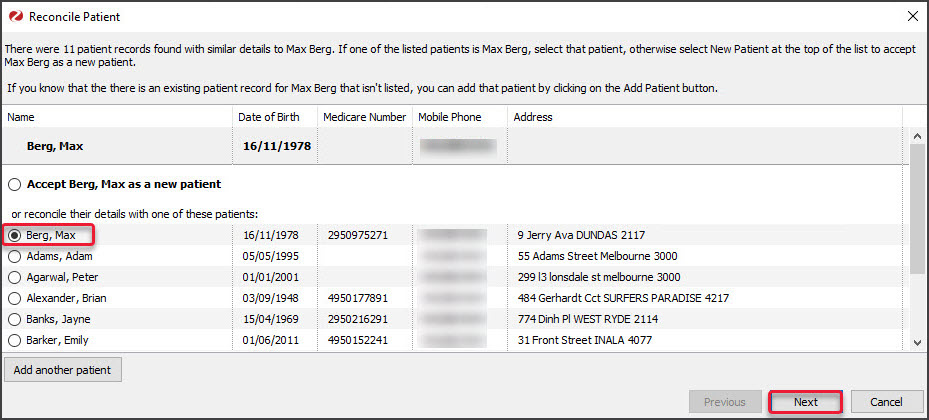
The Reconcile Patient screen will open.The OLA details provided by the patient are shown in bold.
All patient records with matching details are listed below them.
• If you want to remove the patient without reconciling, select them and select Delete Patient. - Look for a matching patient record, and continue with one of the following 3 options:
• If there is a matching patient:
Proceed to step 3 and reconcile to the existing patient record.
• If no matching patients are shown, and it is a NEW patient
Create a new patient record. To do this, leave the Accept <patient name> as a new patient selected and click Next, then Finish. This creates a new patient record using the information provided in the OLA form and ends the workflow.
• If no matching patients are shown, but it is NOT A NEW patient
Select Add another patient and search for the patient. When you select them, they will be added to the list of matching patient records to reconcile, as explained in step 3. - Select the matching patient as shown in the screenshot below.
Check they have the same birth date. - Select Next.
 The Reconcile Patient screen (below) compares the information provided in OLA with the information in the patient's record.
 - Use the radio button next to each demographic to select the information that should be included in the reconciled record.
- Existing Patient will be selected by default with all demographics selections below it.
- You can select specific items under New Patient to update the Existing Patient record. E.g to change the address.
- New Patient is used to easily select all the new information and apply it to the record. It does not create a new patient.
- Select Next.
- Confirm the information and select Finish.
• The patient will disappear from the Online Patient Reconciliation screen.
• Any updates to the patient's record will be made.
• The + symbol will be removed from the Appointment Book entry.
You can now Attend the patient without needing to perform the reconciliation at check-in.
 The Reconcile Patient screen (below) compares the information provided in OLA with the information in the patient's record.