Create or update a patient record. The record includes the patient's demographics and payment information and can be used to manage billing, verify claim entitlements and send SMS messages.
Other patient record resources:
- How to add family members.
- How to add an account payer.
- How to add a referral.
- How to add customised patient fields.
- How to add an Alert - step 9 in this guide.
To create a patient record:
- Go to Zedmed's Reception tab.
- Select Patients.
The Patient Search screen will open.
To edit an existing patient's record, use the Find a patient guide to locate and open the record. - To create a new patient record, select New.
A blank patient record will open with the Patient Details tab selected.
You will need to fill in the relevant information. The following steps explain how to fill in the fields that may require guidance.
- Fill in the Personal fields.
- Former Name
If the patient's surname has changed, the former name is stored away and can be shown by selecting the Former button under Initial. If no former name is stored, this button will be greyed out. - Date of Birth
The year must be entered as four digits. For example, you would enter 1967, not 67. - Sex at birth
Select Male, Female or leave the field blank. - Pronouns (Zedmed v36 and later)
If the patient has preferred pronouns, they can be selected here. The pronouns will appear next to the patient's name in both Office and Clinical. Pronouns can also be added and edited in Clinical. Additional pronouns can be created in Zedmed's list management. - Address
Up to three addresses can be entered: Home, Mail and Previous. The previous address is automatically stored when the home address is changed. Use the drop-down field to select the address type you want to enter or view. - Suburb & Postcode
Manually adding - If you enter the full suburb name and press Tab, the postcode will be automatically added. Zedmed has a postcode file; if a postcode is not found, it checks the national file and updates the local file if a new postcode is found.
Postcode selector - If you type the first few letters of the suburb and press Tab (or F3), the Postcode Selector will open. You can then select the correct Postcode, State and suburb and select Close to save.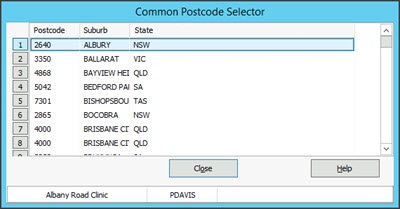
- Preferred Contact Method
Select the drop-down to open the entry fields for Mobile, Home and Work phone numbers and for Email.
Mobile - A mobile phone number is required if the patient wants to receive SMS reminders.
Email - An email should be entered to support the different notification features in Zedmed. - Do Not Send SMS
Select this box if the patient does not want any SMS notifications. - Default Appointment SMS
Select whether the patient has agreed to receive SMS messages for appointment reminders. - Usual Dr.
This is the doctor the patient would prefer to see and is optional. - Medicare
Enter the patient's Medicare card number and the last day of the month that the card expires. This is a requirement for Medicare cards issued to overseas visitors. For simplicity, you could enter the day as 30, which works for all months except February. - Veteran
If the patient is a veteran, enter their DVA card number. - Health Care
Enter the patient's Health Care card number. - Safety Net
This is for the patient's Medicare Safety Net threshold information. - Pen. Stat.
Select if the patient has a Pensioner or Health Care Card. This field can also be used to record the level of DVA coverage. - ATSI
Is the patient Aboriginal or Torres Strait Islander? - Ethnicity
Select Set to open the Select Ethnicity screen. Use the + symbol to expand and the tick boxes to select an option.
- Former Name
- Fill in the Practice fields.
- File #
A number will be generated automatically, and you can override it with your own number if your practice has its own numbering system. The automatic number assignment is set by the Global file numbers tick box in the Practice Details screen. You can access the tick box by selecting Management > Practice Setup > Practice. - Pull File
This box indicates if there is a paper file for the patient's history. An unticked box means the patient only has a computer file. - Hosp. UR No
If your practice serves patients at a local hospital, enter the hospital's UR Number for reference. - Clinical Warnings
The Clinical Warnings section is used to enter important notes for all staff to be aware of. To add a warning, select the button and type the information into the text box and select Close to save it. The button will display a yellow triangle icon when a warning is recorded. Practitioners will be notified of the alert when the patient is opened in Clinical, and the warning can be viewed. - Usual Branch
The branch surgery the patient usually attends. - First In / Last In
These dates correspond to the first and last invoices created and are automatically recorded by Zedmed, but can be overridden. - Patient Type
This is a practice-definable field that can be used to categorise patients.
To learn more, see the Add new patient types guide. - Status
This field indicates whether a patient is Current, Archived, Casual or Deceased.
- File #
- Add any Family.
To learn more, see the Add family members guide.
- Add the Payers.
To learn more, see the Add an Account Payer guide.
- Add any Referrals.
To learn more, see the Adding a Referral article.
- Add any Alerts.
The Alerts section is used to enter important notes that reception needs to be aware of. To add an alert, type the information into the space provided and select Close to save it. The information will appear in red text on the Appointment Details when you make an appointment and in the Waiting Room when the patient is attended.
Examples of alerts:- The patient has an outstanding payment they need to pay in advance. Each time a patient misses an appointment, it can be noted here. E.g. "Missed appt Dr Davis 2/5/22 2:15.
- Patient Verification button.
Click this button to check the patient's eligibility for claims. A response will display the current entitlements, including Medicare, DVA, health funds and concessions. Verification is often performed for each attendance and should be used to confirm a new patient record has been correctly set up for claims. - Further Details tab.
Record additional information using practice-defined fields.
To learn more, see the Practice-defined fields guide.
Personal information can also be recorded by doctors in the Clinical Patient Details tabs. - Recalls tab.
Create, record and manage recall letters for patients.
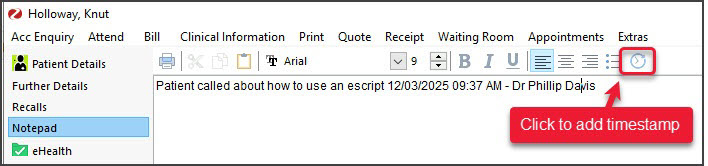
To learn more, see the Recall Management guide. - Notepad tab.
This free-text page can be used to record additional information. Use the Clock icon to add a date/time stamp and user's name.
- eHealth tab.
Search the patient's Healthcare identifier.
An Individual Healthcare Identifier (IHI) is allocated to individuals enrolled in the Medicare program, issued a Department of Veterans Affairs treatment card, or who seek healthcare in Australia (e.g., tourists, visa cardholders). The IHI number is required for My Health Record & ePrescribing. To get an IHI number, the patient's record needs a Medicare Card number or DVA number, Given name and surname, Date of birth, Gender and Address.
Select the Search HI Service button and the IHI number and fields will be populated for eligible patients.
- Message tab.
The Send SMS section is used to type a message to Send to the patient. There is a 160-character limit, and the remaining character count will display as you type. If you exceed 160 characters, you will be charged for 2 SMS messages, even though they are still sent as 1 SMS.
The Add/Edit SMS Template section allows you to quickly send predefined SMS messages, as explained in the Office SMS templates guide.

- Payment Cards tab.
This tab is for practices using Zedmed's Payment Gateway. It displays the card/s provided by the patient. The practice can see the last 4 digits and the expiry date of each card. Zedmed has no other information. The credit card and payments are managed by Tyro eCommerce. - Appointment tab
The Appointments tab displays two years retrospectively by default. To locate the patient's historical or future appointments, select the criteria, then the Search button. Use the Doctor or Resource button to populate the drop-down selector. The report can be printed.
The tab can also be accessed by:
- Right-clicking a patient's appointment and selecting Find Appointment.
- Selecting the Next App" link on the patient record in clinical (on the demographics/title section).
- When all the information has been entered, select Close to save and exit.


