Zedmed Office uses templates for letters, labels and reports. A standard set of templates is included with Zedmed, and you can also create your own. For Zedmed Cloud customers and those using RDP connections, a Rich Text Format (RTF) Internal Editor is used to create and edit templates. If you are a Zedmed on-prem customer, use the Microsoft Word FRM template guide.
Checking the default editor
For Zedmed Cloud customers, the Internal Editor is set as the default under the following settings:
- Under the Zedmed's Management tab > Practice Setup.
- From the Template Mail Merge using the dropdown, check it says Internal.
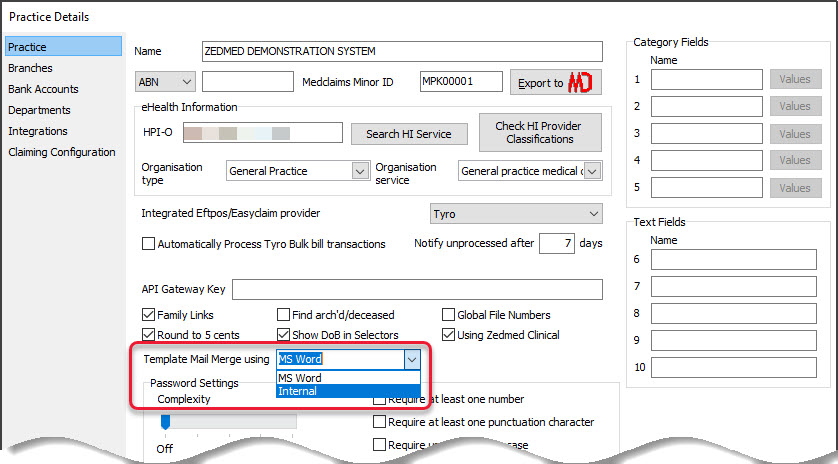

Note: Zedmed also has a print setting called Internal or Word in Print Mapping Setup (F5). Office templates with the word 'Internal' in their name require 'Internal' to be selected for printing. This setting is not related to the type of editor you are using.

RTF templates overview
Letter Templates
There are no Letter templates for the RTF editor. Instead, Clinical's Batch writer is used to write letters and is Zedmed's recommended letter writer for both RTF and FRM sites due to the Data Tool's functionality. To create custom Letter templates, see the Managing Clinical Templates guide.
Label templates
Most custom Word templates that need to be recreated in RTF will be for labels. The steps below explain how to create custom templates for Reports (Mail Merge) and the Patient Details Form, as well as a dedicated section for labels.
Create custom RTF templates
You can create RTF templates using Edit, Duplicate and New.
- Edit: Edit an existing template and save it with the same name - shown in the steps below.
- Duplicate: Create a duplicate of an existing template, save it with a unique name, then edit it.
- New: Create a blank template, manually add information and save it with a unique name.
To create a custom RTF template :
- Go to Zedmed's Management tab.
- Select WP Setup > Maintain Templates.
The Maintain Office Template screen will open and show three tabs:
- Mail Merge Documents - to format Office reports.
- Labels - to print patient and appointment labels.
- Forms - to print out a patient's details.
- Select the template tab required: Mail Merge, Labels or Forms.
- Select an existing template.
- Select Edit.
When you select Edit, the Edit Office Template screen will open. The Save button is greyed out until something is changed.
If you are making a New or Duplicate template:
a) Give the template a unique name.
b) Select the Type to determine what document or label will use this template in Zedmed. - Check the Visible check box selected.
This will show as Y or N in the Visible column and determines if the template appears as an option for Mail merge or Labels.
If there are multiple templates with the same type and all of them are active, the first one on the list will be used.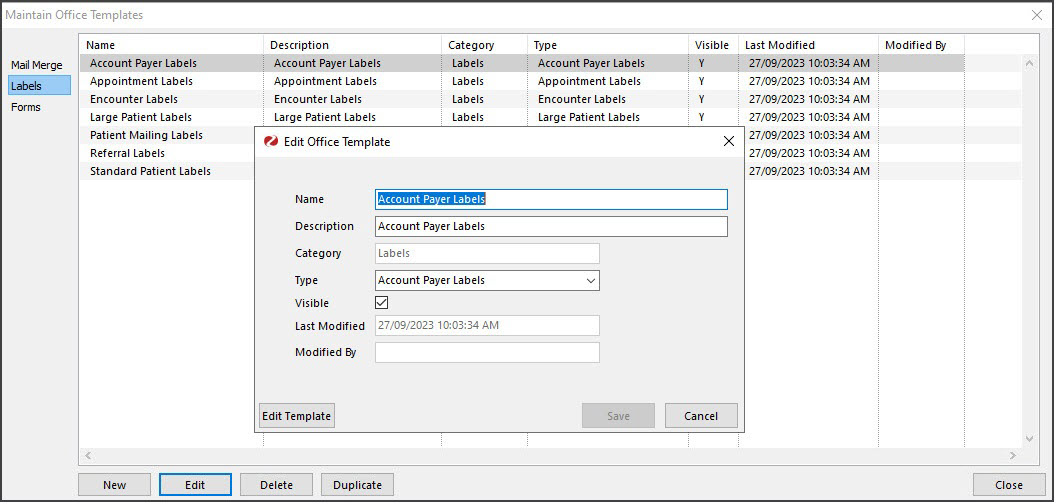
- Select Edit Template.
The template will open in the Zedmed RTF editor.
The example below is for a Label.
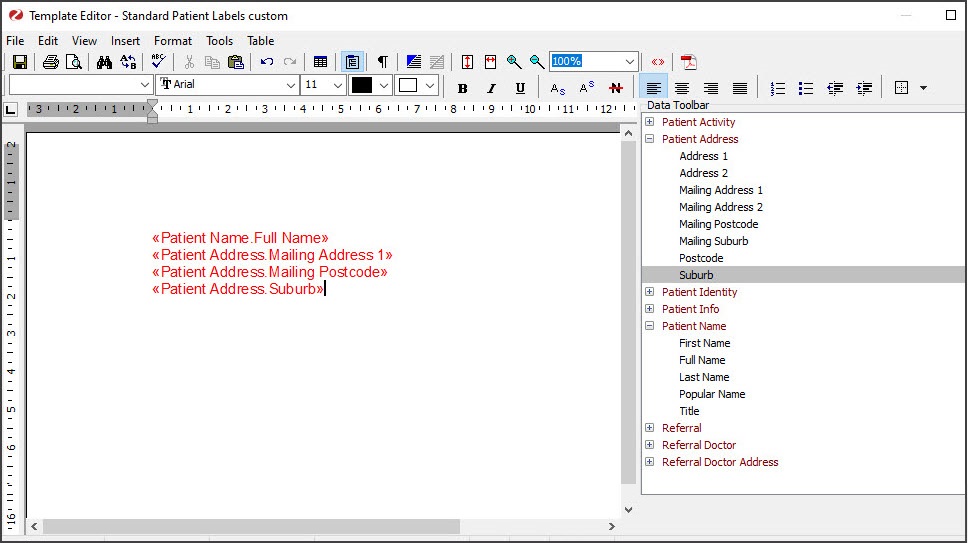
Forms and Mail Merge tab templates will show clinical and demographic options in the Data Toolbar.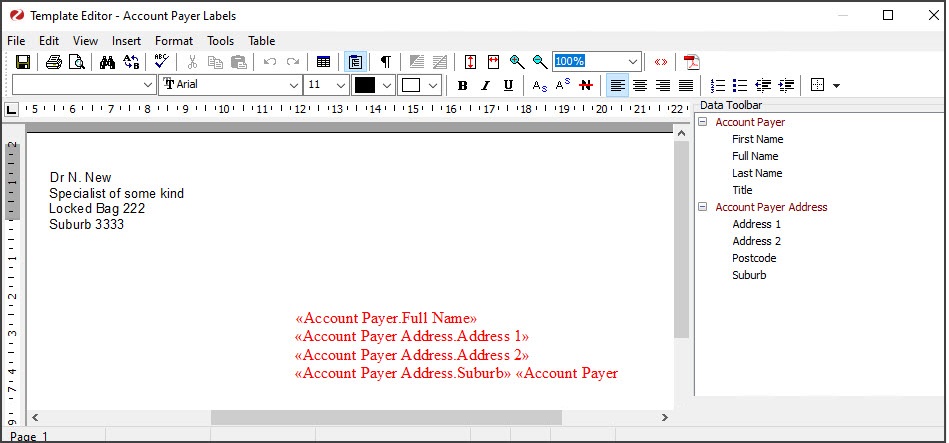
- Make the required edits to any information in the template, delete existing data fields and/or add new ones.
- To use the Data Toolbar to add data fields:
- Locate the information by expanding the categories.
- Select a location on the letter to display the information from the Data Toolbar.
- Double-click the category item you want to add.
- When finished, select File > Save then File > Close.
- Select Save again on the Edit Office Template screen.
- Test that the template reflects the intended changes.
For example, if you updated a template to add text to a letter, use the Letter writer to check that the new text appears.


Create custom RTF label templates
This section is for Zedmed one-prem customers moving to Zedmed Cloud. It explains how to locate the settings of an existing FRM (MS Word) label template and apply those settings to a new custom RTF label template.
Below are the two features that use label templates:
- Patient Record: Print > Label menu has a set of 4 labels. These are linked to the four default label templates in Zedmed.
- Appointment Details: The Print Label button uses the Appointment Labels template.
Step 1: Check the original label template you want to recreate.
In this section, you will open and note down the settings used in the FRM (Word) template that is to be recreated.
- Make sure Word is set as the template editor for Zedmed (so you can open the FRM Template).
- Select WP Setup > FRM Documents and open the Label template.
- Select the Labels tab.
- Open the custom template, respond to the prompts, and the template will open in Word.
- Note down the font and font size. Check each line for any differences in font size.
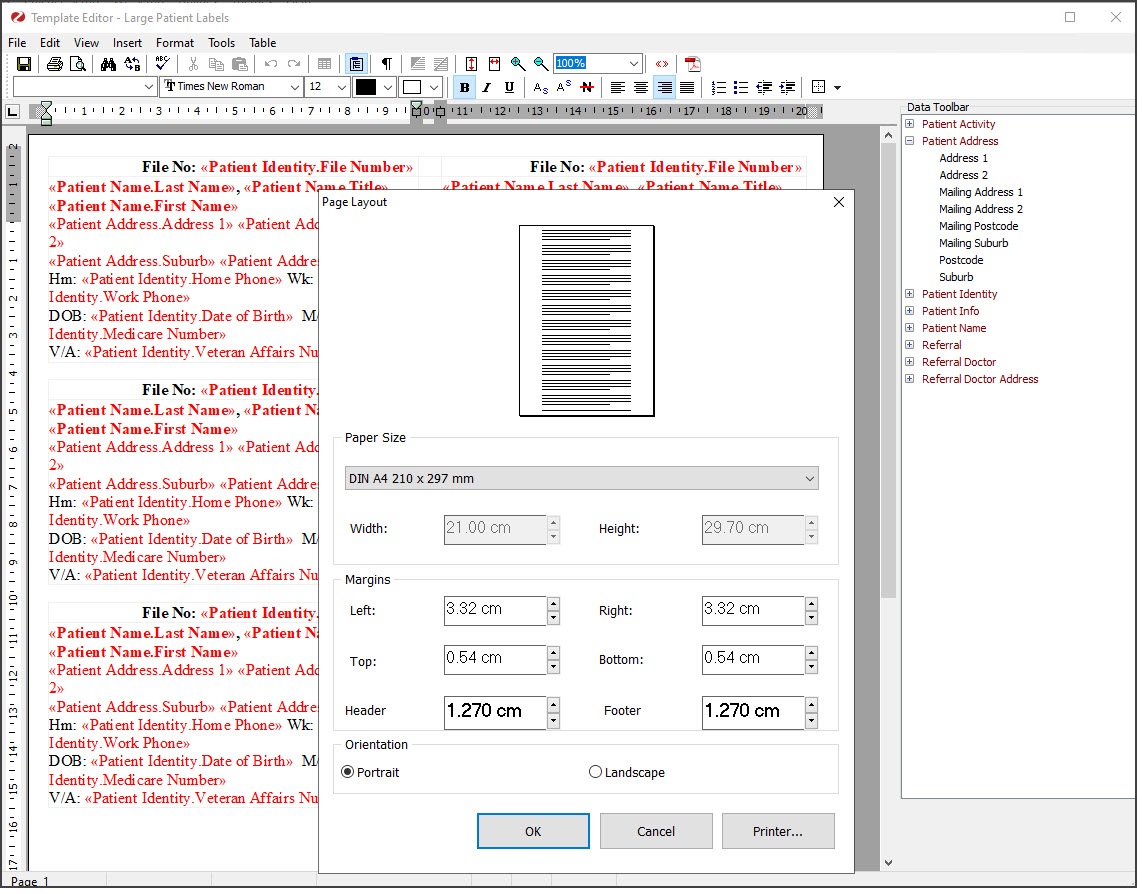
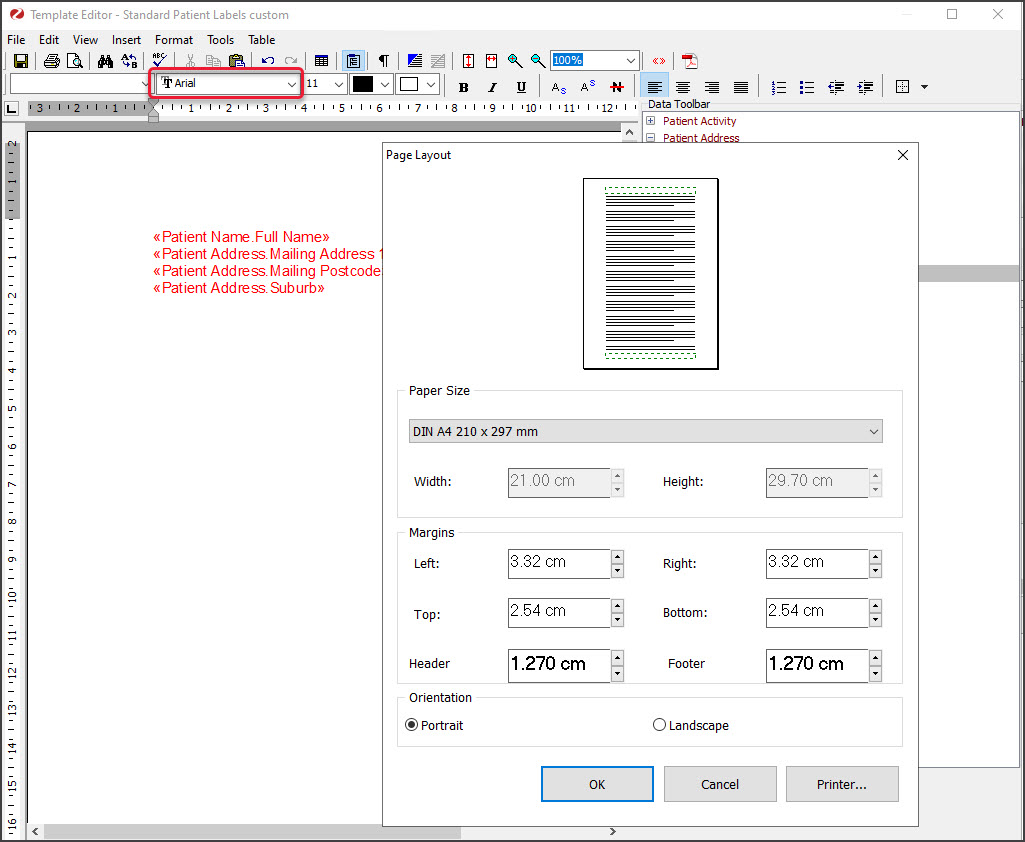
- From the template, select File > Page Setup.
This will open the Page Layout. - Note down or screenshot with width, height and margins.

Step 2: Create a new RTF label template.
In this section, you will create a new label and add the required data fields (similar to mail merge fields)
Important: When creating a custom RTF label, the template may display a single label's contents across multiple labels. This is expected and correct, as long as it only prints out on one label.
- Change the Zedmed template editor back to RTF.
- Select WP Setup > Maintain Templates.
- Select the Labels tab.
- Select New.
The New Office Template screen will open.
You could also Edit an existing template. This is recommended for complex templates that are variations of standard templates.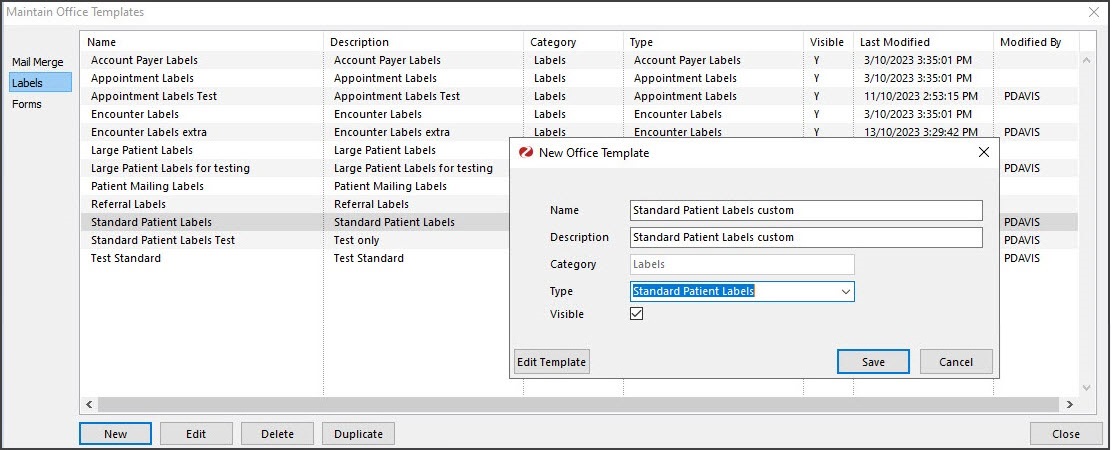
- Give the template a unique name.
- Select the Type to determine which Label menu item will use this template.
- Confirm that the Visible check box is ticked.
- Select Edit Template.
A blank template will open in the editor. - If you need two columns for the template's layout, insert a 2x1 table using the Create Table icon. If you require a more complex grid, we recommend creating a duplicate of an existing template that closely matches your requirements and editing it.
- Use the Data Toolbar to add the required fields:
If you are editing an existing template, you can also delete fields.
a) Locate the information by expanding the Data Toolbar categories.
b) Select a location on the letter to display the information from the Data Toolbar.
c) Double-click the category item you want to add.


Step 3: Apply the settings to the new RTF label
In this section, you will review the settings to ensure the label prints out correctly.
- Click on each line added and check the font and font size shown in Word.
The screenshot above it shows "Arial 11" - If the font or font size differs from the size in the original template, change it to match.
E.g., if the original was Arial 9pt and the Toolbar added size 11pt, select the text and select 9pt Arial font. - Select File > Page Layout.
- Check that the settings you noted in Step 1 are the same:
- Check the paper size.
- Check the Width and Height
- Check the Margins
- Select Landscape for the Orientation. This will be different to FRM templates, which use Portrait.
- When you have finished, select File > Save, then File > Close.
- Select Save again on the Edit Office Template screen.
Note: Some labels will use three or more label displays in the template. This is fine as long as the label only prints on 1.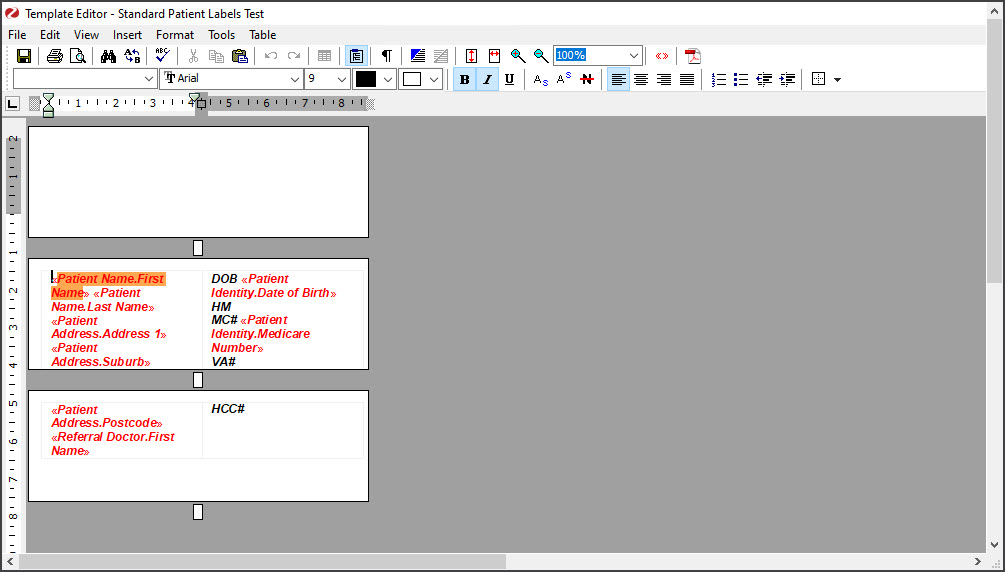


Step 4: Name and test print the new RTF label
In this section, you will verify the label template name and ensure it prints correctly.
- Confirm that the custom template has the same name as the standard template it replaces.
If required, use the Edit button to rename the template you copied or the original.
For a Patient Record, each of the 4 Label options is linked to the template with that name, and Zedmed only works with that name.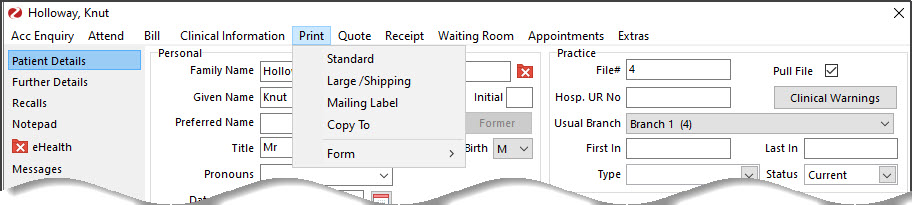
- Use the applicable Zedmed function to print the labels.
For example, if you created a custom Standard Label, select Print>Standard from the Patient Record. - Verify that the label prints correctly and uses only one label.
- If information prints across more than one label or if there is a blank label:
• Check that the font size is not larger than the original template font.
• Reduce the margins or height in the Page Layout. - Trial and error may be required to finalise more complex labels.
