Make and manage appointments using the functionality available on Zedmed's Appointment Grid.
Additional resources
- Appointment display options to change what is shown in the Zedmed Appointment Book.
- Appointment Report to view cancelled or missed appointments and SMS patients.
- Surgical bookings procedure.
- Right-click option descriptions.
Quickstart video
Book an appointment
This section explains how to create an appointment for an existing patient. To learn more, see the Appointment options guide.
To make an appointment:
- On the Reception tab, select Appointments.
The Appointment Book that displays is relevant to the branch you logged into. - Under the relevant practitioner/resource, double-click or right-click the time slot.
- Search for and select the patient
The Appointment Details screen will open.
Referrals or Alerts will appear on the right under Other Details. - In the Type field, select the Appointment Type, and the duration and end time will adjust automatically.
- Optional:
• Duration - can be changed and the End Time will update accordingly.
• Start Time - can be changed in Zedmed v38.7. It does not need to match the slot's start time.
• Notes - to record information relevant to the booking.
• Include all appointment types - overrides limitations on Appointment types. Zedmed v38.8 and later. - Select Close to save the appointment.

Find or Cancel an appointment
Use our dedicated guides to:
Appointment icon explanations
The following icons are used to indicate the patient's status.
| Icon | Description | Explanation |
| Green tick (left) | Patient has been attended to the Waiting Room. | |
| Red folder + cross | The patient's IHI is unavailable. | |
| Green folder + tick | The patient's IHI is available. | |
| Cloud icon | The patient made the appointment via Online Appointments. | |
| Cloud icon with + | A patient's first Online Appointment needs reconciling. | |
| Credit card | Credit card provided. | |
| File folder | File pulled & patient not attended. Replaced by a green tick when attended. | |
 |
Phone icon | Patient replied YES (green tick) to reminder SMS. Replaced when attended. |
 |
Yellow dollar | An invoice has been raised. Replaces the attended tick. |
| Green dollar | An invoice has been receipted. Replaces the attended tick. | |
| Grey dollar | An invoice has been voided. Replaces the attended tick. | |
| Camera + green tic | Telehealth appointment. Green tick is part of the icon not a status indicator |
Repeat, linked and multiple bookings
These topics are extensions of the Make a Patient Appointment section above.
Repeat bookings
Selecting Repeated booking on the Appointment Details screen will enable the week(s) frequency and Booking period fields. Use these fields to repeat the appointment every X weeks for a selected number of weeks (up to 52). When you select Close, the list of appointments and any conflicts will be displayed.
Linked bookings
Appointment types can be used to support Linked Appointments, allowing you to connect two practitioners/resources. This is useful when the practitioner providing the service is different from the one who will be billed for it. For example, an immunisation appointment may have a nurse for the attendance and a doctor to charge it to. After you save (Close) an appointment that supports linked bookings, the Linked Appointment Details screen will appear, simply select the second practitioner/resource and choose the second time slot - available timeslots will be on or after the first appointment. Select Close to save and the two bookings will appear for the one patient.

Multiple bookings
It's possible to create multiple bookings in any time slot. You will be warned of possible conflicts and the same time slot will display in red. There is limited space to show the details, so double-click the booking to view the specific information.

Use the Cancellation Waiting List
If a patient makes an appointment but prefers an earlier time, they can be added to the Cancellation Waiting List and given priority. When another patient's appointment is cancelled, you can check the waitlist and move a patient to the new appointment time based on their priority.
Add an appointment to the Cancellation Waiting list
To waitlist an appointment the patient must first have a booking:
- Open the Appointment Details screen.
- Create the appointment.
If the patient already has an appointment, locate and open their appointment. - In the Cancellation Waiting Priority field, select a Low, Medium or High priority, this adds the patient to the Cancellation Waiting List.
To remove a patient from the waitlist, change the Cancellation Waiting Priority field back to blank.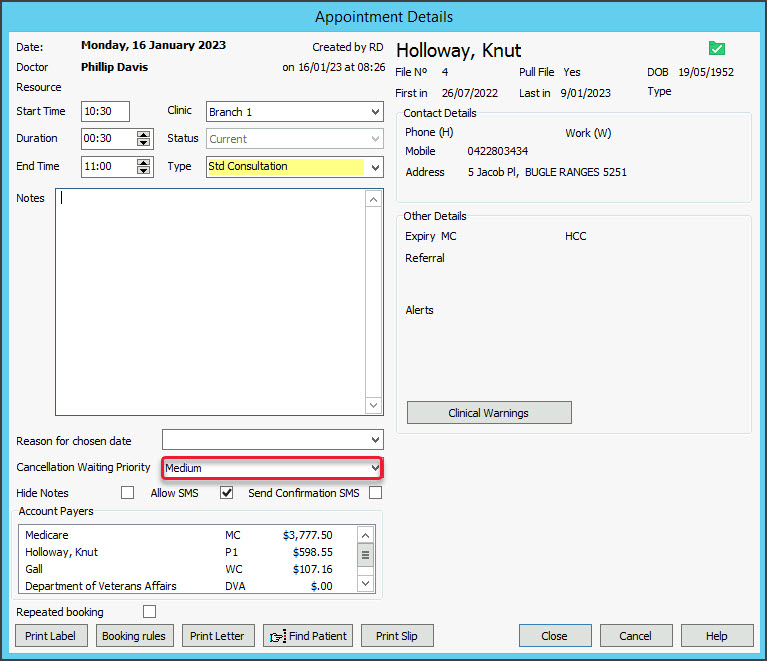

Book an appointment from the Cancellation Waiting list
To move a waitlisted appointment:
- Right-click the spot made available by the cancelled appointment.
- Select Add (From the Cancellation Waiting List).
The Appointments for Cancellation List screen will open.
This lists the patients who want an earlier appointment time, their waiting list priority and contact phone numbers. - Select the patient to add in the new time slot.
- Click Select and the patient will be moved to this spot.
The patient added to the new appointment will have their previous appointment removed and they will be removed from the Cancellation Waiting List.

Make a non-patient appointment
New patients often have a patient record created before an appointment is made. Sometimes you may want to make an appointment for someone without a patient record or at the very least hold an appointment slot for them while waiting for the patient information to be provided.
To book an appointment for a non-registered patient:
- In the Reception tab, select Appointments.
- Right-click the relevant time slot and select Add (Non-Patient).
The Appointment Details screen will open with many of the fields disabled. - Fill in the relevant appointment details:
- In the Type field, select the Appointment Type.
- If required, change the Duration, the End Time will update accordingly.
- Use the Notes section to record information relevant to the booking.
- Select Close to save the appointment.
When the patient arrives, double click the appointment to open it and use the Find Patient button then select New to start the Add Patient process. When you have completed their registration details, you will be returned to the Appointment Details screen and can Attend them directly. -
The Add (Non-Patient) feature may also be used to book a practitioner's time for non-patient activities such as meetings or report writing.


Pull a physical file
For practices using physical patient files, you can right-click an appointment and select Pull File. This will place a folder icon next to the patient in the Appointment Book to indicate the patient file has been pulled for the doctor.
You can then right-click Un-Pull File when the file is returned.

To learn more, see: