Set up a new doctor or locum in Zedmed. This includes a Doctors Details screen with billing and contact information, a Zedmed login for system access and a schedule for the Appointment Book.
Prerequisites
Doctors need the IDs and accounts issued by the relevant national and state regulatory authorities to perform different medical functions. Many of these credentials are entered into Zedmed to support that functionality.
Credentials used by Zedmed include:
- Provider number: need one for each location doctor practices at to claim, bill, refer or request Medicare services.
- Prescriber number: required to prescribe medicines.
- EHealthID (HPI-I): the Health Practice Identifier is required for ePrescribing and loading My Health Records.
- eRx: prescription exchange service for ePrescribing. To learn more, see the ePrescribing with eRx guide.
- Online claiming approval: for Medicare Web Services via the HW052 or HW027 form. Required for bulk billing/DVA.
- AHPRA Number: required for Safescript (Victorian RTPM) functionality.
Create a doctor
Review the following fields and check that you have the information necessary to set up the doctor. Some fields are critical for functions like Medicare billing and e-prescribing, incorrect or incomplete information can result in failed transactions.
Minimum fields to complete
The screenshot below shows the fields that must be completed for a practitioner.
- Yellow = mandatory fields for all practitioners
- Green EHealth = ePrescribing and MHR access
- Green Erx = ePrescribing
- Green Active = Medicare claims
- Green ECLIPSE = Health Fund billing and claims
To set up a doctor:
- Go to Zedmed's Management tab.
- Select Practice Setup then Doctors > Find Treating Doctors.
The Find Doctor Detail screen will open. - In the Family Name field, enter the doctor's surname.
- Press enter and a pop-up will advise "No doctors found! Do you want to add a New Doctor Record?"
- Select Yes.
A new Doctor Details screen will open.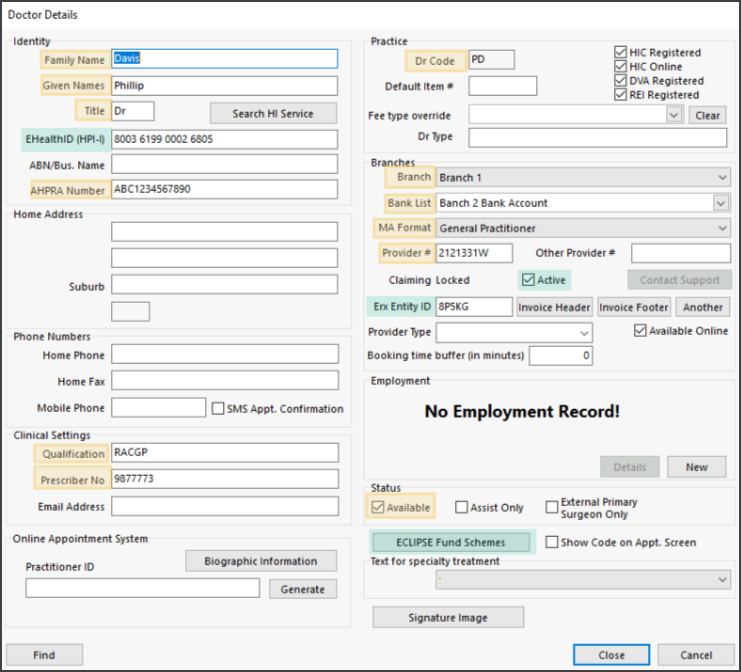
- Fill in the applicable Identity fields.
- Family and Given names are mandatory fields.
- Title is used for the doctor's medical title.
- ABN/Bus. Name and AHPRA Number are optional fields but an AHPRA number is required for Safescript functionality.
- EHealthID (HPI-I) is the Health Practice Identifier.
Required for e-prescribing and loading My Health records. Make sure the ID is searchable in the HI Service. To check, select Search HI Service to open the Search for Healthcare Provider Identifier screen, then select the Search button. If it does not find the ID, contact PRODA Health Professional Online Services - phone 1300 361 457.
For a no HPI-I doctor
- Fill in the Home Address fields.
- Fill in the Phone numbers fields.
SMS Appt. Confirmation
An SMS confirmation can be sent to a practitioner every time a patient makes an appointment with them. The message will contain the patient's name and the appointment's date and time, and incur a cost for the SMS. Requires Zedmed v37 or later. Learn more. - Fill in the Clinical Settings fields.
- Qualification is for the doctor's medical qualification. It is required for e-prescribing.
- Prescriber No is required to prescribe medicines.
- Email Address used by the doctor.
- Provide Biographic Information
This is used for Online Appointments. To learn more, see the Setup Online Appointments guide - doctors section. - Signature Image.
Zedmed letters and referrals can have the practitioner's signature applied using an image file.
To learn more, see the Electronic signature guide. - Fill in the applicable Practice fields.
- Dr Code is a code you make up using your own internal format. Zedmed uses the code to link the doctor's appointments to billing. The drop-down next to the field is used to locate doctors' details using their Dr Code.
- Default Item # is used to add a default Item to invoices raised for this doctor's consultations.
- Fee type override is for doctors who use their own custom fee. This fee will be selected by default when an invoice is created.
- HIC Registered, HIC Online, DVI Registered and REI Registered are required to transmit invoices to Medicare. All 4 boxes should be selected.
- Fill in the applicable Branches fields.
The Branch drop-down box shows the doctor's current branches.
To add a branch: check you completed the Dr Code and Doctor Type fields, select the Another button to open the Branch Selector and choose the branch. Select Close and that branch will appear in the drop-down list of branches.
Branches fields:- Bank list is used to select the bank account to be used for the doctor's billing. Payments, including payments for claims, will be paid into this account. This could be the practice bank account or the doctor's own bank account. Bank accounts are set up in the Practice Details screen's Bank Accounts tab.
- MA Format is used to select the specialty the doctor is registered for at Medicare Australia. This is required for Medicare Billing and it must match the information Medicare has. When a doctor is registered with Medicare, they provide this information to get their Provider Number.
- Provider# is the Doctor's Medicare number and is linked by Medicare to the Practice MinorID. Medicare uses this to link its payments to the doctors so it knows who the money should go to.
- Other Provider # can be left blank.
- Claiming Active and Registration. Follow the steps in the Register doctors for Medicare claims guide.
- eRx Entity ID is entered by Zedmed. It links the doctor to eRx. You should never change or enter anything into this field.
The Doctor will need to register on the erx.com.au website. When eRx provides Zedmed with the relevant registration information, Zedmed will contact the practice's technical contact to add the information to the Zedmed Server.
The practice will also need a NASH certificate for ePrescribing. NASH certificates are provided to registered organisations using the HPOS online portal. You can log into this portal using a PRODA account then request and download a NASH Certificate. - Invoice Header/Footer allows the doctor to have their own details. The default header uses the clinic's details.
- Another is used to select another branch the doctor practices at using the Branch Selector screen.
- Booking time buffer is used to enter a value that will refine the available appointments sent to the Online Appointments (OLA) by only allowing appointment slots that begin after (Booking Time + Buffer). This prevents people booking online appointments close to the current time
- For a Locum fill in the Employment fields.
If the doctor is a locum, select New in the Employment section. This will open the New Employment Record screen. Select the Locum's employer from the drop-down list, then select Close to save and exit.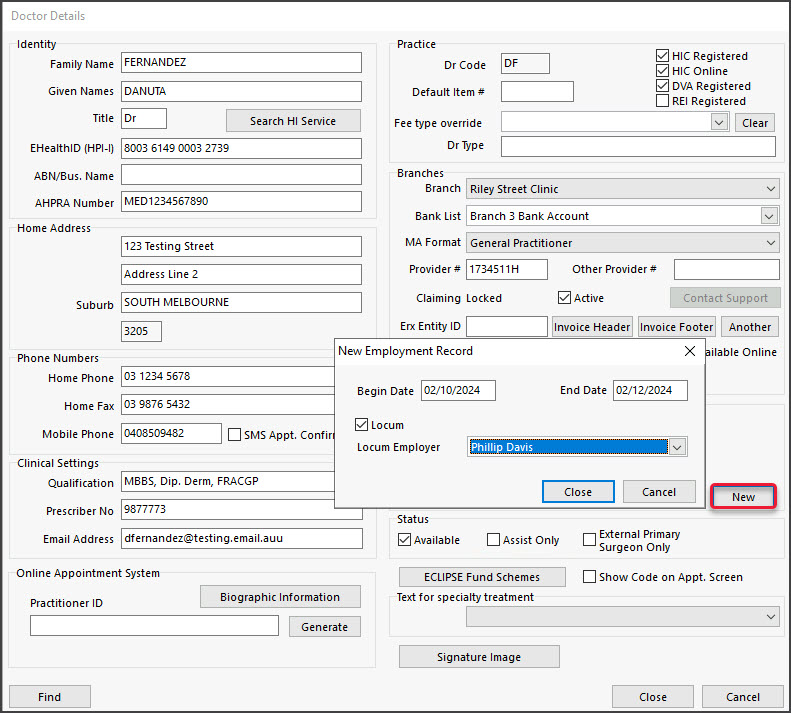
- Fill in the Status fields:
- Available is ticked by default and means the doctor is active and can be selected for appointments. A doctor cannot be deleted so this selection is used if the doctor is on holiday or has left the practice.
- Assist only means the doctor can be added to an invoice as an assist. To learn more, ass the Assisted Billing Guide.
- Available Online is used to make the doctor available for Online Appointments.
- ECLIPSE Fund Schemes is used to set up the doctor for ECLIPSE.
To learn more, see Set up ECLIPSE for treating specialists. - Select Close to save and exit.


Banking, Fees and Funds
If the practitioner has their own bank account, the account will need to be set up at the practice level and then added to their profile. Adding a bank account to the practice is explained in the Bank Account section of the Practice Setup guide. This will create a banklist, that you then select in step 12-a of the doctor setup section above.
If the practitioner has their own fees for services, they will need to be added to the Item Detail screen. This is documented in the Doctors section of the Managing Item Fees guide.
If the practitioner uses ECLIPSE billing, they will need an agreement or a scheme with each Fund they intend to submit claims to. To learn more about ECLIPSE, visit Services Australia. The Funds are added using the ECLIPSE Fund Schemes button documented in step 15 in the section above.
Create a doctor's login
For Zedmed Cloud
Zedmed Support creates usernames and passwords for Zedmed Cloud as part of our managed solution. To have a user login created, please submit a request form.
For Zedmed on-prem
This section sets up the doctor's login credentials and gives them access to the parts of Zedmed required by a doctor.
To create a doctor's account:
- Go to Zedmed's Utilities tab.
- Select Security.
The Zedmed Security Roles and User screen will open at the Staff tab. - Select Add.
This will open the Edit Staff Member screen. - In the User Name field, enter the name the doctor will use to log into Zedmed with. The practice will have its own format.
- For Staff ID, enter the Dr Code you created in the section above.
- Enter the doctor's Given Name and Family Name into the fields provided.
- For Dr Code, select the doctor's code from the drop-down list.
- Enter the doctor's Mobile Phone number into the field provided.
- The EHealthID (HPI) and Healthcare Role do not need to be selected if you have a Dr Code selected.
The EHealthID (HPI-I) is only added for users who need to Participate in My Health Record. A doctor still needs the HPI-I to be entered when they are set up as a treating doctor. - From the User Roles tab, select the applicable doctor role then select the single arrow to move the role into the Included Roles pane.
- Review the Use Clinical History User Group drop-down options.
This optional field is only used to restrict the sharing of patient information between doctors by only allowing members of the selected group to see each other notes. To learn more, see the Accounts and Security article. - The App Access is for access to the Doctor's App.
To learn more, see the Doctor's App article. - Select OK to close.
The Set Password screen will open.
For on-prem practices, the password requirements are set by the practice in Practice Details. - Enter and confirm the password.
- Select OK to save and close.
- You can now provide the doctor with their login information.
Advise the doctor that they should use the Utilities tab > Change Password button to change their password.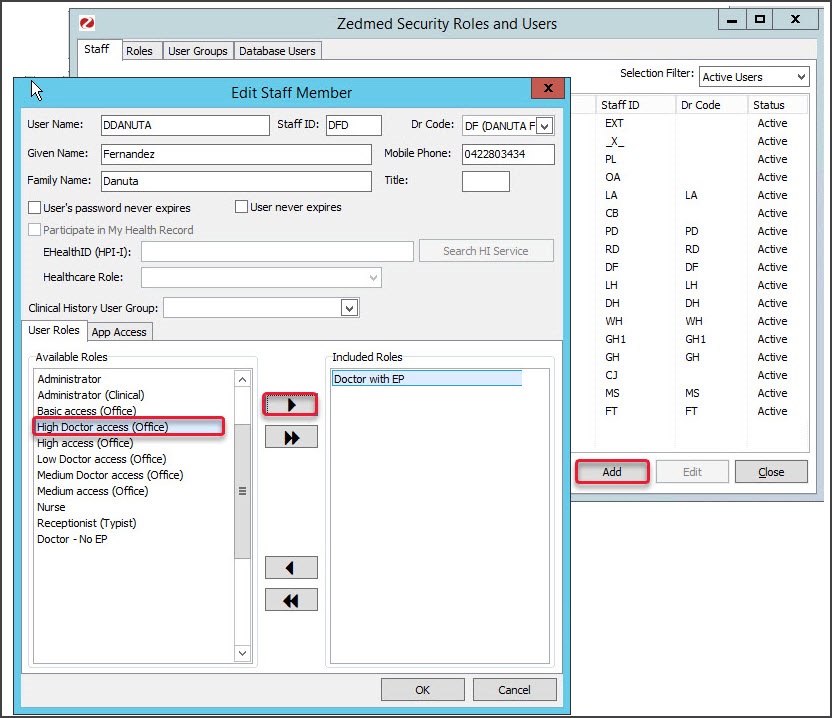

Create a schedule
Each doctor needs a schedule created so they appear in the Appointment Book. The schedule helps manage what a doctor's time is used for, and Activity Types are used to determine the types of appointments that can be booked in that schedule's time slots.
To create the doctor's schedule, follow the Create a Schedule guide.
Create a non-HPI-I doctor
In Zedmed v36.5 and later, you can create a practitioner without an HPI-I. This is ideal for treating doctors without an HPI-I who need to be set up for Online Appointments. This is achieved by generating an ID that Online Appointments can use.
Follow the same setup process for a standard practitioner, but add a Practitioner ID in the Doctor Details screen as outlined below.
To add a Practitioner ID for a non-HPI-I doctor:
- Open the practitioner's Doctor Details screen.
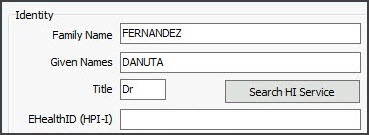
- Clear the HPI-I field and ensure it is blank.
- Select the Generate button next to the Practitioner ID field.
- Select Available Online if the practitioner is to be available for Online Appointments.
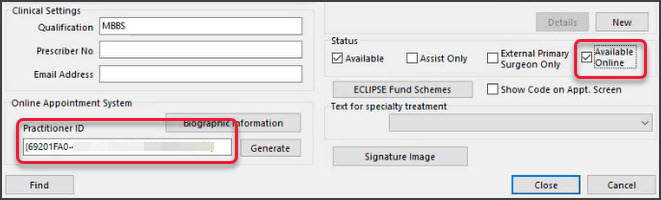

Important: If this practitioner working in multiple clinics, they must use the same autogenerated Practitioner ID in each branch or it will duplicate their schedule.
Configure Online Appointments
If the practice is using Zedmed's Online Appointments, you need to enable the doctor for OLA and provide their Biographic Details and a photo. This is documented in the Set up Online Appointments guide.
The full Set up Online Appointments guides should be reviewed as new doctors must also be configured for OLA Appointment Types and Schedules.
Define Payment Gateway availability
This step is only for doctors taking credit card payments for Online Appointments (OLA) using Zedmed's Payment Gateway. It requires the Appointment Types to have been made available online as part of the Online Appointment setup.