Schedule SMS recalls to be sent to a patient at a set number of days before the recall Maturity date. Using this automated SMS solution is preferred to a manual recall letter. Requires Zedmed v36.5 or later.
Schedule an reminder video
Schedule an SMS recall reminder
To administer recall reminders:
- Go to Zedmed's Management tab.
- Select Practice setup > SMS Configuration.
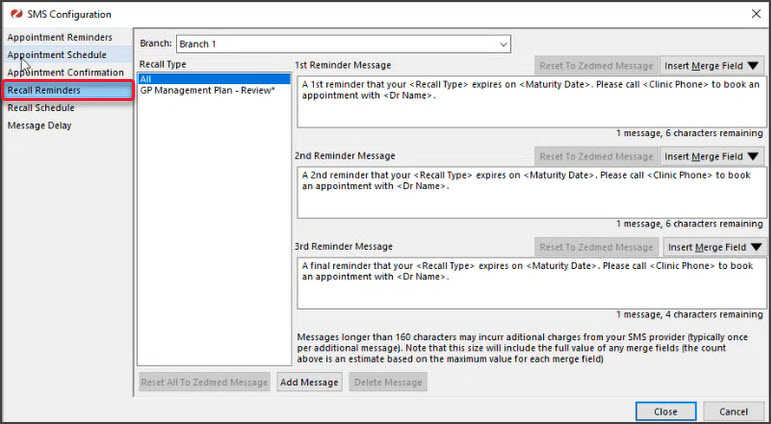
Step 1 - Review / create the recall text. - Select the Recall Reminders tab:
Recall Type - 'All' provides preconfigured text that can be used for all recalls.
• Select Add Message to create a new recall message for a specific recall type.
• Select an existing Recall Type if you want to edit its text.
• Use the Insert Merge field to add variables to new and existing recall messages.
• Reset to Zedmed Message will replace the current message with the standard All message text. Step 2 - Schedule the recall to automatically send
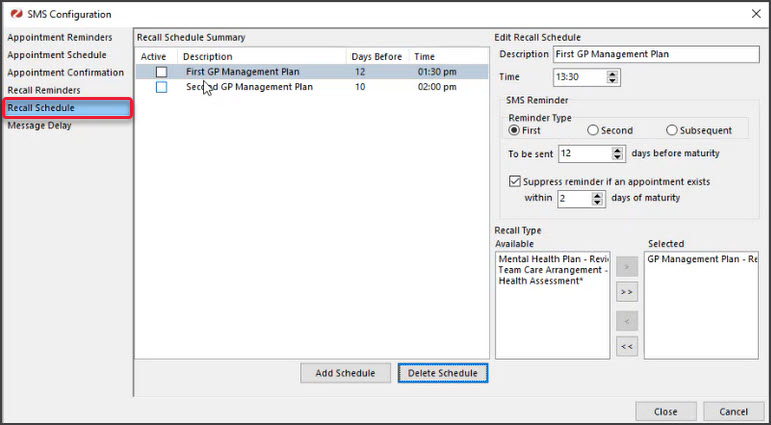
 - Select the Recall Schedule tab.
- Select the Add Schedule button.
- Complete the following fields
- Description - enter a meaningful description for the schedule.
- Active box - enables the recall for scheduling. Select after you have finished getting up a new schedule.
- Time - sets the time of day the reminder will go out.
- Reminder Type - determines the order of reminders (ensures the times match the intended order).
- To be sent - sets how many days before the recall maturity the reminder will go out.
- Recall Type - determines what recalls will use this schedule by moving them into the Selected pane.
All recall maturity types in the Selected pane will receive the reminders.
- Use the Message Delay tab to send recalls in batches.
This prevents recalls from going out at the same time. Enter a value in the Delay field, and that delay will be applied after each batch is sent. - Select Close to save and exit.
Editing schedules
When you select a recall Description, the schedule will appear in the Edit Recall Schedule where it can be edited.
Other Recall guides
Send a manual SMS Recall reminder
Practices can manually send SMS recalls to patients using the Recall Report by selecting the criteria for recipients, then selecting Send SMS. See the Send a manual recall guide in the Office section of the knowledge base
Add a patient recall
Recalls are added to a patient's record, and reminders are sent via SMS using the automatic schedule explained in this guide. See the Add a patient recall guide in the Office section of the knowledge base
The Recalls Report
This report is used to print the First Recall letter or the Reminder Letter, and to print a report for doctors to review prior to their letters going out. It can also be used to print first or subsequent reminder letters using MS Word. To learn more, see the Recalls Report guide.
Create Recall Types
Create Recall Types with their own Maturity date, for example, a recurring Health Assessment every 12 months or a pathology result review in 1 week. To learn more, see the Create recall types guide.

 Step 2 - Schedule the recall to automatically send