Update the text used by Zedmed for your appointment confirmations and both scheduled and manual SMS reminders.
Appointment Reminder text
SMS appointment reminders use a default message for all reminders, but you can create your own custom messages for each Appointment Type and branch. Any appointment types that don't have a customised message will automatically use the 'All' appointment types message.
The message can ask the patient to advise whether they can or cannot make the appointment by replying Y/Yes - No/No - or either. Zedmed recognises these responses, so care must be taken when composing reminders so the patient replies with a valid response.
To change the default SMS message:
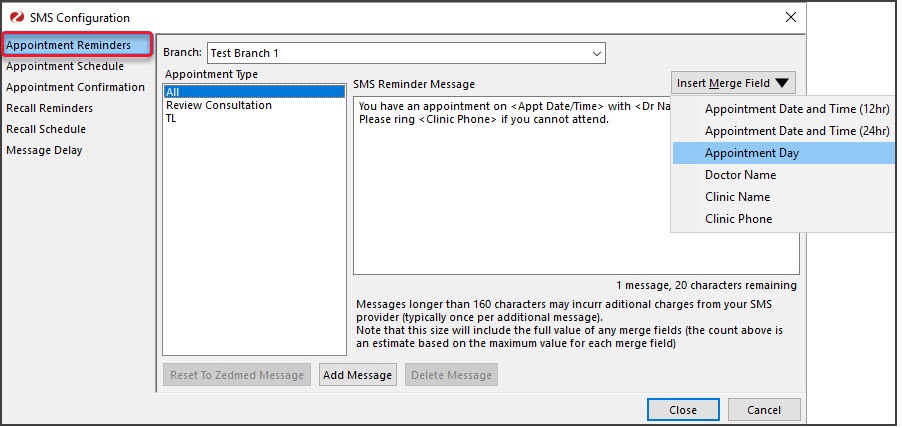
- Select Practice Setup then SMS configuration.
- Select the Appointment Reminders tab.
The SMS Reminder Message field shows the standard 'All' message for all branches and appointment types. - Select the Branch the reminder text is for.
Repeat the following steps for each branch as required. - Make the required changes.
- Edit the message text.
Select the Appointment Type and update the SMS Reminder Message field. Type in changes and use the Insert Merge Field drop-down to add merge fields to the displayed SMS Reminder Message. - Change the messages for different branches.
Select the branch and change the text for that branch. - Create different messages for different appointment types.
Make a selection in the Appointment Type field and enter the text into the SMS Reminder Message field. - Add more appointment types.
Select Add Message then the Appointment Type and select Create New. Provide message text for the appointment.
- Edit the message text.
- Select Close to save and exit.

Appointment Confirmation text
SMS Appointment confirmations use a default message, but you can create your own custom messages for each branch and appointment type. Any appointment types that don't have a customised message will automatically use the All appointment types message.
To change the default SMS message:
- Go to Zedmed's Management tab.
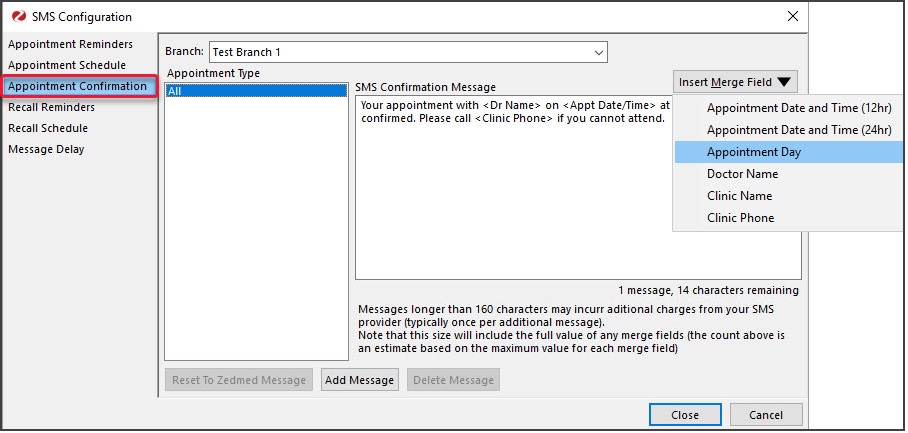
- Select Practice Setup then SMS configuration.
The SMS Configuration screen will open. - Select the Appointment Confirmation tab.
The SMS Confirmation Message field shows the standard message for all branches and appointment types. The message includes merge fields and appointment-specific information. - Select the Branch the reminder text is for.
Repeat the following steps for each branch as required. - Make the required changes.
- Edit the message text.
Select the Appointment Type and update the SMS Confirmation Message field. Type in changes and use the Insert Merge Field drop-down to add merge fields to the displayed SMS Reminder Message. - Change the messages for different branches.
Select the branch and change the text for that branch. - Create different messages for different appointment types.
Make a selection in the Appointment Type field and enter the text into the SMS Confirmation Message field. - Add more appointment types.
Select Add Message then the Appointment Type and select Create New. Provide message text for the appointment.
- Edit the message text.
- Select Close to save and exit.

Manual Appointment Reminder text
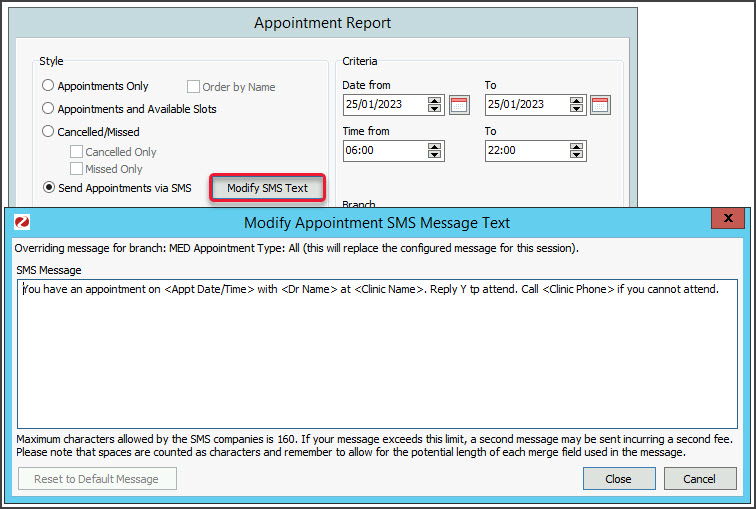
Update the text used in manual appointment reminders sent from the Appointment Report.
To update the message text:
- Go to Zedmed's Reception tab.
- Select Daily reports then Appointments.
The Appointment Report screen will open. - Select Send Appointments via SMS.
- Select the Modify SMS Text button.
- Edit the content of the message.
The merge fields (phrases inside < >) will automatically populate the message with the appropriate information according to your appointments. These merge fields are not customisable, and there are only a few available for your SMS reminders. - Select Close to save your changes.
Selecting Reset will revert back to the default message.
The maximum number of characters (including spaces) in a message is 160 (1 ZedSMS credit). If you exceed this limit a second message will be sent. Merge fields are included in the character count and vary in size.