Create a new Appointment Type with a specific duration and assign the doctors that can be booked for this Appointment Type via phone or Online Appointments.
Overview
A practitioner's Schedule in the Appointment Book is allocated an Activity Type with a colour, for example, blue for Consultation time and purple for Theatre time. This tells staff what Appointment Types they should book in the doctor's schedule. Appointment types have a colour that replaces the colour of the Activity Type in the Appointment Book.
Example: A practice has a green Activity Type - Theatre used for the Appointment Type > Surgery and a blue Activity Type -Consultation used for the Appointment Types: Long Consultation-30min, Std Consultation-15min and New Patient-30min. Reception wants to book a Std Consultation and sees 2 doctors with a blue schedule and 1 doctor with a green schedule, and make the appointment in a blue block of time.

Create a new Appointment Type
In this section, you'll create an Appointment Type, give it a name and colour and assign it to an Activity Type. You will then be able to use that Appointment Type to make bookings in the time that's scheduled using that Activity Type.
To create an appointment type:
- Go to Zedmed's Management tab.
- Select Practice Setup then Appointments > Appointment Types.
The Appointment Types screen will open. - Select New.
This will clear the fields so you can use them to create an Appointment Type. - In Type Name, enter a name for the appointment type.
- In Type Code, enter a code for the appointment type.
The code should follow a logical format. For example, you could use C for Consultation, O for Operation, V for Visit. - In Duration, enter the appointment's duration in minutes and hours.
- Select any of the required options:
- Unavailable - prevents the Appointment Type from being used.
- Linked Appointment - for appointments that may require two practitioners or a non-attending practitioner to charge the attendance to. For example, an immunisation appointment may have a nurse for the attendance and a doctor to charge it to. When the appointment is made, you can select the other practitioner in the Linked Appointment Details screen, which opens when you select Close.
- Surgical Procedure - this option is explained in the Surgical Appointment section below.
- The following settings are only for Online Appointments.
They are explained in the Set up Online Appointments guide > Appointment Types section.
• Zedmed v36.7 and higher - Appointment Types settings = Available Online and Available to options.
• Zedmed 36.6 and lower - Appointment Type settings = Available Online, Initial Consultations and Doctor Overrides - The following settings are only for Payment Gateway.
They are explained in the Set up Payment Gateway guide > Appointment Types section.
• Zedmed v36.7 and later, Appointment Type settings = Online Appointment Billing defaults and Per doctor Overrides. - Use the colour options to assign the Appointment Type a colour.
- Select Close to save and exit.
To delete an appointment, select it, select Delete then confirm. You can't delete an Appointment Type that's in use.
This screenshot is for Zedmed 36.7 and above, which includes Payment Gateway options.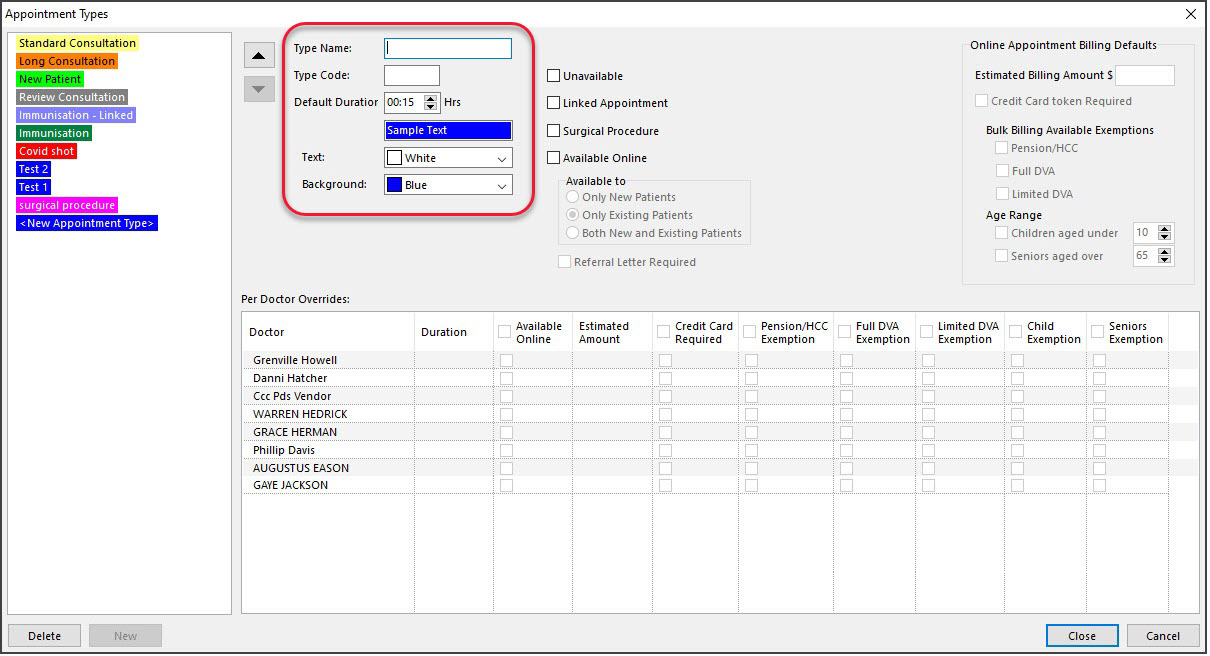

Create a surgical Appointment Type
Appointments for surgical procedures include a report called the Operations List, which is sent to the hospital the patient is attending. The Operations List contains information about the procedure and the booking for both the hospital and surgeon. Creating a Surgical Procedure and setting up the Operations List options are separate tasks, and each is explained below.
To set up a Surgical Procedure Appointment Type:
- Follow steps 1-8 in the section above to create an Appointment Type called Surgical Procedure.
- In the Appointment Types screen, select the Surgical Procedure Appointment Type.
- Select Close to save and exit.
Now that you have the Appointment Type set up, you need to configure the Operations List options.
To set up the Operations List's options:
- Go to Zedmed's Management tab.
- Select Practice Setup then Drop-Down List Management.
The Drop-Down List Management screen will open.
The contents of the Checklist, Instrument and Procedure Type categories determine what can be included in an Operations List. The items you add to each category are up to you, and examples are provided below.
Repeat the following steps for each of these 3 categories. - Select the category.
- Select Add Value.
- Enter a name for the item into the field provided.
The screenshot below shows examples of items including:- "Signed consent form" under Checklist.
- "Scalpel" under Instrument.
- "Knee reconstruction" under Procedure Type.
- Select the tick box below each branch where the item should be available.
Each branch is shown along the top. - Select Close to save and exit.
To delete an item, select the item then select Delete Value. You can't delete an item that's being used.
To remove an item as an option, untick the box by that item in the Active column.
In the screenshots below, MED, BR3 etc. are branches added by the practice. Active is a permanent column that's used to enable/disable an entry for all branches.
