Add a new product to Stock Management. If the product needs to be managed in smaller denominations, you can also create a sub-product. When a product is used in an encounter, the stock is reduced and the product's item number is added to the billing wizard.
Requirements:
- A Product Category must exist for a consumable before it can be added. To learn more, see Add a Product Category article.
- Before adding a product, you must first have the supplier set up. To learn more, see Add a supplier article.
Considerations
- If a consumable has no stock it will not appear as a product to select in a clinical encounter.
- For consumables with a sub-product, both the product and sub-product can have item numbers.
- For immunisations with a sub-product, only the sub-product should have an item number and vaccination selected.
- If an immunisation product is not linked to a vaccine, it will not appear as a selectable vaccine during the clinical encounter.
- If an immunisation does not have an item number, it will be selectable in an encounter but will not be added to the invoice.
- If an immunisation has an item number, it will be added to the invoice as a (doctor assigned) billable item under Add all for reception.
Adding a product
To add a product to Stock Management:
- Go to Zedmed's Management tab.
- Select Stock Management.
The Stock Management UI will open in your web browser (Chrome). - Select Add Product on the top menu.
- Enter the product's Name.
For Immunisations, this name will appear next to the vaccine in AIR and indicate that it is a stock item.
For Consumables, this name will be what the doctor or nurse selects in the consumables module. - Select the product Category.
- Enter the product's Brand name (optional).
- Enter the Reorder Threshold.
If the stock falls below this level, it will be added to the Reorder Report, when the report is run. The product will also have a pink cell in the current stock column. - In the Associate Suppliers Select field, select the product's supplier then select Add.
The supplier field is mandatory, and you can Add multiple suppliers. - Select a Preferred Supplier.
This is not mandatory, but only products with a preferred supplier are automatically added to the reorder report. - Enter the Associated items.
This section is used to link a product to its item number. This is the item number the practice created for the product and includes the price that will be charged on the invoice. See the create an item number section in the Set up Stock Management article for more information. Currently, 1 item number is supported per product.
Medicare item numbers for services, like administering a vaccine, are not added to Stock Management, they are added to billing during the clinical encounter. If you do not want to charge for a vaccine, you can leave this section blank and the item will not be added to the invoice but stock will still be adjusted.
For vaccines, if you're using a sub-product, like doses in a vial, you only link the sub-product to an item number. This is because only the sub-product will be used in a clinical encounter.
For consumables, both a product and its sub-product can be linked to an item number. For example, a practice may dispense medications as a packet or as individual blister strips. The packet would be the product, and the blister strip the sub-product.
To link an item number:
- Enter the item number into the Search field.
- Select the item from the list that appears.
- Select Link.
The item will be added to the Associated Items list.
- Select the Item Type.
You can start typing the name of the vaccine in AIR to locate it in the list.- For vaccines, select Immunisation, then select the type of vaccine from the drop-down list of vaccines in AIR. This makes the vaccine product selectable from the Immunisation screen during a clinical encounter.
You can add different products and link them to the same AIR vaccine from the list. - For a vaccine with a sub-product leave the Item Type as the default - Other. The Item Type > Immunisation will be selected for the sub-product, as documented in the next section. A sub-product is used when a product is divided into smaller units, like vaccine vials that contain multiple doses.
- For a consumable, select Consumable, and it will be selectable from the Record Consumable Use screen during a clinical encounter.
- If a product is not a vaccine or consumable, and you want to charge for it, leave it as Other. Stock linked to the product's item number will be reduced by 1 when the invoice is processed.
- For a product with stock that can only be manually adjusted, select Other.
- For vaccines, select Immunisation, then select the type of vaccine from the drop-down list of vaccines in AIR. This makes the vaccine product selectable from the Immunisation screen during a clinical encounter.
- Active
selection.
If Active is not selected the product will not display. It cannot be set per branch. - Batch No Required and Expiry Date Required selections.
These fields are for tracking products that have batch numbers and/or expiry dates. A tick means when you must enter the batch number/expiry date when adding stock and making adjustments.Note: If the Batch No Required & Expiry Date Required are enabled but you don't need to record the information, you can deselect them if the stock level is 0. - Serial No. Required - This option allows you to link a serial number to a consumable. It is not available for immunisation because there is no way to record the serial number when performing an immunisation.
- The Stock notes field can be used to add additional information.
- If you are not adding a sub-product, select Save.
The product will be added to Stock Management.
If you want to add a sub-product, select Add Sub-Product and continue to the next section.
Once you have added a product, you will want to bring stock in. To learn more, see the Add stock to a product article.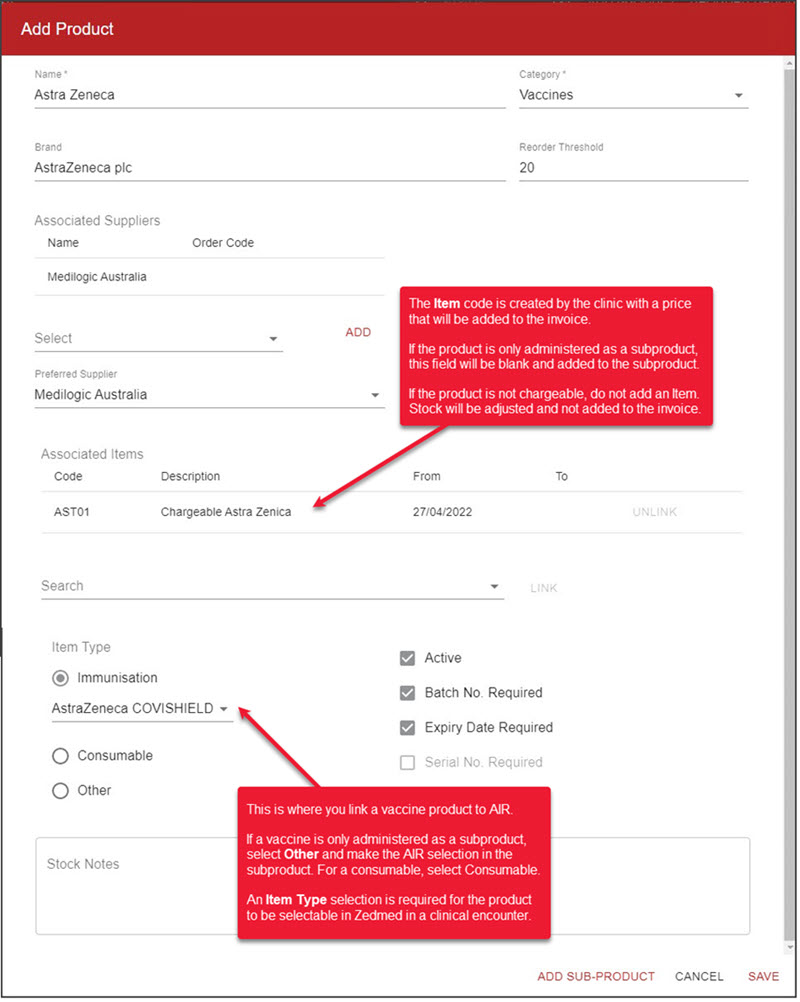

Adding a sub-product
A sub-product is used when a product can be broken down into smaller units to be sold or used. For example, some vaccines come in vials that contain multiple doses which must be drawn into individual syringes. In this case, you would add the vaccine vial as the product and then create a sub-product for the individual doses.
When the vial is drawn into individual syringes, the Split Item button is used to remove one or more vials from stock and add stock to the “dose” sub-product corresponding to the number of doses successfully drawn from the vial. The “dose” sub-product would then be selected when adding an immunisation to a clinical encounter.
This section continues from the last step in the Add a stock product section above.
To add a sub-product to Stock Management:
- Select Add Sub-Product.
This will open the Add Sub-Product screen. - Review the sub-product Name. It will use the parent product's name with "split" added to the end.
You can rename the default name, and this name is what will appear in Clinical when the stock is being used. - Select the product Category.
- Enter the product's Brand name (optional).
- Enter the Associated items.
This section is used to link a product to its item number. This is the item number the practice created for the product and includes the price that will be charged on the invoice. See the create an item number section in the Setup up Stock Management article for more information.
Medicare item numbers for services, like administering a vaccine, are not added to Stock Management, they are added to billing during the clinical encounter. If you do not want to charge for a vaccine, you can leave this section blank and the item will not be added to the invoice but stock will still be adjusted.
To link the sub-product to an item number.- Enter the item number into the Search field.
- Select the item from the list displayed.
- Select Link.
For a vaccine, there should be no item number linked to this sub-product's parent product.
- Select the Item Type.
You can start typing the name of the vaccine in AIR to locate it in the list.
- For vaccines, select Immunisation, then select the type of vaccine from the drop-down list of vaccines in AIR. This makes the vaccine product selectable from the Immunisation screen during a clinical encounter.
For a vaccine, the parent product for this sub-product should have the Item Type set to Other.
You can add different products and link them to the same AIR vaccine from the list. - For a consumable, select Consumable, and it will be selectable from the Record Consumable Use screen during a clinical encounter.
- For a product that's not a vaccine or consumable, select Other.
- For a product with stock that can only be manually adjusted, select Other.
- For vaccines, select Immunisation, then select the type of vaccine from the drop-down list of vaccines in AIR. This makes the vaccine product selectable from the Immunisation screen during a clinical encounter.
- Active selection.
If Active is not selected the product will not show in Stock Management. It cannot be set per branch. - Batch No Required and Expiry Date Required selections.
These fields are for immunisation tracking. A tick means when you must enter the batch number/expiry date when adding stock and making adjustments.
Note: If the Batch No Required & Expiry Date Required are enabled but you don't need to record the information, you can deselect them if the stock level is 0. - Serial No. Required - This option allows you to link a serial number to a consumable. It is not available for immunisation because there is no way to record the serial number when performing an immunisation.
- Expected Split Quantity is the amount of doses added to the Subproduct stock from 1 stock item of the Product.
- The Stock notes field can be used to add additional information.
- Select Save.
Once you have added a product, you will want to bring stock in. To learn more, see the Add stock to a product article.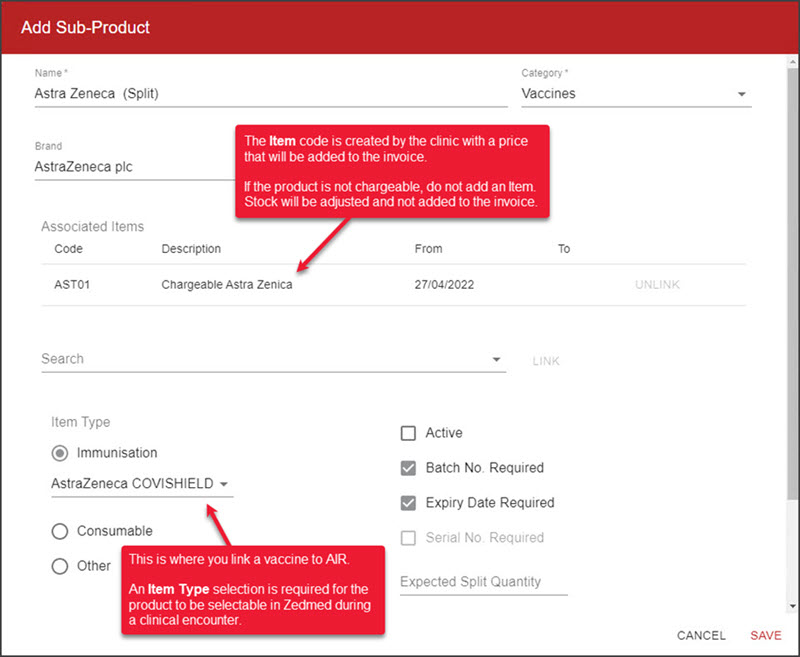

Updating a product's details
To edit a product's details:
- Go to Zedmed's Management tab.
- Select Stock Management.
The Stock Management UI will open in Chrome. - Select the name of the product you want to edit.
The Edit Product screen will open. - Make the required changes.
- Select Save.