Update the status of deceased patients and those who have not visited the practice in some time. This provides more appropriate search results and accurate information.
Patients whose records have been marked as Archived or Deceased will not be selected to display on the Patient Selector screen unless you tick the Search Archived and Deceased box. This option can be permanently switched on through Practice Setup > Practice > Practice Details and selecting the Find arch'd/deceased checkbox.
Video guides
Please see our video guides for a detailed walkthrough and explanation.


Archive patients
Patients can be archived if they have not visited the practice within a specified period of time.
As it is not possible to delete patients with financial data, this function can also be used to set the patients' Status (in Patient Details) from Current to Archived automatically.
To archive a patient:
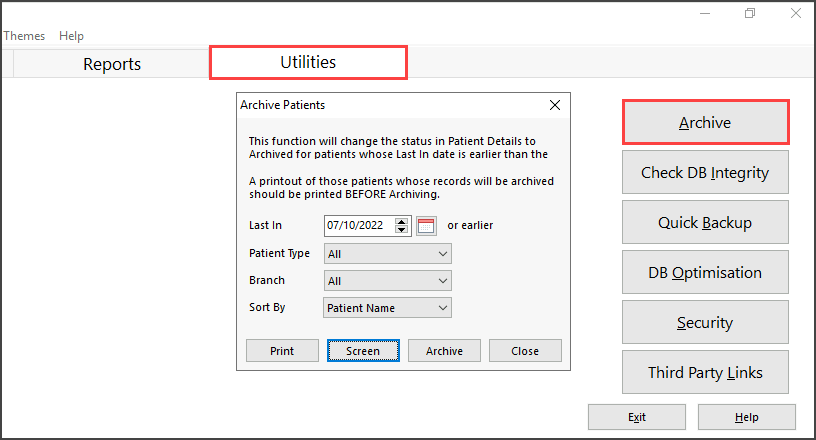
- In Office, go to Zedmed's Utilities tab.
- Select Archive then Archive Patients.
The Archive Patients screen will open. - Select the parameters for archiving.
Before you proceed with the Archive, you may Print a list of Patients. Alternatively, you can view a list of Archived patients through the Reports/Patients Report using the Status criteria of "Archived". - Select Archive.

Deceased patients
A patient's status will need to be updated if the patient has passed away. This will ensure the patient is removed from any generated reminders reliant on a patient's status.
To update the patient:
- In Office, search the Patient and open their record.
To learn more, see the find a patient's record article. - Update the patient's Status to Deceased. If Recalls exist, you will be prompted to deactivated them.
Important: Cancel any future appointments for the patient, as they are not automatically removed.

Merge patient records
The Merge Patients Wizard allows you to consolidate and merge duplicate patient records.
To merge a duplicated record:
- In Office, go to Zedmed's Utilities tab.
- Select Merge Patients.
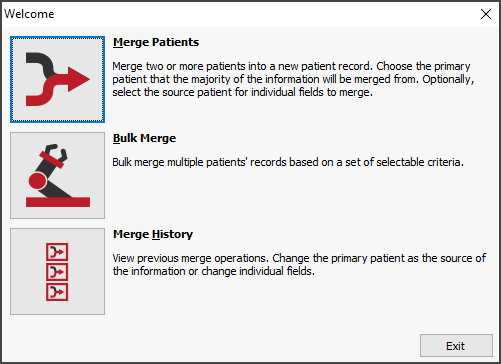
The Merge Welcome screen will open. - Select Merge Patients.
 The Merge Patients screen will open.
 - Select Select Patient(s).
- Enter the duplicated patient's information and select Search.
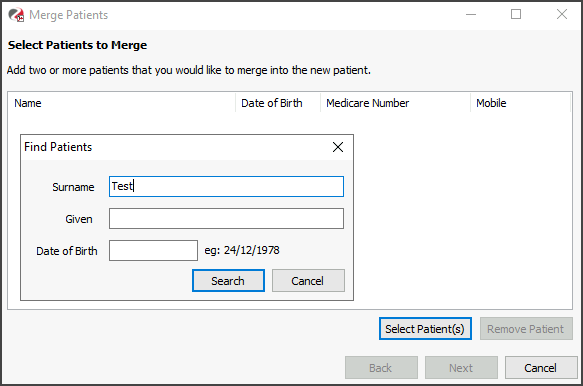 The records of matching patients will appear.
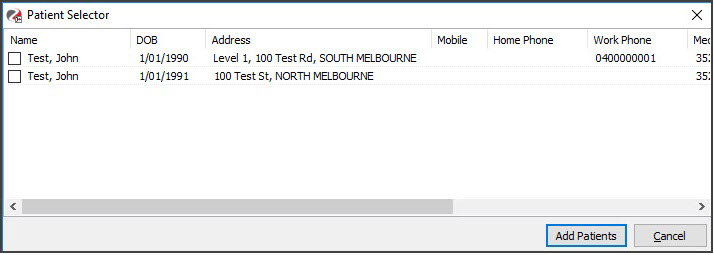
- Tick the boxes next to the duplicated records to be merged.
- Select Add Patients to add the selected patients to the Choose Preferred Patient screen.
- Select the Patient that you want to be the primary record.
If you want to specify the fields you would like to keep, select Advanced.
- If you chose Advanced, a granular view of the patient will display.
Use the radio buttons to select the fields you wish to keep in the final patient record. In the below example, Patient 1 has been selected as the preferred/primary record; however, Patient 2's Home and Mailing Address details have been selected for the final record. You will often find that one record is more complete than the other. -
Select Close.
This will take you back to the Merge Patients window.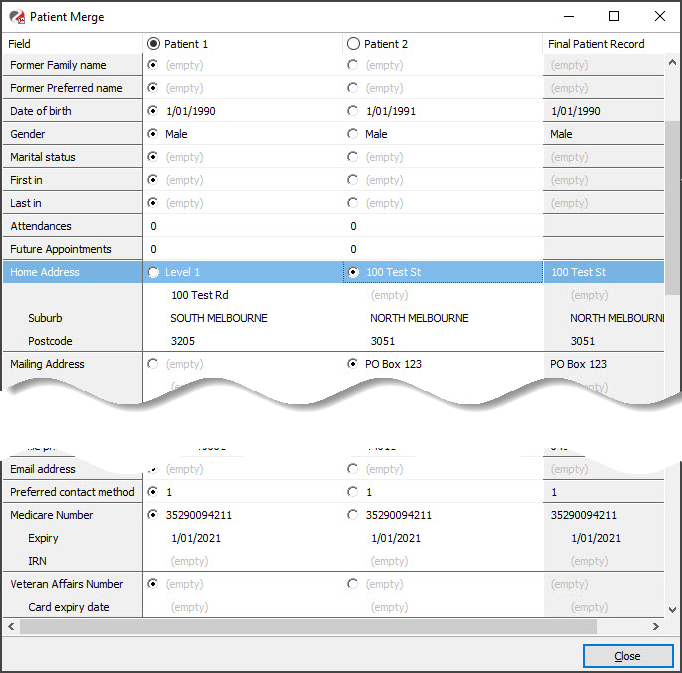
- Select Next.
The confirmation screen will appear. - Review the settings and select Next.
The merge will start and display a notification once it has been successfully completed. A new Primary record is created and the original two records are archived.
 The Merge Patients screen will open.
 The records of matching patients will appear.


Merging conflicting NOK Acc payers
A criteria for merging is Family which may include the NOK Account Payers. If a duplicate record exists and both records have different NOK Account Payers, when merging only one set can be selected for the final record.

Where an invoice exists for the family member (NOK Account payer) that was not selected in the merge, it will be merged to the final record but the payer will change from the family member to the patient. Users may want to make sure that the NOK Account Payers are represented on a single record prior to merge. All third parties will be merged without impact, regardless of which record they belonged to.
Bulk merge patient records
If you identify duplicate records for multiple patients, the Bulk Merge tool allows you to process multiple duplicate records at the same time. This feature will not allow you to choose the fields you wish to keep in the final patient record. The newest record will automatically be made the Primary record.
To merge a duplicate record:
- Go to Zedmed's Utilities tab.
- Select Patient Merge.
The Merge Welcome screen will open. - Select Bulk Merge.
- Review the Match Patients By options to modify the results.
You must use at least two criteria. - Select And Family Names Starting with and choose the letters or select ALL Family Names.
- Select Search.
The patient records matching the selected criteria will display. - Expand the family name to check there are only duplicated records showing.
- Select the records to merge.
- Select Merge Selected.
Caution: this will start the merge, so make sure you have only selected duplicate records and that you have used the Match Patient By options to exclude any records that are not duplicates. -
Should you wish to further define the Primary record, or conduct the merge using the Merge Patients Wizard, right click on the patient name and select Merge in Merge Wizard.
In the example below, the records of Pat and John Smith will be merged followed by the merging of Zaneta and Alessia Smith.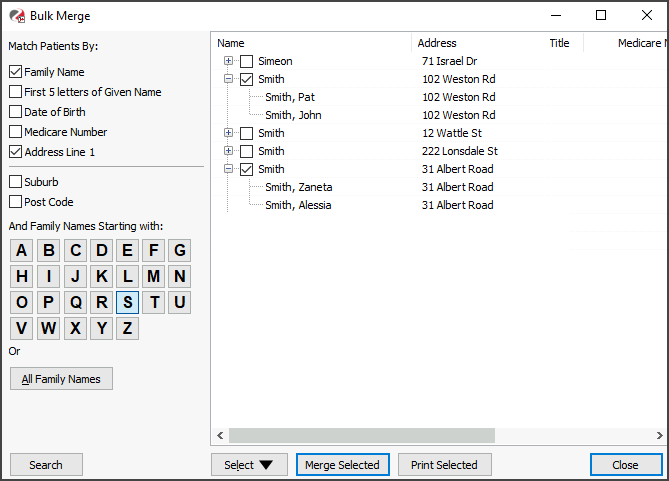

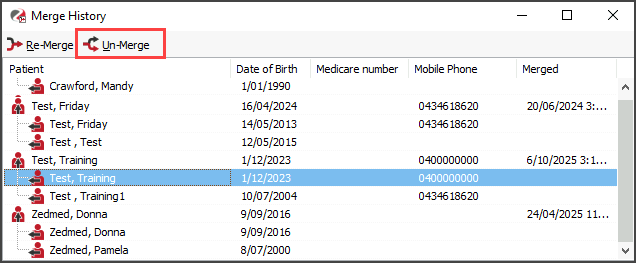
Un-Merge
Merged records can be viewed in the Merge History screen. To undo a merge:
- Select one of the merged patient records
- Select Un-Merge.