If you have voided an invoice and not informed Medicare that day, you will receive a payment for that claim and will not be able to reconcile the payment because the invoice is no longer valid. The invoice will show an amount paid and $0:00 outstanding.
This will result in 2 possible scenarios for reconciling:
- The payment from Medicare is valid so you need to create an invoice to manually receipt the payment for the voiced invoice.
- The payment from Medicare is not valid so you need to refund the payment for the voided invoice.
Note: In Zedmed v37.4.0 to avoid changes to an invoice after transmitting a claim, adjustments cannot be made to that invoice from Account Enquiry for 1 day. The Practice can increase this duration or change it to 0 to disable it in Practice details.
Identifying a payment for a voided invoice
If you try to reconcile a Medicare payment with a claim for a voided invoice, the reconciliation will fail and you will receive one of these error messages depending on your version of Zedmed you have. The voided invoice will need to be manually receipted. If the bulk bill payment had multiple invoices, you will need to manually receipt all of the invoices. You may also need to refund Medicare if payment was made for an incorrect claim.


Manually receipt an invalid Medicare payment for a voided invoice
This process is for receipting payment advice that includes a payment for an invoice that was voided. In this scenario, you will need to manually receipt the valid invoices in the payment, then contact Medicare who will advise on the refund process for the duplicate payment. This will leave an unallocated credit that you can then allocate as a refund.
Step 1 - Receipt the valid (correct) invoices
To receipt the valid invoices in the Payment ID:
- Go to Zedmed's Management tab.
- Select Claims.
- Select the Payment tab.
- Expand the applicable Payment ID.
At this point, you may want to use the Print Report feature at the bottom of the screen to capture all the invoices under the Payment ID, as you will need to manually allocate them in a later step. - Select the tick box next to the Payment ID.
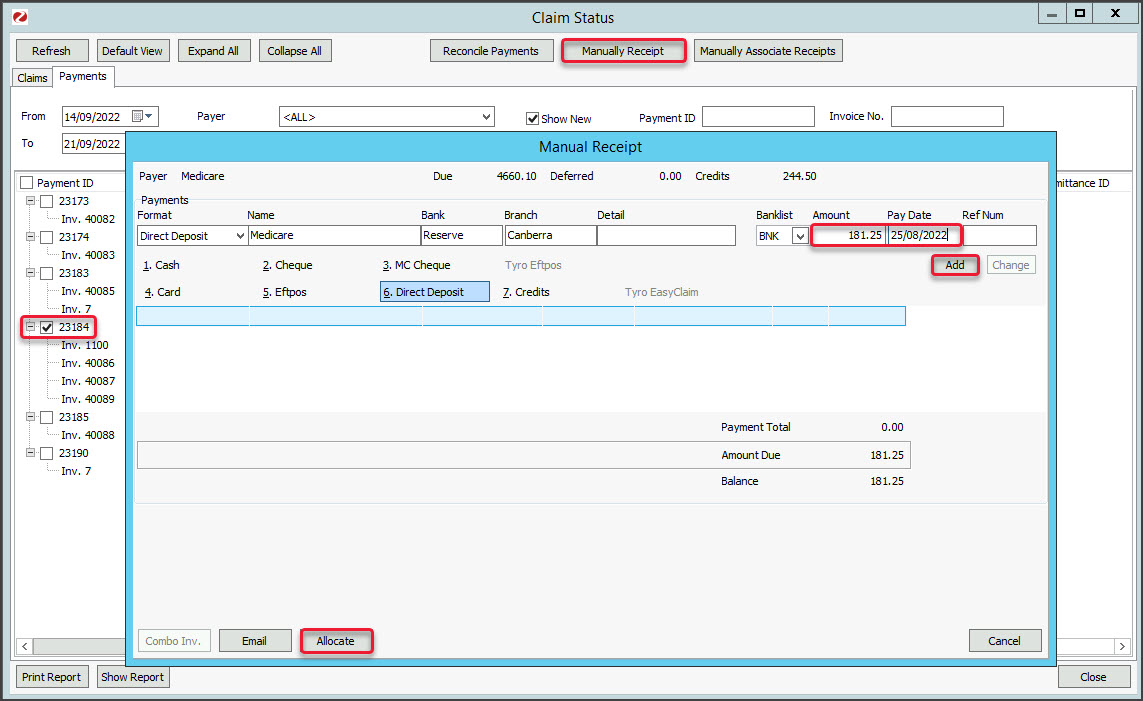
- Select Manually Receipt.
An Information dialog will show the possible payers. - Select the invoices' payer: Medicare, DVA or Patient.
The Manual Receipt screen will open and show the total payment received for the Payment ID. Check the full amount is shown and update it to reflect the full amount if required. This total will reduce as each invoice is manually allocated to it. - A Medicare payment will show as a Direct Deposit with a Pay Date. Choose the correct Banklist. Enter the original payment date into the Pay Date field.
- Select Add.
- Select Allocate to start allocating invoices.
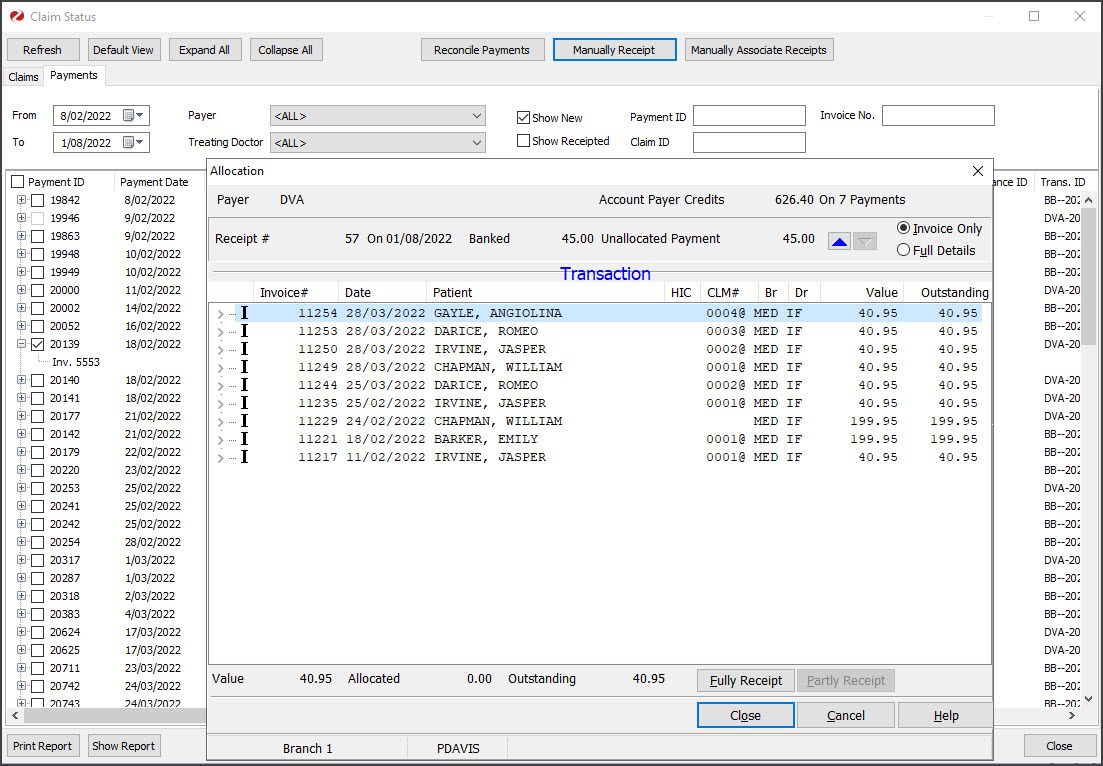
 The Allocation screen will open (screenshot below) and show all unpaid invoices for the type of payer you selected in the Payer's dialog.
 - Select the (first) invoice to be allocated to the payment.
- Select Fully Receipt.
The Account Payer credit will reduce as the invoice is receipted. - Continue with the other invoices with claims covered by the Payment ID and Fully Receipt each one.

Step 2 - Refund the payment and allocate the unallocated credit
When the last invoice has been manually receipted in step 1, you will have an unallocated credit showing on the Allocations screen. This is the amount that Medicare paid for the voided invoice. This payment now needs to be refunded from the doctors/practice bank account to Medicare, and the unallocated credit needs to be allocated in Zedmed.
To refund the payment back to Medicare:
- Call Medicare's e-business line on 1800 700 199.
- Advise Medicare that an invalid payment was received.
You will need to provide your Minor ID, which can be found under Practice Setup > Practice.
Medicare will collect some details and send you a form to complete. - Complete the steps on the form to transfer the invalid payment amount from the doctor/practice bank account to Medicare.
To allocate the credit in Zedmed:
- Go to Zedmed's Management tab.
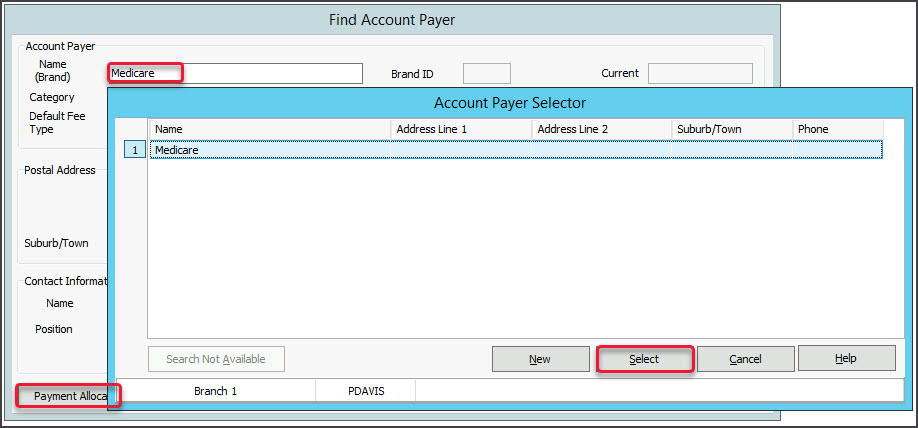
- Select Debtors > Account Payers.
The Account Payer Selector screen will open. - Type Medicare into the Name field and select Search.
- Select 'Medicare' from the results.
The Account Payer Details screen will open. - Select Payment Allocation.
 The Third Party Account Enquiry/Allocation screen will open.
 - Select Payments.
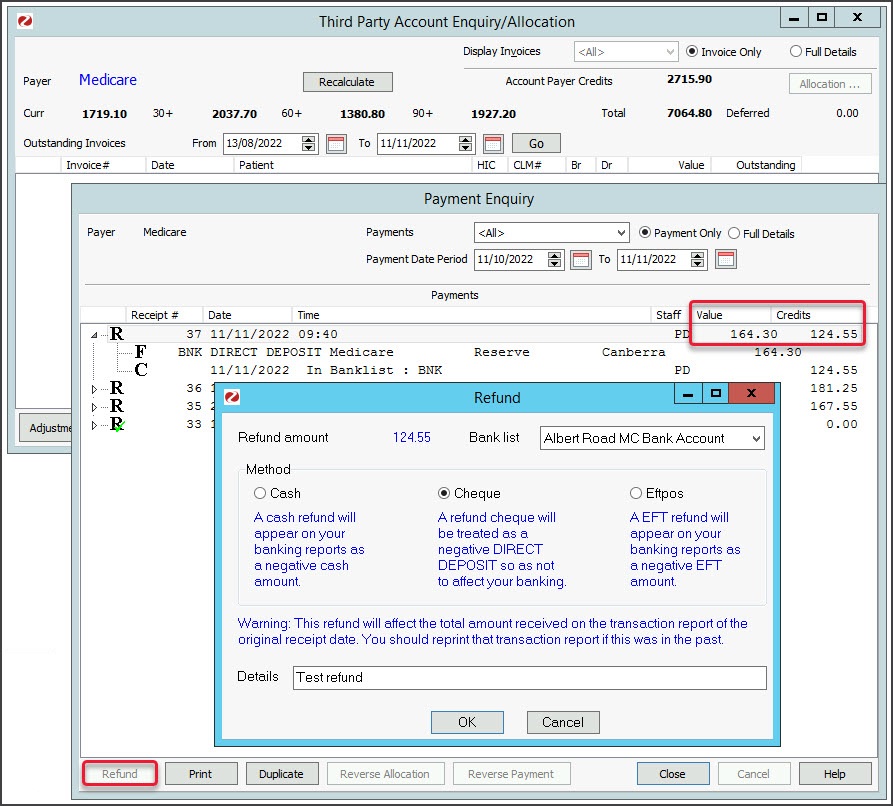
The Payment Enquiry screen will open.
Under Value and Credits, the receipt will have a credit that has not been allocated to the value. - Select the receipt (R).
- Select Refund.
The Refund screen will open. - Select the refund option you will be using: Cash, Cheque or Eftpos.
- Enter reference information into the Details field.
- Select OK.
The credit will be allocated to the value and the Credits will show 0.00.
Manually receipt a valid Medicare payment for a voided invoice
This process is for receipting payment advice that includes a valid payment for an invoice that was voided. In this process, you will need to allocate the amount for the voided invoice to a replacement invoice. It is therefore important that the invoice you create is for a legitimate payment for a service that was provided and not a duplicate payment.
Step 1 - Create a replacement invoice
The first step is to create an invoice to replace the one that was voided. Follow this process for each voided invoice that needs to be manually receipted.
To create the invoice:
- Open the record of the patient who the cancelled invoice was for.
- Select Acc Enquiry.
- Locate the voided invoice and note down all the items, the service date and the doctor.
- Close out of Acc Enquiry and now select Bill on the patient record.
- Create a new invoice using the information noted down in step 3.
- Suppress the invoice.
For more information, see Zedmed's invoicing guides. - Enter Acc Enquiry and note down the invoice number, as you will need to select it in the next step when you assign it to the payment.
Steps 2 - Manually receipt the payment:
The next step is to manually receipt all invoices under the Payment ID, including the invoice that had a replacement invoice created in step 1.
To receipt the payment and allocate the invoices:
- Go to Zedmed's Management tab.
- Select Claims.
- Select the Payment tab.
- Expand the applicable Payment ID.
At this point, you may want to use the Print Report feature at the bottom of the screen to capture all the invoices under the Payment ID, as you will need to manually allocate them in a later step. - Select the tick box next to the Payment ID.
- Select Manually Receipt.
An Information dialog will show the possible payers. - Select the invoices' payer: Medicare, DVA or Patient.
The Manual Receipt screen will open and show the total payment received for the Payment ID. Check the full amount is shown and update it to reflect the full amount if required. This total will reduce as each invoice is manually allocated to it. - A Medicare payment will show as a Direct Deposit with a Pay Date. Enter the original payment date into the Pay Date field.
- Select Add.
- Select Allocate to start allocating invoices.
 The Allocation screen will open (screenshot below) and show all unpaid invoices for the type of payer you selected in the Payer's dialog.
 - Select the (first) invoice to be allocated to the payment.
If you are receipting a voided invoice, select the invoice you created to replace the one that was voided. - Select Fully Receipt.
The Account Payer credit will reduce as the invoice is receipted. - Continue with the other invoices with claims covered by the Payment ID and Fully Receipt each one.
- Once the full amount has been receipted off, select Close to exit.


 The Allocation screen will open (screenshot below) and show all unpaid invoices for the type of payer you selected in the Payer's dialog.
 The Third Party Account Enquiry/Allocation screen will open.