Create a pathology referral and print it for the patient or Securely Send the referral to the patient using SMS or Email (ideal for telehealth). Secure Send requires Zedmed v36.5 or later.
Quickstart video
Considerations:
• To reprint or delete a referral, see the Summary Views article.
• Secure Send uses a generic Pathology Referral template with an electronic signature.
• The Secure Send template
must be set up as generic addressees in the Address book.
• Results sent back electronically go to the Results inbox and printed results can be scanned into the Results inbox.
• The HealthShare integration can be used to cc: a practitioner to notify them of the requested pathology test.
Create a pathology referral
To create a pathology referral:
- Start an encounter with the patient.
For a detailed explanation of how to do this, see the Start an encounter article.
When the encounter starts, the Current Encounter pane will open and display the clinical modules. - Select Referrals from the Current Encounter menu.
This will open the Referral Selection screen.
The New Referral > Pathology tab is selected by default. - In the Addressee field, the preferred lab will be selected.
You can use the drop-down list to select a different addressee.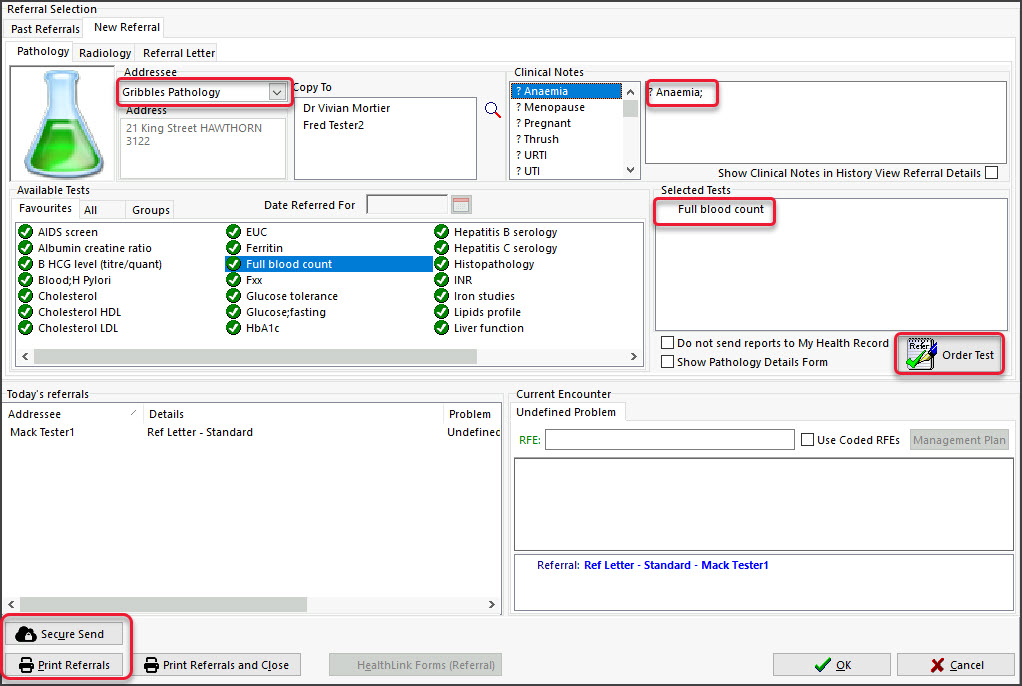
Note: To use Secure Send (e.g. telehealth consultation), select an addressee linked to the 'Zedmed- Pathology Referral' template (generic pathology format that adds your electronic signature). The practice creates these addresses.
- Use the Copy To field if you want to notify a practitioner of the requested test.
You will be asked if you want to print a copy for the cc'd practitioner when distributing the referral.
a) Select the Copy to Search icon to open the Address Book Search screen.
b) Enter the practitioner's name into the field provided and select Find.
c) Double-click the name to add it to the Copy to field.Composing the referral
- Enter the Clinical Notes.
Type your notes into the text box. You can also add each condition by selecting those listed under Clinical Notes. - Add the test required.
Double-click any test shown in the Favourites, All or Groups tabs to add it to the Selected Tests section.- To locate a test in All, start typing in the test's name or use the sidebar.
- To create a new test, right-click the All tab, select Add test, enter a name and select OK.
- To add a test to the Favourites, right-click the test and select Add to Favourites.
- To delete a test or remove a favourite, use the right-click menu.
- Adding Groups.
The Groups tab contains groups of tests for a specific condition. Double-clicking a group will add all the tests to the Selected Tests section. To learn more, see the Maintain test Groups section below. - Review the tests selected.
To remove a test, right-click it and select Remove.
The right-click menu also allows you to manually enter a new test and change a test's name. - Review the My Health Record settings.
Results are uploaded to My Health Record by the laboratory if the patient has not opted out of MHR. Tick Do not send reports to My Health Record if you do not want the lab to upload them. To view the settings, see Set up My Health Record. - Select Order Test.
This moves the test to the Today's Referrals section. - Print the referral - or - securely send it to the patient.
Option 1 - Print Referrals
a) Check that the printer contains the correct paper for the laboratory.
b) Select Print Referrals and confirm that the right paper is inserted.
All referrals in Today's referrals that have not been printed will print. You will be prompted to confirm copies for cc'd doctors.
Option 2 - Secure Send
Secure Send uses email or ZedSMS to send a referral to the patient or NOK payer using a link to a secure download page.
This referral uses a standard template and will include your electronic signature.
To learn more, see the Patient FAQ and dedicated Secure Send guide.
To securely send a pathology referral:
a) Select Secure Send.
The Secure Send button will open the Send screen for the referral in the Today's Referrals section.
b) Review the Send dialog.
• The title will show the referral's details.
• Select Recipient Email or Recipient Mobile, depending on the patient's preference.
• Additional recipients can be added using a comma.
Caution: if an incorrect email or mobile number is used, the unintended recipient will be able to access the documents.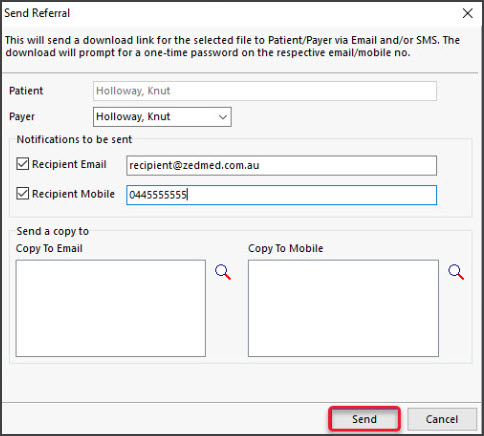
c) Optional: Copy To Mobile or Copy To Email fields using the Clinical Addressbook.
To remove a CC: use right-click > Remove. The HealthShare directory is only available for email delivery.
Note: This is different to the referrals Copy To field that is used if you want to notify a practitioner of the requested test.
d) Optional: Pin not required (Zedmed v37 and later).
Overrides the one-time security code requirement - the code sent to the patient to open the portal and access the sent files.
e) Select Send.
• A message will display that includes the text 'Delivery successful'.
• The patient will receive a link to download the referral, which will be useable for 7 days.
To view the patient's steps, see the Secure Send guide.
'Template not found' will appear if the referral addressee does not have the Zedmed pathology or radiology template.

Selecting the recipients

Sending the referral


Maintain test groups
A Group is a set of tests for a specific condition, and doctors can create and maintain their own test groups.
To update the group tests:
- Right-click in the Groups field and select Group Maintenance.
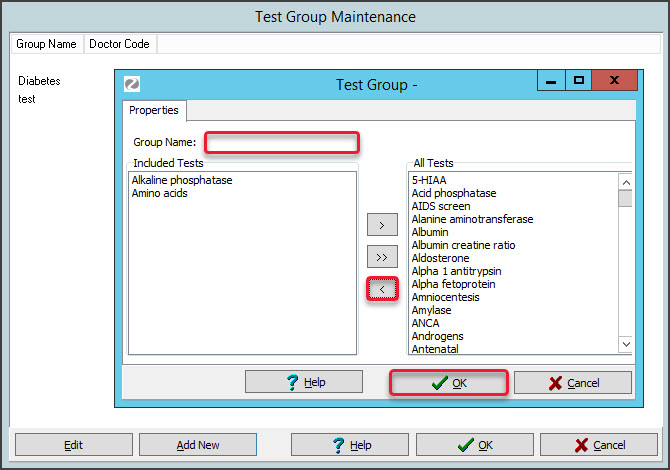
This will open the Test Group Maintenance screen.- Select a group and select Edit to modify the tests in the group.
- Select a group and select Delete to remove that group.
- To add a new group, select Add New.
The Test Group screen will open. - In the Group Name field, enter a name for the set of tests.
- Use the left-pointing single-arrow icon to move the required tests from All Tests to Included Tests.
- Select Ok to save and exit.
Use the Outbox Viewer to see your sent messages.