Search the Appointment Book for all bookings that have been made for a patient, then open or delete any of the appointments found. At the end of this guide is a table explaining what the Appointment Book icons mean.
Considerations:
- Select View > Options to open the Appointment Display options and select or deselect the practice's preferences.
- The Appointment Book of the branch you logged into (the default branch) will be searched.
- The change branch, press F3 and choose from the Select Branch screen.
- You can't search for a non-patient booking as the person has not been registered.
- You cannot search for Online Appointment bookings that have not been reconciled to a patient.
To find an appointment:
- Go to Zedmed's Reception tab.
- Select Appointments.
- Select Search > Find Appointment from the top menu.
The Patient Search screen will open. - Enter the patient's name into the Search field.
- Select Search.
- Select the patient.
- Select OK.
To learn more, see the finding a patient record article.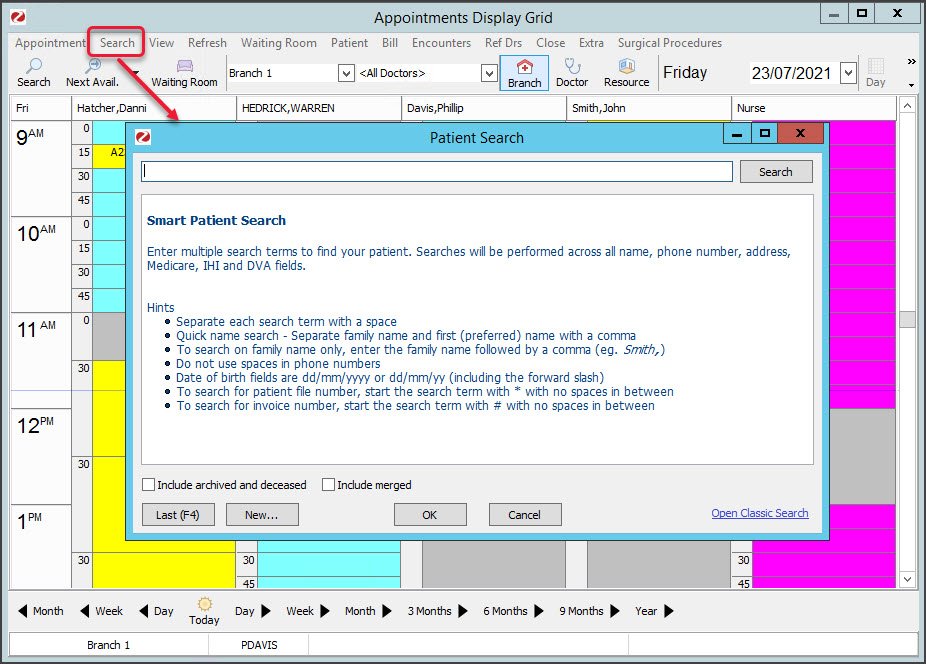 The Search for Appointments screen will open.
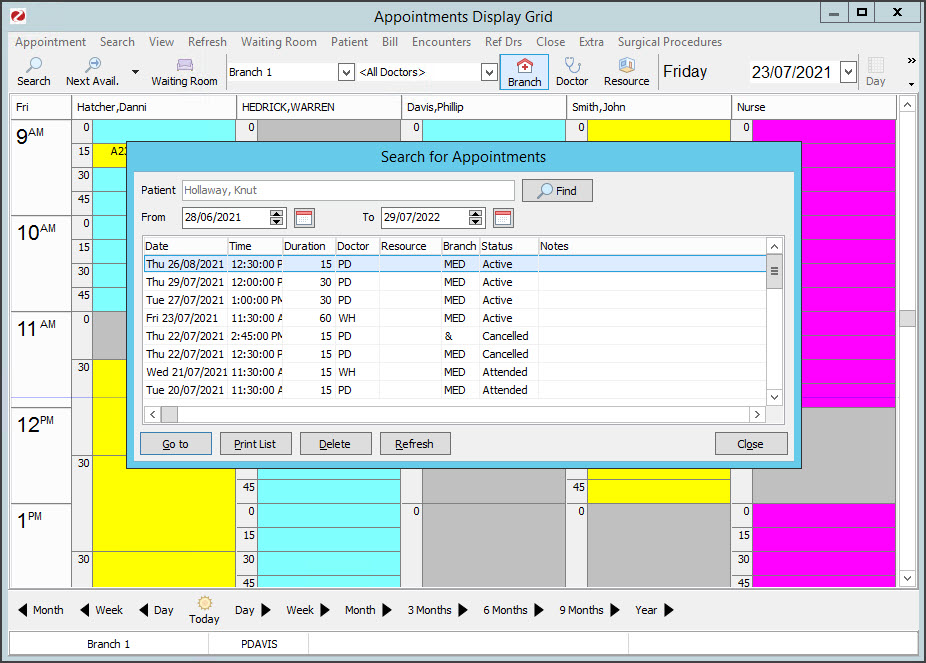
It displays the patient's appointments, looking back a month (in case an appointment was missed) and forward a year.
You can perform the following actions:
- Go to - Takes you to the day of the selected appointment with the appointment highlighted.
- Print List - opens a report of the listed appointments. Select the printer icon to print it out.
- Delete - removes (and cancels) an unwanted appointment.
An appointment should be cancelled, not deleted. Deleted appointments are not included in the cancelled appointment report.
To learn more, see the Cancel an appointment article. - Find - opens the Patient Search screen so you can look for another patient.
- Refresh - if you change the From/To date range, you need to select the Refresh button.
- Select Close to return to the Appointments Display Grid.
 The Search for Appointments screen will open.

Booking icon explanations
The following icons are used to indicate the patient's status.
| Icon | Description | Explanation |
| Green tick (left) | Patient has been attended to the Waiting Room. | |
| Red folder + cross (right) | The patient's IHI is unavailable. | |
| Green folder + tick | The patient's IHI is available. | |
| Cloud icon | The patient made the appointment via Online Appointments. | |
| Cloud icon with + | A patient's first Online Appointment needs reconciling. | |
| Credit card | Credit card provided. | |
| File folder | File pulled & patient not attended. Replaced by a green tick when attended. | |
 |
Phone icon | Patient replied YES (green tick) to reminder SMS. Replaced when attended. |
 |
Yellow dollar | An invoice has been raised. Replaces the attended tick. |
| Green dollar | An invoice has been receipted. Replaces the attended tick. | |
| Grey dollar | An invoice has been voided. Replaces the attended tick. | |
| Camera + green tick | Telehealth appointment. Camera changes to a green tick when attended. |