Zedmed supports HealthLink SmartForms for electronic patient referrals to participating healthcare providers. The SR Specialists & Referrals integration adds their Specialists Directory to the supported recipients. Requires Zedmed v35.10.2 and later.
SmartForms referrals
Zedmed can prepopulate SmartForms with patient and referrer information and include the attachments and notes saved in Zedmed. This means hospitals and healthcare organisations that require the SmartForm format are supported.

Considerations
- Zedmed uses SmartForms for RTWSA
- To use SmartForms for GP and specialist referrals, use an SR SmartForm
- You can view a list of the organisations and hospitals available, see the HealthLink SmartForms provider list.
- Referral recipients need HealthLink and a compatible PMS system to receive SmartForm referrals.
- Incoming SmartForm referrals are delivered to Zedmed's Results Inbox and require linking to the practitioner
Opening Healthlink SmartForms
This section shows the 3 ways SmartForms can be opened in Zedmed.
From the Referrals Module:
- Start an encounter with the patient.
- Select Referrals from the Current Encounter menu.
- Select the Pathology, Radiology or Referral letter tab.
- Select the HealthLink Forms (Referral) button.
HealthLink SmartForms will open in your web browser.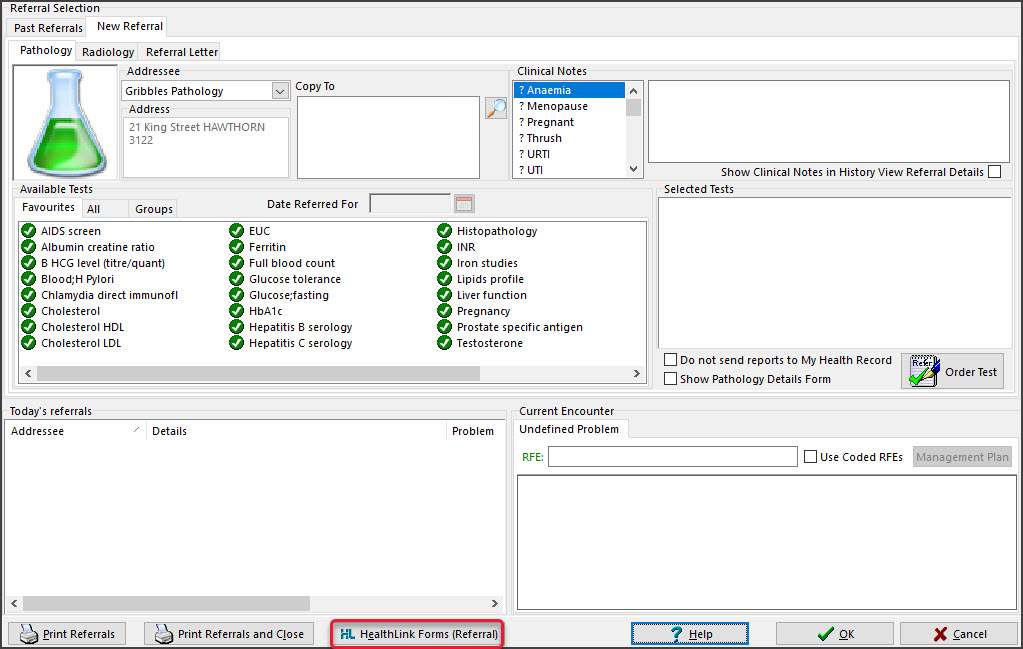

From Quick Documents:
- Open the patient's record in Clinical.
- Select the Quick Documents icon above Summary Views.
- Select HealthLink Forms (Document).
HealthLink SmartForms will open in your web browser.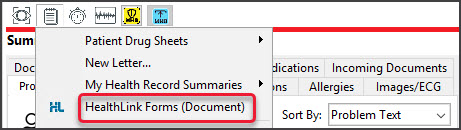

From the Current Encounter menu:
- Open the patient's record in Clinical.
- Start an encounter with the patient.
- Select HealthLink Forms (Referral) from the Current Encounter menu.
HealthLink SmartForms will open in your web browser.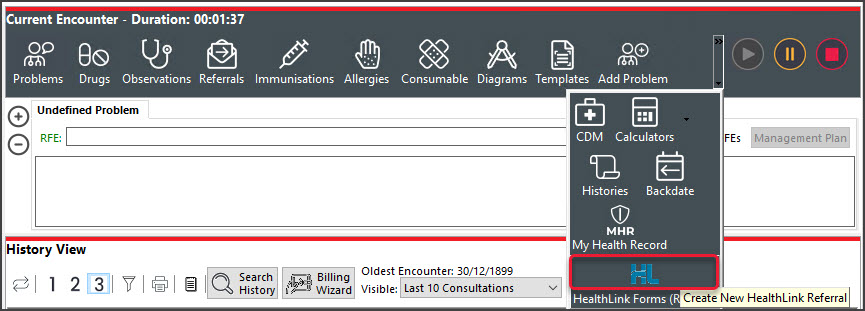

Creating a SmartForm
HealthLink SmartForms uses a standardised format to record, send and store the document's information.
Step 1 - Selecting the organisation and service
- Select the organisation to display the services it provides.
- Select the service you require.
- Select Continue to open the form for that service.
Navigation
Use the browser's back arrow to return to the previous screen. If you do not Submit or Park (save) a Smart form, you can close the browser, and the form will not be saved.

Step 2 - fill in the form for the service
Go through each tab on the left and fill in the required information. Zedmed will prefill what fields it can with the patient and referrer information that is available in Zedmed. The Requested Information tab will be different for each service, and the other five tabs will remain the same.
Mandatory fields have a red star * beside them, and a red warning icon will appear on a tab with an empty mandatory field. If you are unsure what fields have been missed, selecting Submit will display a list of incomplete fields.
The following actions are available when filling in a form:
- The Park option saves the form so you can continue at a later time.
- It will be saved in Zedmed's Summary Views > Referrals or Documents tab with the (D) draft status.
- If you Park a form, you will need to reselect any attachments.
- Editing the information, which is useful for changing the prepopulated information.
- See the Modifying data section below to learn more.
- See the Modifying data section below to learn more.
- Adding attachments like PDFs or JPG using the Attachment/Reports page.
- See the Adding Attachments section below to learn more.
- Select the TV icon to preview the file. If it is a PDF, the PDF will download so you can review it.
- The Browse for More Medications and Browse for Consultation Notes buttons allow you to open another window and change the time frame and search for more items. Use the Attach button to add selected items to the form.

Step 3 - Select Submit to send the form
After you Submit a referral, it will be saved in the Summary Views > Referrals tab under HealthLink, and documents will be saved in the Documents tab.

Important: After you select Submit, the form will display. Use the Print button to print the completed document for the patient.

The Summary Views will show the status of the SmartForm. After 30-60 minutes, the status will show P-Processed if the service provider has SmartForm confirmations running. You can also call to confirm. If the SmartForm is not accepted, you will need to recreate and resubmit it. To learn more, see the Summary Views section.
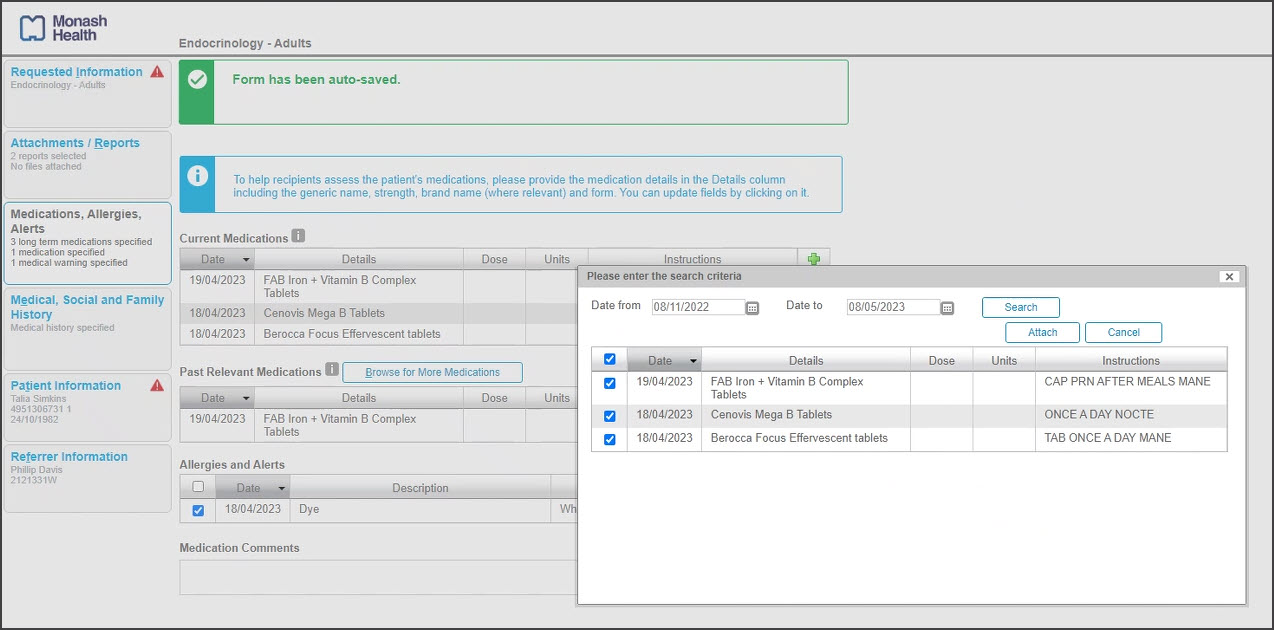
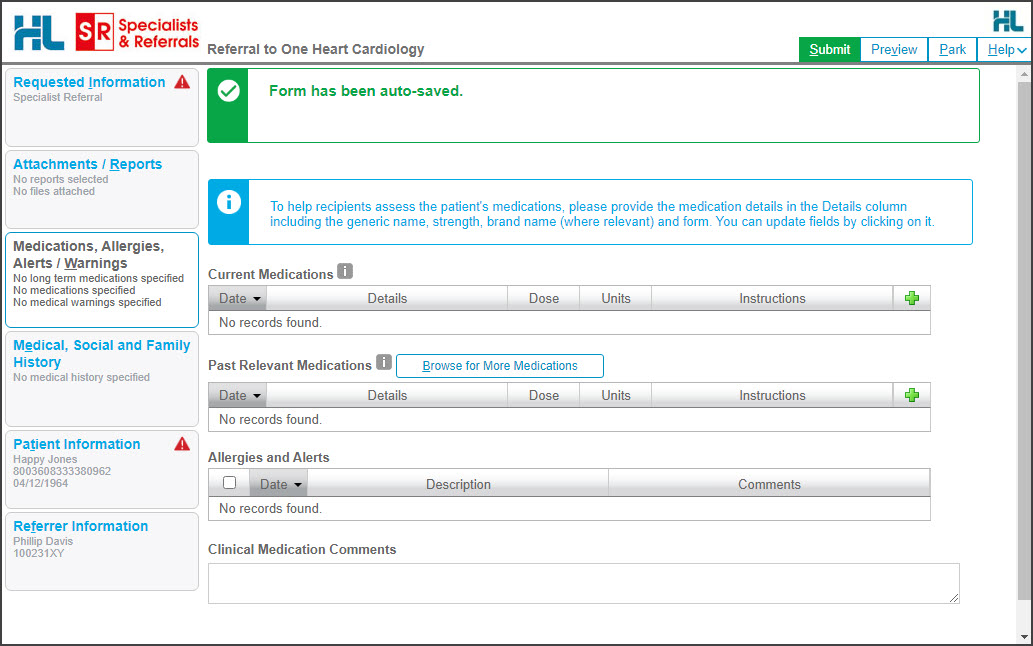
Modifying clinical data
Any of the information auto-populated by Zedmed can be edited or deleted.
- To modify an entry, select it, and the information will open an editable field with a Save button.
- To remove an entry, select the cross in the far right column and confirm that you want to remove that row.
In the example below, the Medications in the patient's Summary Views have been added to the SmartForm. Those medications are shown in the editable field, and some or all of the medications can be deleted and the changes saved.

Adding attachments
Files in the Summary View's Attachments and Images tabs can be attached to the SmartForm's Attachments/Reports tab. You can also attach local files from your computer using the Browse for Local File button. If you Park a form, you will need to reselect any attachments.
To attach a file from Zedmed:
- Select the SmartForms Attachment/Reports tab.
- Tick the box next to the name of the file you want to attach.
Select the TV icon to preview the file. PDFs will download, and other file types will open a preview window.
To locate and add files from a longer time frame:
- Select the SmartForms Attachment/Reports tab.
- Select the Browse for Patient Document button.
The Attach Files screen will open and show all attachable files in Zedmed. - Change the date range to and select Search to display the file available.
- Select the tick box next to each file you want to add.
- Select Attach.
The files will be added and appear in the Attachment/Reports tab with a tick.

SmartForms Summary Views
Any HealthLink Smartform created for a patient can be viewed and interacted with in the Summary Views section of the patient's record. If the form does not appear, select the Refresh button above the Event History.
SmartForm locations
• SmartForm referrals are saved under the HealthLink header in the Summary Views>Referrals tab.
• SmartForm referrals and documents are saved under the HealthLink header in the Summary Views>Documents tab.

SmartForm right-click options
Zedmed options - for Referrals
When you right-click a Referral, you can change the Zedmed Status to (O) Open (default when created) or (C) Closed (what you change it to when the results have been received). This manual setting helps keep track of what Referrals need to be followed up on.
HealthLink options - for Referrals and Documents:
- (D) Draft - can Edit and Delete.

- (A) Awaiting acknowledgment - can View/Print the form.
- (P) Processed - can View/Print the form.
- (P-crossed out)Failed - can View/Print the form.


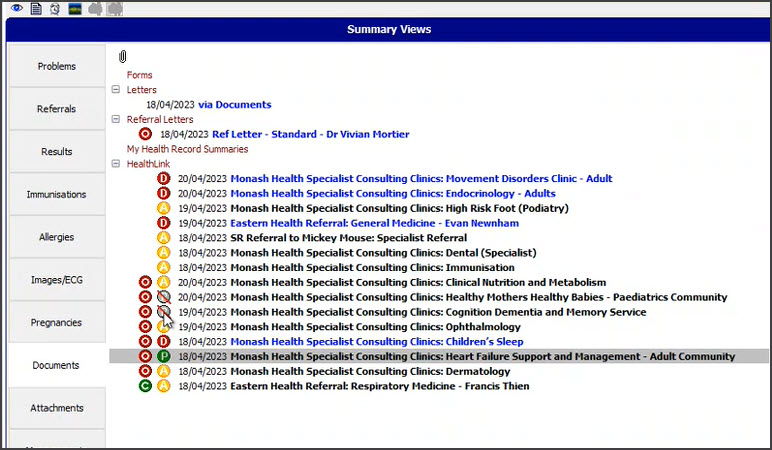
SmartForm status icons
The status icons are important as they tell you the status of a SmartForm.
Left-column status icons (as with normal documents) for referrals only:
- (O-red) Open - referral has not been actioned or discussed with the patient.
- (C-green) Closed - referral has been discussed with the patient, and no action is required.
Right-column HealthLink status icons for referrals and documents:
- (D-red) Draft - the SmartForm has been parked (saved locally). You can complete and submit at a later time.
Draft descriptions will also have blue text instead of black. - (A-yellow) Awaiting acknowledgment - waiting for the service provider to accept or reject the SmartForm.
- (P-green) Processed - The destination (e.g. hospital) received the SmartForm.
- (P-crossed out) Failed - The destination received but rejected the SmartForm. You will need to recreate it.

Zedmed SmartForms video
S&R SmartForm referrals
SR Specialists & Referrals is a HealthLink SmartForms integration that provides access to an online version of the Medical Specialists Directory for NSW, ACT, VIC and TAS. This directory is ideal for finding practices, specialists, GPs and Allied Health providers within SmartForms, and supports both printed and e-referrals.
Considerations
- For hospitals, certificates, and states not covered by SR, refer to the standard SmartForms guide.
- If you already use Zedmed's SmartForms integration, there are no additional configurations or costs.
- Referral recipients need HealthLink and a compatible PMS system to receive SmartForm referrals.
- Incoming SmartForm referrals are delivered to Zedmed's Results Inbox and require linking to the practitioner.
Opening an SR SmartForm
There are three ways to open HealthLink SmartForms in Zedmed.
From the Referrals module:
- Start an encounter with the patient.
- Select Referrals from the Current Encounter menu to open the Referrals screen.
- Select the Pathology, Radiology or Referral letter tab.
- Select the HealthLink Forms (Referral) button.
HealthLink SmartForms will open in your web browser.
From Quick Documents:
- Open the patient's record in Clinical.
- Select the Quick Documents icon above Summary Views.
- Select HealthLink Forms (Document).
HealthLink SmartForms will open in your web browser.
From the Current Encounter menu:
- Open the patient's record in Clinical.
- Start an encounter with the patient.
- Select the HealthLink Forms icon in the Current Encounter menu.
HealthLink SmartForms will open in your web browser.
Creating an SR SmartForm
When HealthLink SmartForms opens, SR Specialists & Referrals is displayed at the top.
Step 1 - Find a practitioner or practice in the SR directory
- Select Specialists & Referrals from the Smartforms homepage.
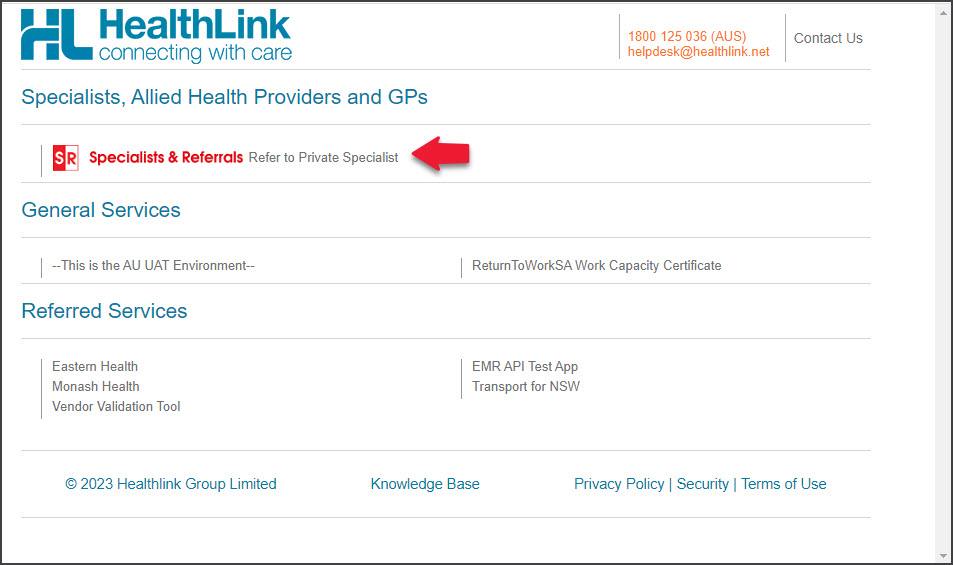 The SR Specialists & Referrals page will open.
 - Search for the SR practitioner or practice.
Use the search fields to set the criteria then select Search Specialists.
The options:
• Enter Specialist Name - opens a drop-down list of specialists and practices that match the name you type.
• Select a Category - opens a drop-down list of specialties to choose from. You must use one of the options provided.
• Enter Suburb or Telehealth - opens a drop-down list of locations that match what you type, including 'telehealth'.
• Enter Keyword - opens a drop-down list of common options that match what you type. You can enter any word.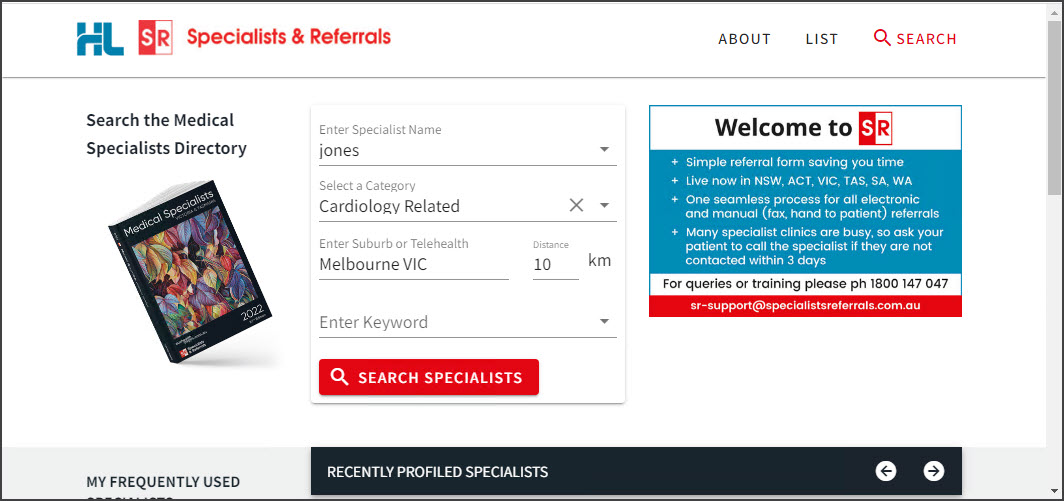
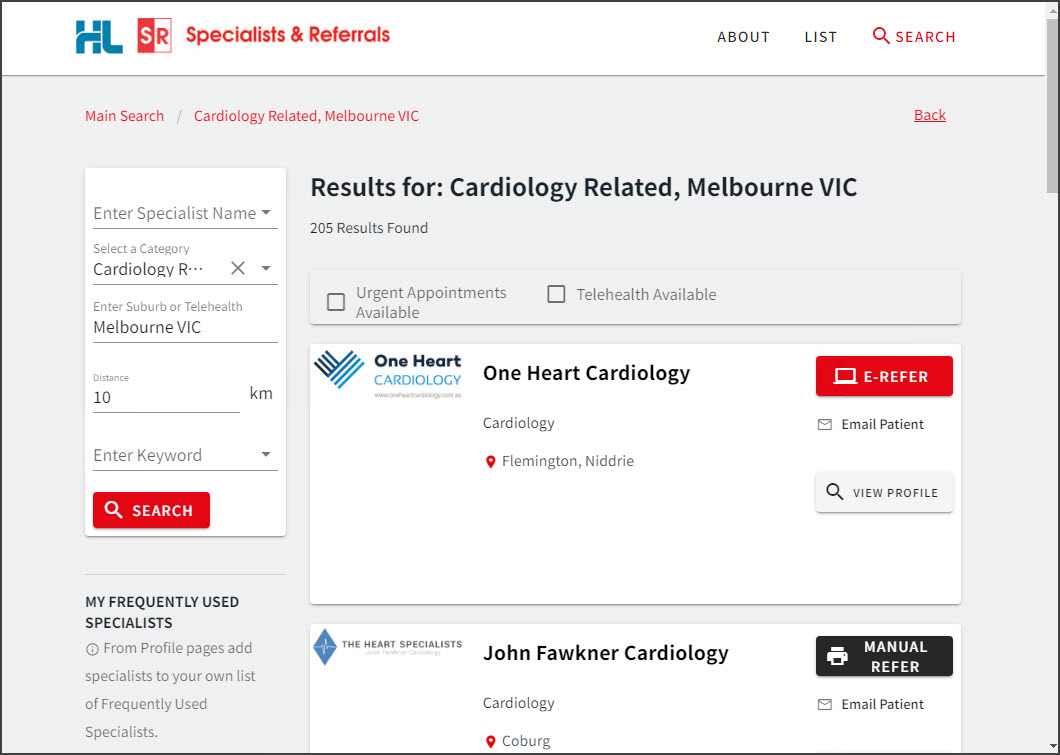
Next steps: Each specialist and practice has either a Manual Refer or E-Refer button, which will open SmartForms. You can also select View Profile to open the specialist or practice profile and learn more about them. If you select practice, you can also view and select a specific practitioner.
- Open a SmartForm for one of the practitioners or practices shown in the search results.
The selection is made by clicking the MANUAL REFER or E-REFER button.
• E-Refer - when the SmartForm is ready, select Submit to send it using HealthLink's secure messaging.
• Manual refer - when the SmartForm is ready, select Print for hand delivery or faxing. Attachments are not supported and will need to be printed separately.
The search filter is also available on the results screen. You can change the criteria to refine or change the results shown.
Email Patient will send the practitioner or practice profile to the patient from the SR Specialists and Referrals mail server.
After you select the MANUAL REFER or E-REFER button, you will be shown the available locations. - Select the location to send the referral to.
- Optional step - View Profile
Specialists and practices have a profile page accessible via the View Profile button. The profile provides information and lists the services available. Practices also include a list of specialists at the clinic with links to their SR profiles.
You can:
• Select Add to frequently used to bookmark the practitioner or practice on the SmartForms starting (Home) page.
• Email the profile to a patient by typing in their email address.
• Print the profile out.
• Use the E-REFER or MANUAL REFER button to open a SmartForm.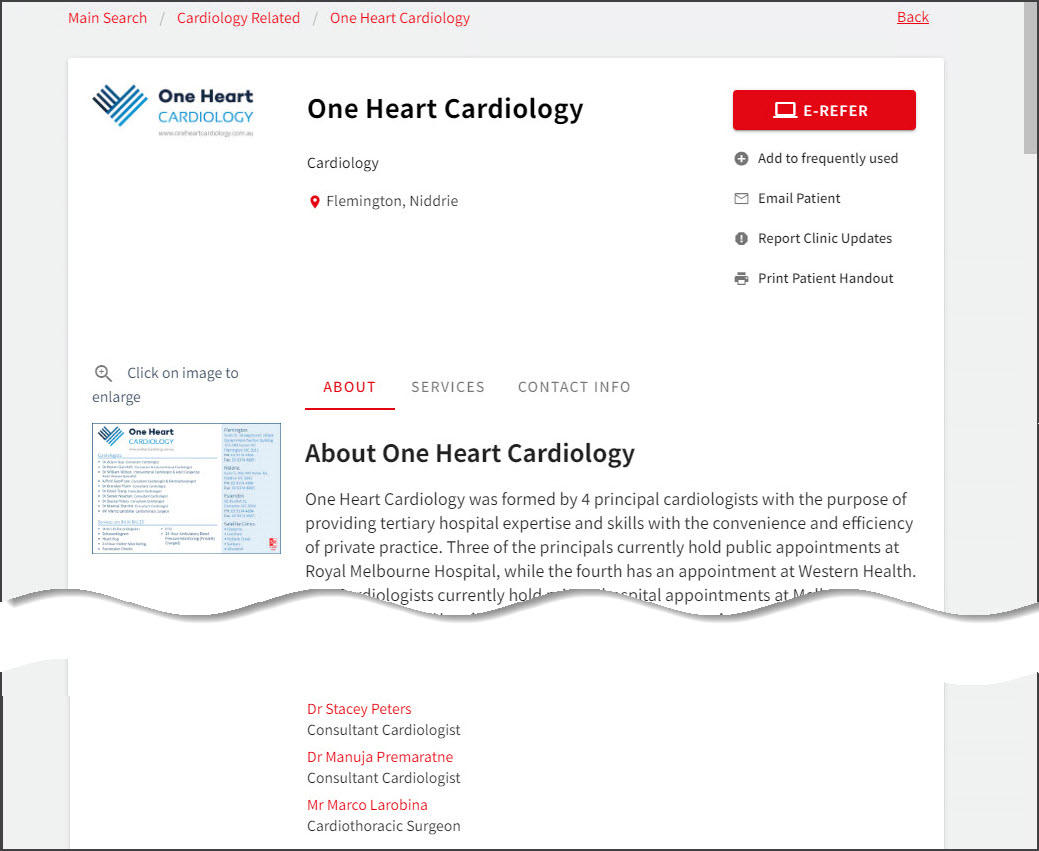 When you select the location, the SR Specialists & Referrals SmartForm will open. The format is used for all SR SmartForms.
Navigation
• Use the tabs on the left to complete each page.
• A SmartForm for an E-REFER will have a green Submit button.
• A SmartForm for a MANUAL REFER will have a green Print button.
• The Park option will save a draft of the SmartForm in the patient's Summary Views (Referrals or Documents tab)
• Use the browser's back arrow to go back to the previous screen.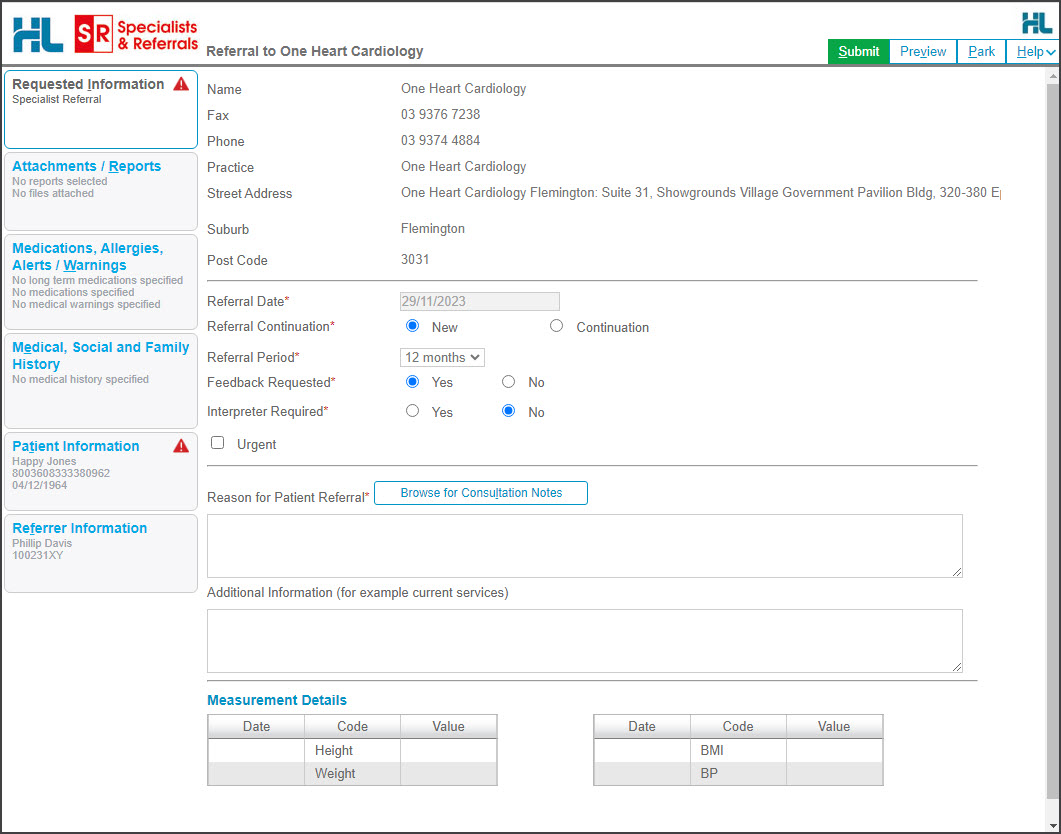
 The SR Specialists & Referrals page will open.

 When you select the location, the SR Specialists & Referrals SmartForm will open. The format is used for all SR SmartForms.
Step 2 - Fill in the SmartForm
Go through each tab and enter the information. Zedmed will prefill what fields it can with the patient and referrer information that is available in Zedmed. The selected practitioner or practice will also have their information added to the SmartForm.
Mandatory fields have a red asterisk * beside them, and a red warning icon will appear on a tab with an empty mandatory field. Selecting Submit will also display a list of incomplete fields.
- The Park option saves the form so you can continue at a later time:
- It will be saved in Zedmed's Summary Views > Referrals or Documents tab with the (D) draft status.
- If you Park a form, you will need to re-select any attachments.
- Editing the information, which is useful for changing the prepopulated information:
- See the Modifying data section below to learn more.
- See the Modifying data section below to learn more.
- Adding attachments like PDFs or JPG using the Attachment/Reports page:
- See the Adding Attachments section below to learn more.
- Select the TV icon to preview the file. If it is a PDF, the PDF will download so you can review it.
- You cannot add attachments for Manual referrals (MANUAL REFER button), these need to be printed separately.
- The Browse for More Medications and Browse for Consultation Notes buttons allow you to open another window and change the time frame and search for more items. Use the Attach button to add selected items to the form.

Step 3 - Submit or Print the SmartForm
Complete the SmartForm by selecting Print (for a Manual Refer) or Submit (for an E-Refer).
• Submit will send the SmartForm referral using HealthLink's secure messaging.
You will have an option to print the referral for the patient on the confirmation page.
• Print will send the SmartForm to your printer for hand delivery or faxing.
The printed and submitted referrals are saved in the Summary Views > Referrals tab under HealthLink. Documents will be saved in the Documents tab.
An E-Referral Summary View status will show P-Processed if the service provider has SmartForm confirmations running. You can also call to confirm (allow 30-60 minutes). If the SmartForm is not accepted, you will need to recreate and resubmit it.
Important: When the form has been submitted, it shows as Acknowledged, which means HealthLink saved the referral and will send it. In Zedmed, the SmartForm referral will appear in the Patient's Summary Views with the status Ack - indicating HealthLink will send it - not that it has been seen by the recipient.
Adding attachments (e-referrals only)
Files in the Summary View's Attachments and Images tabs can be attached to the SmartForm's Attachments/Reports tab. You can also attach local files from your computer using the Browse for Local File button. If you Park a form, you will need to reselect any attachments.
To attach a file from Zedmed:
- Select the SmartForms Attachment/Reports tab.
- Tick the box next to the name of the file you want to attach.
Select the TV icon to preview the file. PDFs will download and other file types will open a preview window.
To locate and add files from a longer time frame:
- Select the SmartForms Attachment/Reports tab.
- Select the Browse for Patient Document button.
The Attach Files screen will open and show all attachable files in Zedmed. - Change the date range to and select Search to display the file available.
- Select the tick box next to each file you want to add.
- Select Attach.

SmartForms Summary Views
Any SR Smartform created for a patient can be viewed and interacted with in the Summary Views section of the patient's record. If the form does not appear, select the Refresh button above the Event History.
All SmartForms submitted using the SR directory will have the prefix SR in Summary Views.
• SmartForm referrals are saved under the HealthLink header in the Summary Views>Referrals tab.
• SmartForm referrals and documents are saved under the HealthLink header in the Summary Views>Documents tab.
D (draft) means the SmartForm has been parked. Right-click and select Edit HealthLink Form and open the SmartForm again.

SmartForm status icons
Left-column status icons (as with normal documents) for referrals only:
- (O-red) Open - referral has not been actioned or discussed with the patient.
- (C-green) Closed - referral has been discussed with the patient and no action is required.
Right-column HealthLink status icons for referrals and documents:
- (D-red) Draft - the SmartForm has been parked (saved locally). You can complete and submit at a later time.
Draft descriptions will also have blue text instead of black. - (A-yellow) Awaiting acknowledgment - waiting for the service provider to accept or reject the SmartForm.
- (P-green) Processed - The destination (e.g. hospital) received the SmartForm.
- (P-crossed out) Failed - The destination received but rejected the SmartForm. You will need to recreate it.
