Manage access to Zedmed for staff and doctors. This is done by assigning specific roles to users, which gives them access to the parts of Zedmed required to perform their work.
For Zedmed Cloud customers, Zedmed manages user accounts and accepts requests via the cloud user request forms.
Overview
Zedmed uses granular permissions called functions that give access to specific features and processes within Zedmed. These functions are grouped into roles based on employees' duties and each employee's user account is given access to one or more roles.
Roles make it easy to assign access. For example, if you have a new nurse, just create an account and allocate the Nurse role and the nurse has all the access they need.
You can change the functions that the standard roles have or create new roles. Out of the box, Zedmed has 4 pre-configured roles: Administrator, Doctor, Nurse and Receptionist. Each role gives access to the functions commonly used by those roles.
To access the Security Roles and Users screen:
- Go to Zedmed's Utilities tab.
- Select Security.
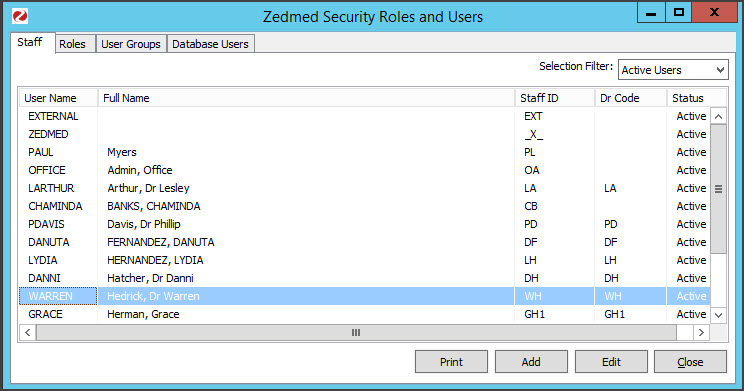
The Zedmed Security Roles and User screen will open.
Managing users and roles
This section explains how to create and modify roles and assign them to users
- To add a new staff member, see the Add new staff guide.
- To add a new doctor, see the Add new doctor guide.
Creating a new role
To create a new role:
- Select the Roles tab.
- Select Add.
The Role Properties screen will open. - Give the new role a name and description.
- Add the functions you want the role to have by selecting the function and clicking the arrow button.
- Select OK to save the new role.
Adding roles to users
To add a role to a user:
- Select the Staff tab.
- Select the user.
- Select Edit.
The Edit Staff Member screen will open. - Select the role you want to add.
- Select the arrow button to add it to the users.
- Select OK to save the changes.

User Groups (restrict clinical note sharing)
By default, doctors can see each other's clinical notes (encounter history), but if you create a User Group, only doctors added to that group will be able to see each other's clinical notes. For example, you could create a user group for GPs so that only the GPs in that group can see each other's clinical notes, and another group for specialists, or you could have different groups for different clinics within a practice.
You can also allow members of a group to see the clinical notes of members in another group without sharing their own. For example, if a practice had a group so GPs could restrict the sharing of clinical notes and a psychologist wanted to view those notes without joining the group (because the GPs would see the psychologist's notes), you can create a group for the psychologist and add it to the GP's group. The psychologist will see the GPs' clinical notes but the GPs will not be able to see the psychologist's.
Important: these sharing restrictions will only apply to clinical notes added after the group security is applied.
Create a group and add members
Only members of this group will be able to see each other's clinical notes (encounter history).
- Go to Zedmed's Utilities tab.
- Select Security.
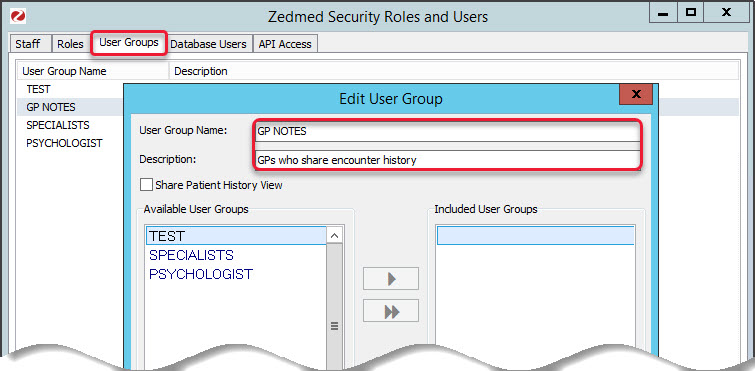
The Zedmed Security Roles and User screen will open. - Select the User Groups tab.
- Select Add.
- Enter a User Group Name and Description.

- Select OK to save the group.
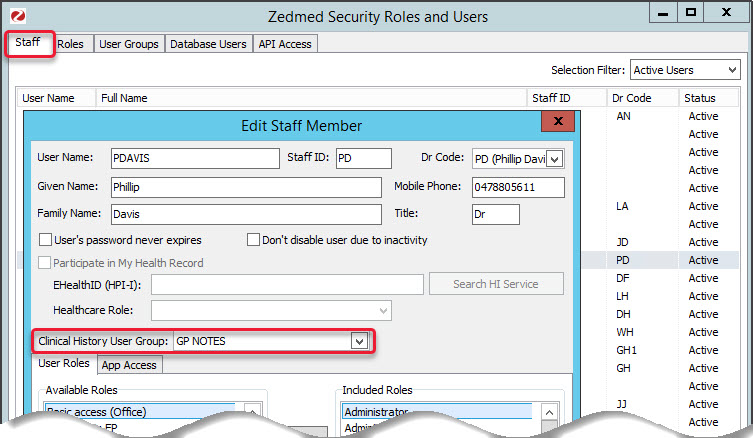
Now you need to add the doctors to the group. - Select the Staff tab.
- Double-click an applicable doctor to open their Edit Staff Member screen.
- From the Clinical History User Group field, select the name of the group you created.
- Repeat this for each doctor that wants to restrict access to their clinical notes - to group members.

Allow a doctor to see the clinical notes of another group (not reciprocated)
In this example, a psychologist uses a group called PSYCHOLOGIST where they are the only member. The psychologist wants to access the clinical notes of a practice's GPs (who also use a group) but does not want to share their own clinical notes by joining that group.
- Go to Zedmed's Utilities tab.
- Select Security.
The Zedmed Security Roles and User screen will open. - Select the User Groups tab.
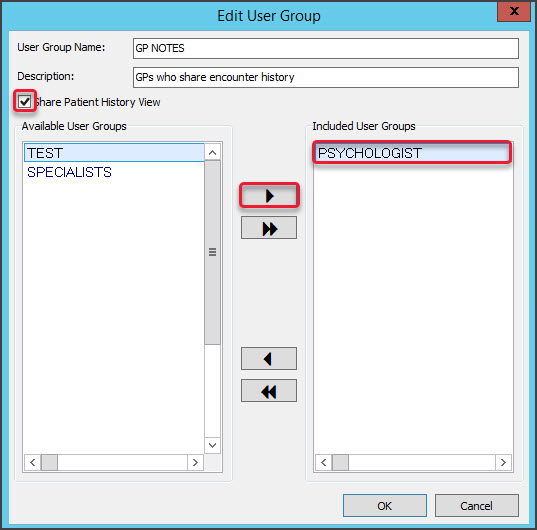
- Open the group used by the doctors.
- Tick Share Patient History View.
- Select the PSYCHOLOGIST group.
The section above explains how to create a group. - Select the arrow to add the PSYCHOLOGIST group to the right pane.
- Select OK.
On the screenshot below, members of the Psychologist group can see the notes of members of the GP NOTES group - but members of the GP NOTES group can not see the notes of members of the PSYCHOLOGIST group.


