Send an internal email safely and securely. You will receive a notification when mail arrives, and you can link a message to a patient's record and add the message to a patient's history.
Overview
You can open Intramail from the Zedmed Office landing page by pressing F7. Users are notified if they have unread emails when they log in or refresh the Waiting Room list (for doctors in their rooms). The number of unread Intramails for a user will appear in the bottom left corner of the main menu.

In Office, a notification will pop up when you have new mail. In Clinical, Intramail notifications will appear when you log in and out. Popups don't appear in Clinical to avoid interruption during consultations, but you will see unread Intramail in the Clinical notification bar on the bottom left.

Send an Intramail
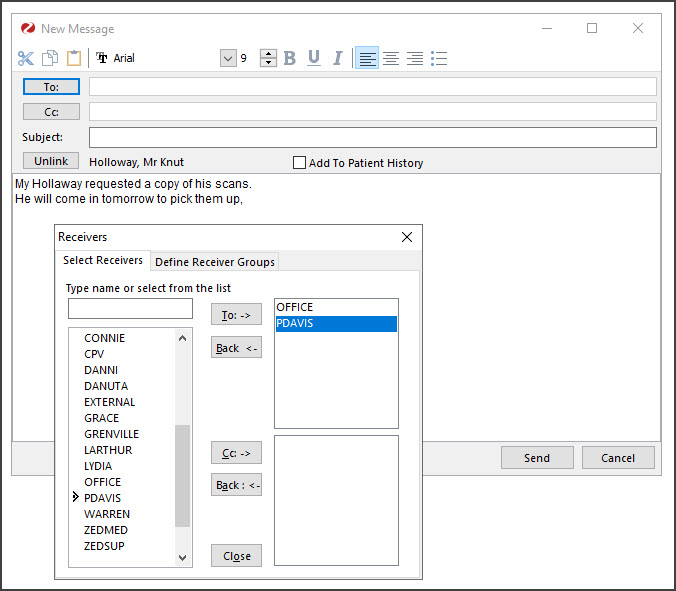
To send an Intramail:
- If Intramail is not open, press F7 to open it.
- Select New.
The Receivers screen will appear. - Select the username you want to Intramail
- Select the To button.
Repeat for any recipients you want to include.
Use the Back button to remove a username. - Select Close.
- Enter a Subject for the Intramail and then your message.
- You can also include either of these features.
Link the message to a patient
This feature links the message to a patient's record, making it easy to open. Just select the Link button and use the Find Patient screen to Find and select the patient. To learn more, see the Find a patient article.
Add the message to the patient's history
This feature adds the message to the patient's History View if the patient's record is linked to the message. Just select the Add To Patient History tickbox and the sender, recipients, subject and content will be added to the patient's history. - Select Send.

Intramail Search
Zedmed v36.3.1 and later includes a mail message search function.
To search for mail messages:
- Select the Search icon on the Intramail menu.
- This will display the search criteria.
You can use the Search button to toggle the search options on and off. - Define the search criteria.
Multiple search criteria can be used in a single search.
The Clear button will remove all current search criteria.
The Show Deleted button can be selected to include deleted mail.
The options are:- From: Enter the sender's name or part of their name.
- Date Range: Tick this box and use the From: and To: fields to specify the date range to search.
In Clinical, a date range is applied by default. - Subject: Select Starts with or Contains then type in the applicable words.
You can use partial words and the text is not case sensitive. - Link Patient: Use the button to select a patient and search for mail with that patient attached.
- Select the Inbox or Sent Items tab
- Select the Search button.
All matching mail items will be displayed.
Select Search each time you change the criteria.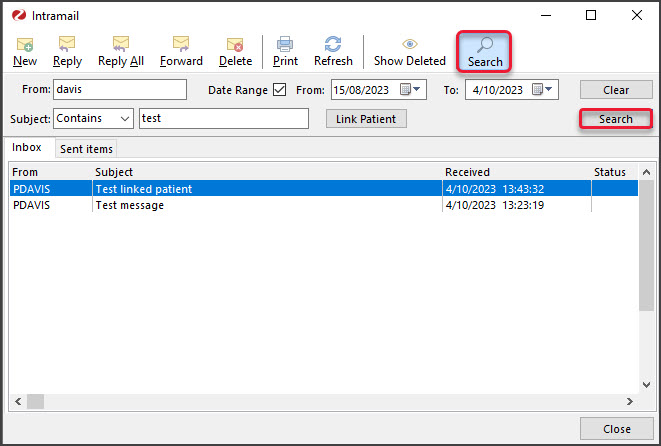

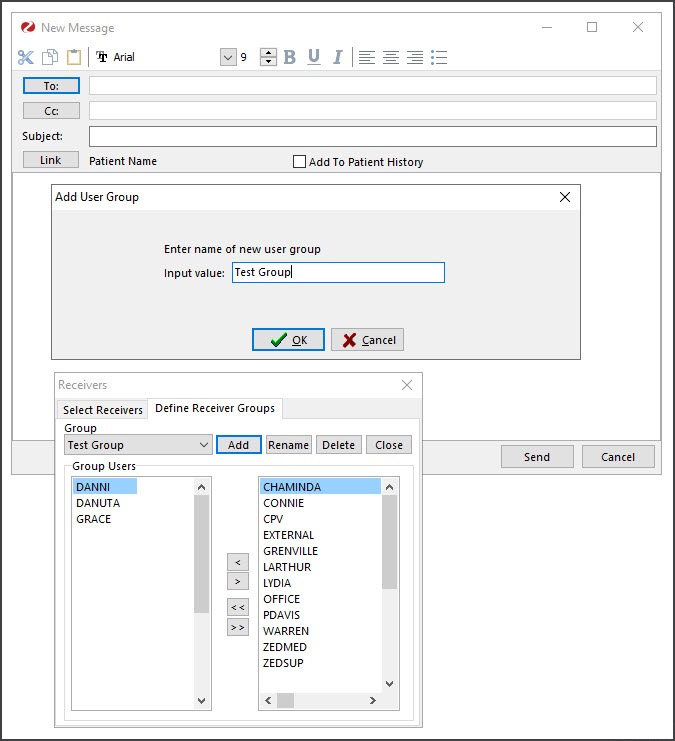
Create an Intramail group
You can create Intramail groups to send mail to a group of users, such as reception.
To create a group:
- If Intramail is not open, press F7 to open it.
- Select New.
- Select To:
The Receivers screen will appear. - Select the Define Receiver Groups tab.
- Select Add.
The Add User Group screen will open. - In the Input Value field, enter a name for the group.
- Select OK.
The Group field will show the name of the new group, and the left pane will be empty. - Add a user to the group by selecting the user and then the left-pointing arrow to move them into the left pane.
Repeat this for all group members. - Select Close to save the group.