Secure Send uses email or ZedSMS to send invoices, referrals and documents to a patient or next-of-kin Account Payer using a link to a secure download page.
Resources
- Secure Send FAQ for patients.
- Secure Send integrations request form.
- Practice Manager implementation guide *
- Address Book and template requirements. *
* These guides explain how to set up laboratory templates for Secure Send referrals.
Considerations
- Documents will be available in the Secure Send portal for 14 days.
- If multiple documents are sent within 15 minutes, one notification will be received to give access to all documents.
- Printing a document sent to a mobile phone may pose problems for some patients.
- There is no cost to use Secure Send via email. If you use ZedSMS, you will pay the cost of the SMS message.
Secure Send video guide
Sending referrals
To send a referral:
- Follow the standard pathology, radiology or referral letter process.
- For radiology and pathology:
- Select an addressee that uses the "Zedmed Default" template.
- The Order Test button will add the referral to the Today's referral section.
- For referral letters:
- After selecting File > Distribute, review the Send to Patient section.
- Choose a Recipient email or recipient mobile.
- You can also use Distribute to send it electronically to the referral recipient with secure messaging.
- Select OK to add the referral letter to the Today's referral section.
- Select Secure Send.
- The Secure Send button will open the Send screen for the referral in the Today's Referrals section.
- Multiple referrals will open in the tab's order (Pathology, Radiology, Letter), not the order in which they are listed.
- Review the Send dialog.
- The title will show the name of the referral being sent.
- Select Recipient Email or Recipient Mobile, depending on the patient's preference.
Additional recipients can be added using a comma between email addresses and mobile numbers.
Caution - if an incorrect email or mobile number is used, the unintended recipient will be able to view any documents in the download portal. - Optional: Copy TO Mobile or Copy To Email fields.
You can add recipients to the Copy fields if they have a valid email address or mobile in the Clinical Address Book.
To remove a CC: use right-click > Remove.
Note: This is different to the referrals Copy To field used when you want to notify a practitioner of the requested test.
You can use the Address Book's HealthShare directory for email delivery, not for SMS. - Optional: Pin not required (v37 and later)
Overrides the one-time security code requirement - the code sent to the patient to open the portal and access the sent files.
- Select Send.
A message will display that includes the text 'Delivery successful'.
The patient will receive a link to download the referral, which will be useable for 14 days, as explained in the section below.
If a laboratory referral addressee does not have the pathology or radiology template, 'Template not found' will appear.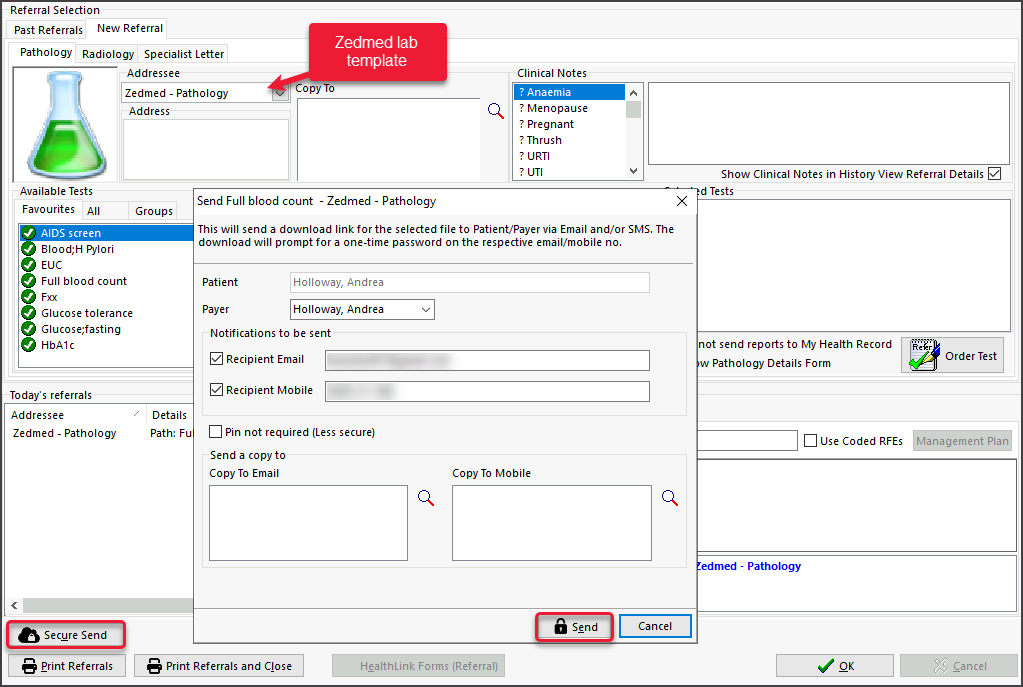

Sending letters
Practitioners can send referral letters and documents, such as management plans and medical certificates, using Secure Send.
To send a letter or document:
- Follow the normal process for a referral letter or a quick document.
- Select File > Distribute.
The Print/Send screen will open with a section called Send to Patient.
The patient's name will be shown, and the payer will be the patient or 'NOK Account Payer'. The notification will be sent to the payer. - Select Recipient Email or Recipient Mobile, depending on the patient's preference.
- Optional: Copy TO Mobile or Copy To Email fields.
To add additional recipients using these fields, they must be in the Clinical Address Book and have a valid email address or mobile number. To remove a CC, right-click > Remove.
You can use the Address Book's HealthShare directory for email delivery but not for SMS. - Optional: Pin not required (v37 and later)
Overrides the one-time security code requirement - the code sent to the patient to open the portal and access the sent files. - Select OK.
A message will display that includes the text 'Delivery successful'.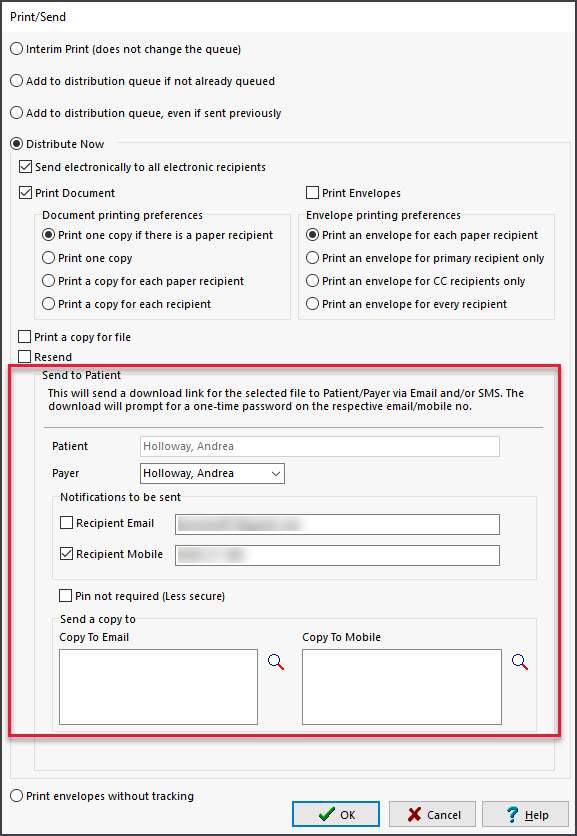

Sending invoices
A patient's invoices can be sent electronically to the patient if they are the payer. This is done in the New Invoice screen or later from the patient's Account Enquiry screen.
Third-party payers can have their email or mobile number typed into the fields provided, and additional recipients can be added using a comma between email addresses and mobile numbers. This should be done with caution because if an incorrect email or mobile number is used, the unintended recipient can view any patient's documents in the download portal, including letters and referrals.
To send an invoice:
- Follow the standard invoice creation process to create and fill in the new invoice.
- Select Send to Patient.
The Send Invoice dialog will open.
The patient's name will be shown, and the payer will be the patient or 'NOK Account Payer'. The notification will be sent to the payer.
Note: If you select the down arrow by Send to Patient, you can access the original Email as Attachment option. - Select Recipient Email or Recipient Mobile, depending on the patient's preference.
- Optional: Pin not required (v37 and later)
Overrides the one-time security code requirement - the code sent to the patient to open the portal and access the sent files. - Select Send.
A delivery success or failure notification will display.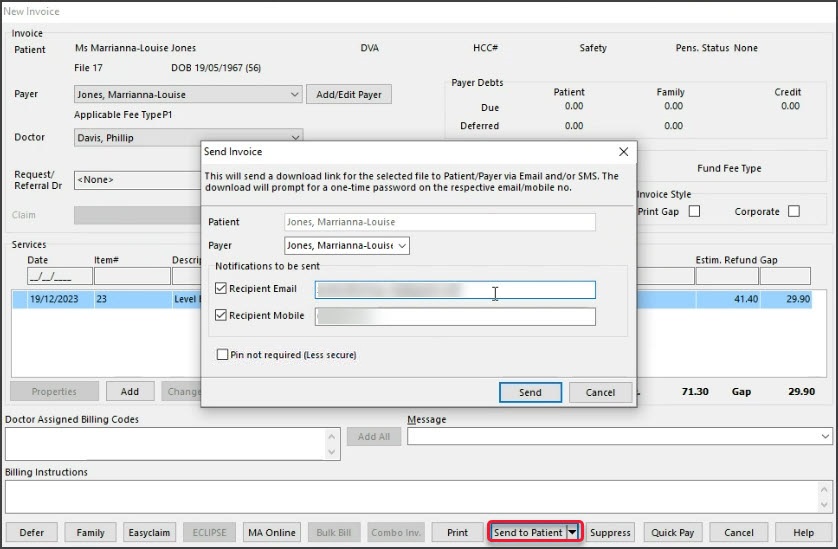

To send an invoice at a later time at the patient's request:
- Open the patient's record.
- Go into Account Enquiry.
- Select Send to Patient and follow the process outlined above.
Sending from Batch Writer
Secure Send is provided as a right-click option for each letter in Clinical's Batch Letter Writer. This allows the letter to be sent to a specific patient's email address.
To use Secure Send:
- Right-click the patient's name under the letter and select Distribute.
- Review the Distribute Now options and untick any not required.
- Select the recipient's Email or Mobile.
- Use Copy to add other recipients.
- Select OK.

Sending from Summary Views
Secure Send can send documents from a patient's Summary Views tabs. Zedmed v36 and lower only support Referrals.
- Summary Views > Referrals.
- Summary Views > Images (can send supported image files).
- Summary Views > Attachments.
- Summary Views > Results (right-click View Results > Send to Patient).
To send from Summary views.
- Right-click the letter, document or file.
For Results, right-click View Results. - Select Send to Patient.
- Select Send on the Send dialog.

For security reasons, some files (exe, dll, etc.) cannot be sent, as shown in the restricted list below.
Sending from Results Inbox
With Zedmed v37 and later, you can send patient results from the Results Inbox.
- Select the result.
- Select the Send to Patient button.
The Secure Send dialog will open. - Select Recipient Email or Recipient Mobile, depending on the patient's preference.
- Optional: Pin not required (v37 and later)
Overrides the one-time security code requirement - the code sent to the patient to open the portal and access the sent files. - Select Send.
A delivery success or failure notification will display.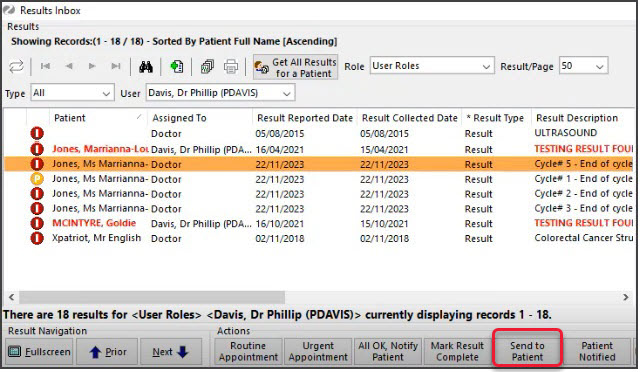

How a patient uses Secure Send
The patient will receive an email or SMS with a link to the document followed by another message with a security code to enter into a security prompt. The link will be valid for 7 days.
The steps are as follows:
- Open the first email or SMS message from the practice.
There will be a Download link in the message.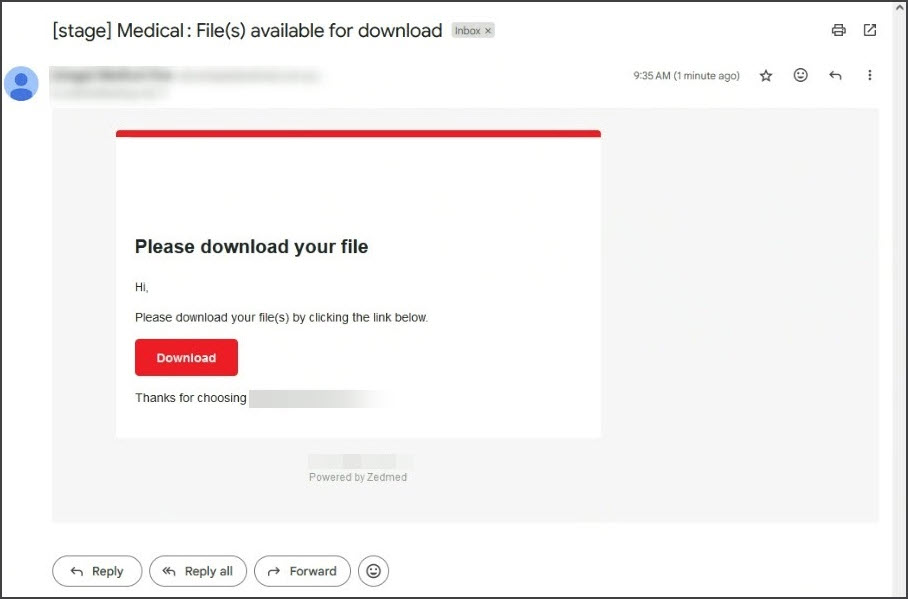
- Select the Download button.
You will be presented with a 6-digit security code prompt.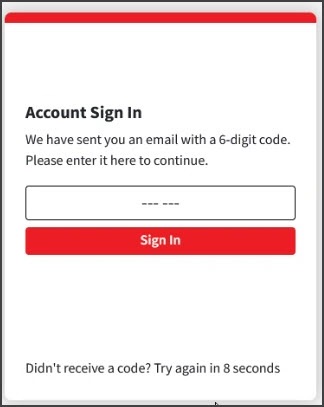
- Open the second email or SMS with the security code.
This will be delivered just after the message with the download link.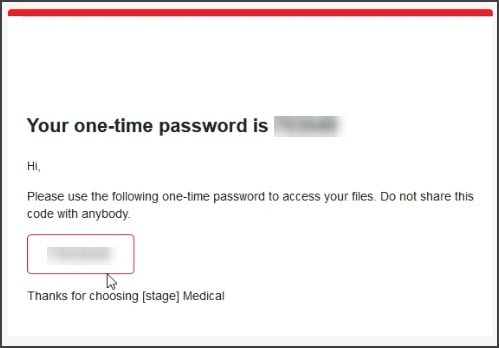
- Copy or type the code into the prompt.
- Select Sign In.
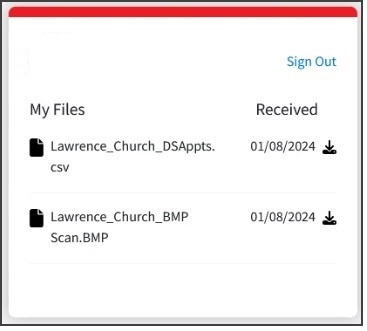
Your Secure Send portal will open and show all the files sent to you in the last 7 days.
The filename format is <Patient Given Name><Patient Family Name><File Name>. - Click on the file to open or use the down arrow to download it.
A download lock will apply for 30 minutes if you download multiple files quickly.