Use the Immunisations module to record a vaccination for a child under the age of ten. The immunisations will be mapped to ACIR for reporting.
Record a child vaccination
Vaccine stock is updated when the vaccine information is entered in the Immunisations module. This process is important as the vaccines need to be correctly recorded and the stock updated as they are used.
To record the vaccination:
- Start an encounter with the patient.
For a detailed explanation of how to do this, see the Start an encounter article.
When the encounter starts, the Current Encounter section will open and display the clinical modules. - Select Immunisations from the Current Encounter menu.
The Child Immunisations Schedule will open.
This contains the Medicare schedule for child immunisations, grouped by age and state. An indicator arrow shows the child's current age.
The schedule can be used to :
- Identify and Add the required vaccination.
- Select and Delete a vaccination.
- Select and Modify a vaccination.
If the dose is not correct, the immunisation must be deleted and added to the correct part of the schedule.Note: If a combination vaccine is modified or deleted, the changes will apply to all immunisations the vaccine has been recorded against. This is especially relevant for Childhood Immunisations that form part of the ACIR schedule.
- Select the immunisation to be given.
- Select Add.
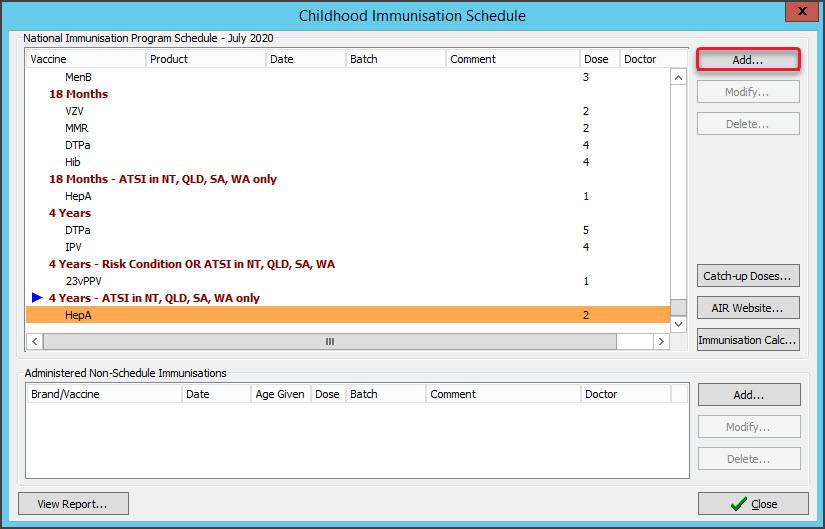 The Child Immunisation screen will open, with the vaccine selected.
 - Select the Not Given Here box if you're recording a vaccination that's already been given somewhere else.
- In the Name field, select the doctor administering the vaccination.
- In the Brand/Vaccine field, use the drop-down list to select the vaccine.
Typing the vaccine's name helps locate it, and if the vaccine has a linked sub-product, it will appear beside the product name.
Selecting Manual allows you to enter a vaccine that's not on the list.
If the clinic is using Zedmed Stock Management, the vaccine selected must have an entry in the right column as shown in the screenshot below. This is the product's name in the Stock Management system and stock will be adjusted as vaccines are dispensed when this option is selected.
- If applicable, select Include non-ACIR coded vaccinations.
- Fill in the vaccination details:
- Enter the Date.
- In Dose, enter 1 or 2 to indicate if it was the 1st or 2nd vaccine dose. This information will be passed to AIR.
- Enter the School ID if vaccinations are being administered at an ACARA school.
- In the Batch Number field, use the drop-down to select the correct batch.
Important: Always check the vial label to make sure the batch number you selected is correct. - In the Site field, select where the vaccination was given.
- Select the Route from the options provided.
- Select the Vaccine Type. This must match the vaccine selected. A mismatch will require the vaccine to be re-selected.
This mandatory field is in Zedmed v36.5 and later and is required for government compliance - in effect March 2024. - Enter information into the Comment field if required.
For example, you could use the Comment field to enter the batch number and expiry date for additional verification.
- Use the Add Recall button to set up a reminder for the patient's next vaccine.
To learn how to do this, see the Add a Recall section below. - Select OK to save the vaccination record.
A tick will appear next to the Immunisation in the Child Immunisations Schedule. - If there are more vaccinations to give, select Add and repeat the steps.
- When the last vaccination has been given, select Close to save and exit.
The record will appear in the Administered Vaccinations screen, the History View and the Summary View.
When you end the encounter, remember to Bill for the vaccine used.
The practice will upload the immunisation to AIR.Note: If a mistake is made, you can delete the product from the Administered Vaccinations screens by selecting the item then selecting Delete. This will put 1 of that item back into stock.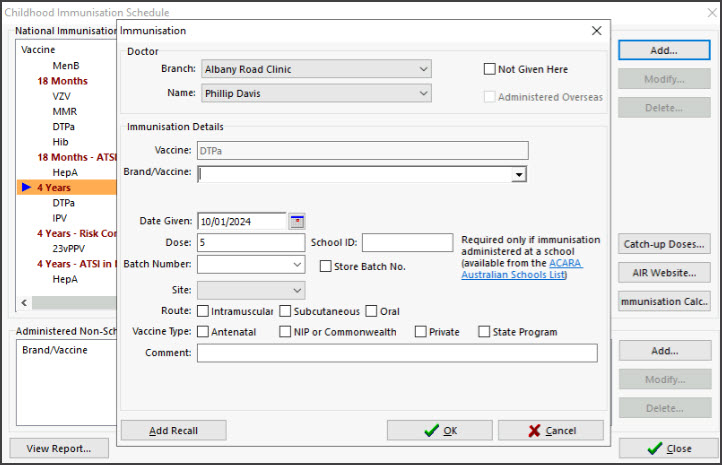

 The Child Immunisation screen will open, with the vaccine selected.

Add a Recall
Add a recall for the patient to come back for their next vaccination. These steps explain how to add a recall from the Immunisation screen as referenced in step 11 in the section above.
To add a recall:
- Select the Add Recall button.
The Recalls screen will open. - Select New.
The Recall Property - New screen will open - Select the Recall Type from the list.
This will automatically add a Maturity Date for the patient's next vaccination.- The Recall Type is set up for the practice. To learn more, see Recall Management.
- The Attendance Date will be filled in when the patient returns for their next vaccination.
- The First Letter and Second Letter fields show reminders sent by the practice.
- Add any Recall Notes.
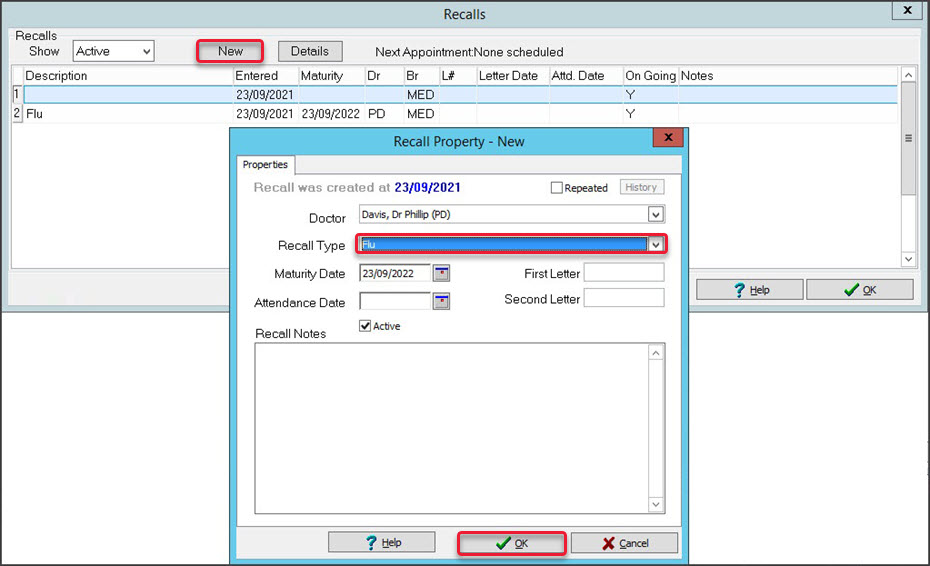
- Select OK to save and exit.
The recall will be added to the Recalls screen
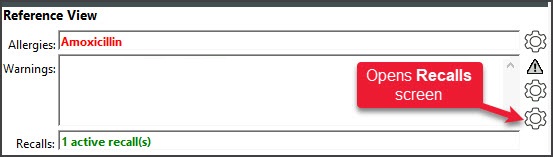
A notification will appear in the Reference View, and the icon will open the Recalls screens. From the Recalls screen, you can right-click a recall when the patient comes in and set the current day's date for the attendance.