The Batch Letter Writer is Zedmed's recommended letter writer for Clinical and Office staff. It can be used to write both individual letters and batches of letters using standard and custom letter templates. The batching feature is ideal for Specialists who dictate a separate letter for each patient, as it allows those letters to be reviewed and distributed in bulk.
Requirements for letters sent using a secure messaging service:
- Letter recipients must be set up in the Clinical Address Book with the secure messaging service they use.
- Zedmed supports the HealthLink, Medical Objects and Promedicus secure messaging services.
- The practice distributing the letter must be set up with the same secure messaging service as the recipient.
Write a single letter
Clinical and Office staff can both access the Batch Letter Writer from the clinical menu without opening a Patient.
To write a letter:
- Go to Zedmed's Reception tab.
- Select Clinical Records.
The Zedmed Clinical console will open. - Select Batch Writer from the main menu.
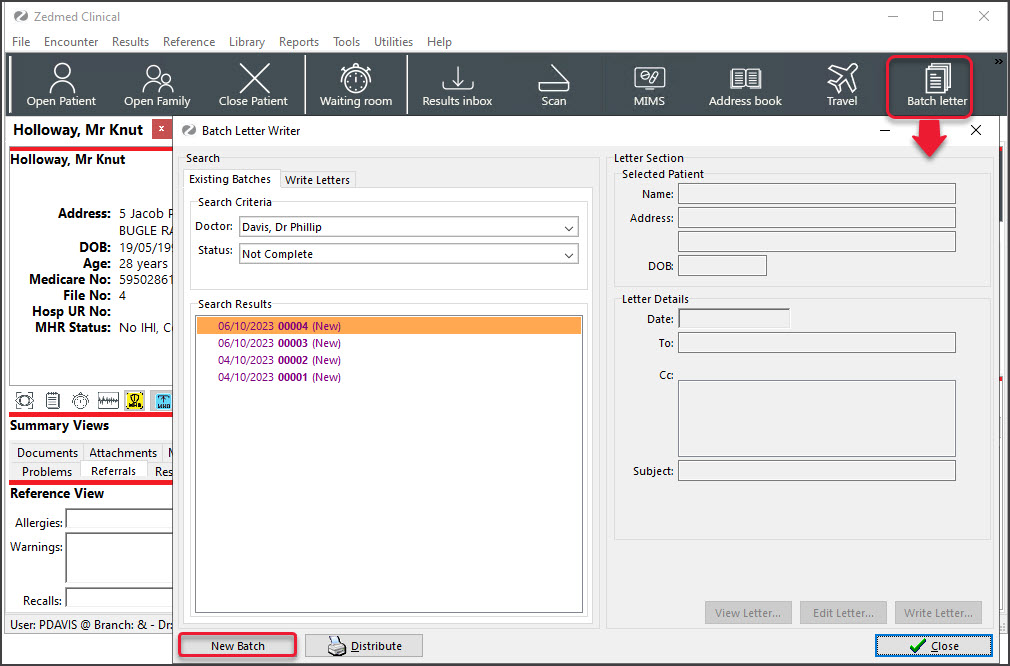
The Batch Letter Writer will open.
- Select New Batch.
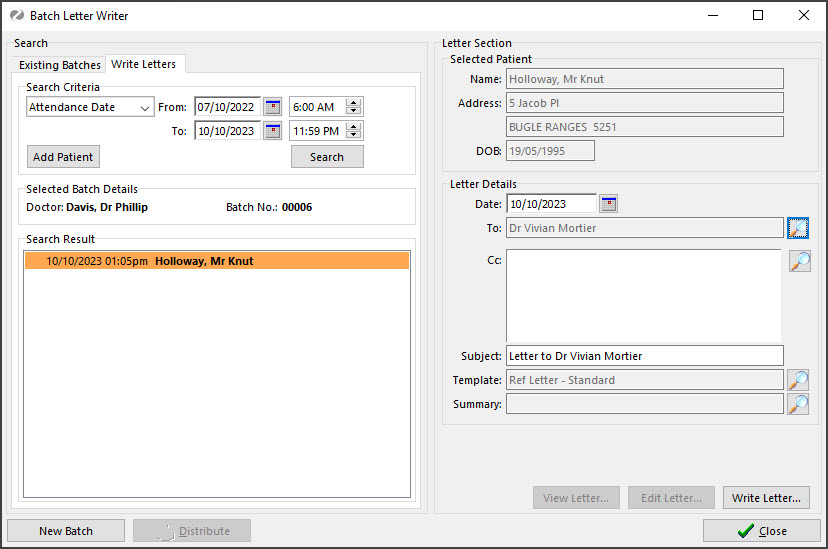
This will select the Write Letters tab.
- Select Add Patient.
- Use the Find Patient screen to locate and select the patient the letter is about.
This will populate the Selected Patient section. - Add the To (recipient).
You can add an addressee from the practice Address Book or HealthShare. You can set your preferred default.
Address Book
Contains practice-defined addressees, which can be set up for secure messaging. To learn more, see the Address Book guide.
a) Enter the specialist's family name into the Name field and select Find.
You can view all the recipients available by selecting Find and leaving the Name field blank.
b) Double-click on the specialist's name to add them as the Addressee.
Healthshare Directory (Zedmed v36.3.3 or later)
Printed referrals for specialists and allied health providers. For detailed instructions, see our HealthShare guide.
a) Type in the Practitioner name, Practice name or Specialty name.
b) Select one of the results displayed to add it as an Addressee. - Use the Copy To field if you want to cc another practitioner.
- Review and update the Subject if required.
- Select the Template icon and select the clinical template for the letter.
- Select Write letter.
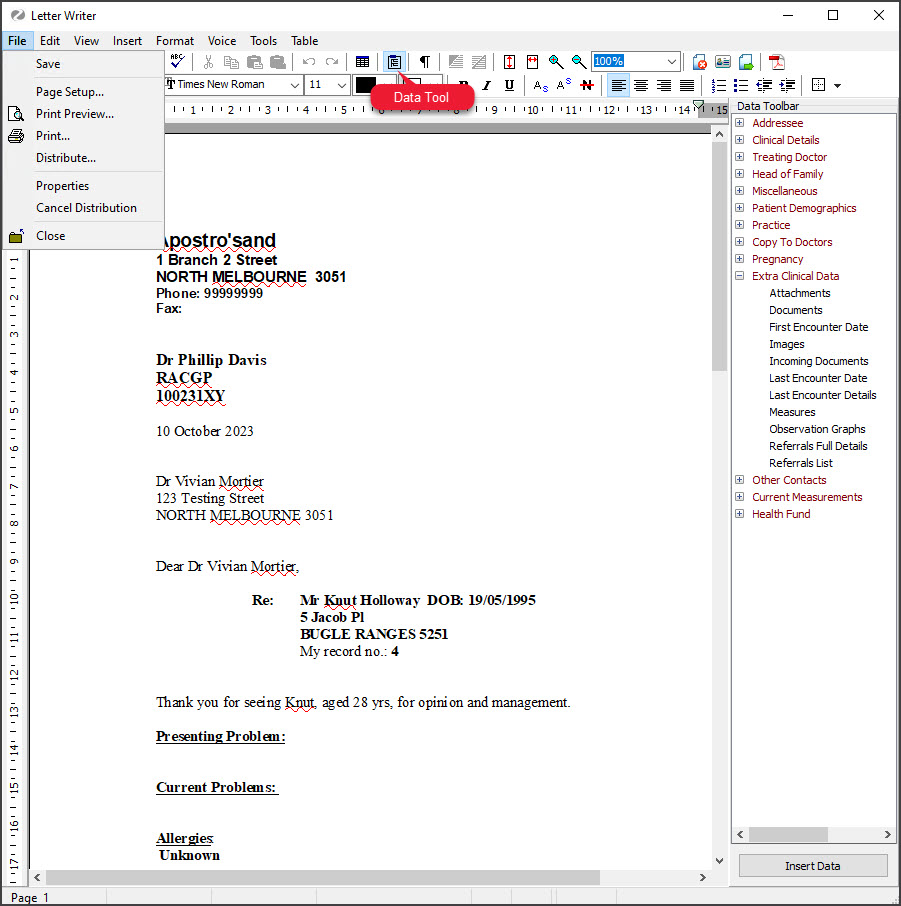
The Letter will open in the Zedmed editor. - You can add clinical information as follows:
- Select View > DataToolbar.
- Locate the clinical information by expanding the categories.
- Select a space on the letter
- Double-click the information you want to add.
If the option you selected has no information, nothing will be added.
- Add any clinical results as follows:
- Select View > DataToolbar.
- Expand the section called Extra Clinical Data.
- Double-click Documents,Images or Incoming Documents.
These contain results based on how Zedmed received them. - Select the result you want to attach.
- Click OK, and the selected item will be attached to the letter.
- Other options for the letter:
Auto Text can be selected from the Tools menu, which allows you to add pre-written text to the letter.
The PDF icon on the top right will export the letter as a PDF.
- When you have completed the letter, you can:
- You can now print the letter or send it electronically.
To print the letter:
a) Check the printer contains the correct paper.
b) Select File > Print.
c) Select Close.
d) You will be prompted to save the letter.
The letter will be saved in Summary View > Documents > Letters.
To send the letter electronically:
a) Select File > Distribute > and select Correct on the dialog.
b) Select Yes when prompted to save the document.
c) Check that Send electronically to all electronic recipients is selected.
d) Select OK.
The letter will be sent, and you can use the Outbox Viewer to see the messages you sent.
Manage Letter Batches
The section above explains how to create a clinical letter. This section describes the Batching functionality and how to use it.
Letter Batches can have three statuses - New, Under Review and Complete. Letters/Additional letters can only be added to a New Batch. A batch can only be changed from Under Review to Complete when all the letters have been marked as Correct.
Individual Letters may have three statuses (Not checked, Incorrect and Correct).

Step 1: Create a New Batch of letters
On the Existing Batches tab, select the doctor for the new batch first and then click on the New Batch button to start a new batch.
You will automatically switch to the Write Letters tab. Select the Appointment (Bookings) or Attendance (Arrivals) Search Criteria and the From/To date range to source a list of relevant patients for the batch. Click on the Search button.
Patients can be removed from the batch using right-click. Extra patients can be added to the batch using the Add Patient button. This does not affect other batches or the patients’ appointments.

Listen to the tape to identify the first patient letter and click on that patient's line. Using the Magnifying Glass icon, add the addressee to the letter, add any Copy To doctors and confirm that the Template is correct. To change these entries, click on the magnifying glass next to the relevant field and select the appropriate entry. Then click on the Write Letter button.
The Letter Writer will display the merged WP template so you can continue typing the body of the letter. When you close the letter, you will be asked if you wish to save it. The Current Letter Status defaults to To be Reviewed (either of the other two statuses can be selected) and is saved against the letter. It will be added to the Letter Batch with a ? beside it, implying that it is Not checked yet.
Select the next patient in the Appointment/Attendance list and type the next letter. If no letter has been dictated for a patient on the Appointment/Attendance List, just right-click on that patient and Remove the entry.
If a letter has been dictated for a patient whose name does not appear on the Appointment/Attendance list, you can use the binoculars at the top of the Patients tab to Search for the patient and add them to the list.
When all letters in the batch have been typed, you can return to the Batches tab, your batch will be refreshed with the list of letters written, right click on the batch and change its status from New to Under Review.
To change the default Template, go into My Options > General tab then, in the Default Template section, search and select the template required.
Step 2: Doctor reviews the typed batches
The doctor can now be advised that the batch of letters is ready for review. If they do not have a screen on their desk, then the secretary can do a draft print run by printing out all of the letters on plain paper for manual correction (without the letters to Copy To doctors).
Assuming the doctor has a screen available, they enter the Zedmed Clinical and select Batch Letter Writer. On the Batches tab, the batches in progress (New and Under Review) will be visible. The doctor right-clicks the header line for the Batch and chooses Review all Non-Correct Letters, whereupon each letter will be displayed in turn in the Letter Writer system. The specialist can make and Save corrections when exiting each letter, then change the Letter Status to Correct or Needs Correction if further editing is required.
When all letters are marked as Correct, the doctor will advise the secretary that the batch is Corrected and ready for printing and/or electronic distribution.
Step 3: print the batches
The secretary can then right-click on the batch header line and either right-click and select Distribute Batch or simply click the Distribute button at the bottom of the Batch Letter Writer. The Print/Send form will appear to allow the distribution options to be selected. Including the number of copies, whether to print envelopes and whether to send electronic letters. These options can be defaulted for each user.

Individual letters can also be printed and sent as required by right-clicking on the letter in question within the Batch and selecting Distribute Letter. Envelopes can also be printed separately for either an entire batch or an individual letter.
To print envelopes for an entire batch, highlight the Batch Header Line and either click the Print Envelopes button at the bottom of the Batch Letter Writer window or right-click and select Print Envelopes.
To print an envelope for an individual letter, highlight the letter within the batch and either click the Print Envelope button at the bottom of the Batch Letter Writer window or right-click and select Print Envelope.
The envelope layout is for a DL-size envelope.
Batch Distribution Status
To confirm whether or not a letter has been printed or emailed, right-click the batch in the Existing Batches tab and select Batch Distribution Status so that it can be established whether or not the letter has been printed or emailed.

There is a legend on the right to assist in interpreting the icons used.
From here, individual letters and recipients can be selected for distribution by ticking the relevant check boxes associated with each letter.
Example of a batch letter workflow
The following sequence explains the batch writer workflow:
- The specialist/Doctor sees the patient and dictates a letter during a consultation or when the patient has left.
- The typist receives dictation from the doctor and selects Zedmed Clinical Batch Letter Writer.
- Typist calls up a list of patients seen by the doctor, extracted from the Zedmed Office Appointments or Attendance (Waiting Room) lists. Once the date and time filters are applied, select Search
- The typist starts a "New" Batch of letters, picks a patient from the list and selects the first/relevant patient to type a letter.
- The typist picks the second and subsequent patients from the list and types the letters for that batch. The letters are automatically indexed and stored in each patient's Documents Summary folder of their medical records for future review.
- The typist changes the Batch Status from "New" to "Under Review" and advises the doctor that the letters are now available for checking electronically (or the typist can bulk print all letters onto plain paper for the doctor to correct manually).
- The doctor enters the Zedmed Clinical program, selects Batch Letter Writer and calls up the batch of letters just typed. The doctor reviews each letter on the screen and makes minor changes to letters, as required, marking letters as "Correct" (green tick) or "Needs Correction" (red cross). The doctor advises the typist that the batch of letters has been reviewed and marked as correct or requiring correction.
- The typist calls up the batch, makes any further corrections and repeats this process until all letters are marked as "Correct."
- The typist then prints the whole batch in one print run, and the Batch Status is changed to "Complete."
(Electronic sending can also be done in this stage)
Using Secure Send
Secure Send is provided as a right-click option for each letter. This allows the letter to be sent to a specific patient's email address. Learn more.
To use Secure Send:
- Right-click the patient and select Distribute.
- Review the Distribute Now options and untick any not required.
- Select the recipient's Email or Mobile.
- Use Copy to add other recipients.
- Select OK.

Troubleshooting
Review the following considerations to avoid issues with your batch letters.
- Ensure that completed batches are marked complete to avoid loading unnecessary batches every time the batch letter writer is opened. This can significantly slow the opening of the Batch Letter Writer.
- Editing or deleting letters can only be completed when the Batch has a status of New or Under Review. If the incorrect letter appears in a complete batch, the batch status can be changed to Under Review while the amendments are made to the batch.
- If a letter has been typed for the wrong patient, a listing of the correct patient should be created in the batch (using the Binocular Icon) if they do not already appear. The letter with the incorrect patient details is then opened, the relevant bits copied (highlight, right click and select copy, or press Alt A to select all) and pasted into a letter created for the correct patient.
- To add additional letters to an existing batch, ensure that the required batch is highlighted on the Existing Batches Tab before you click on the Write Letters Tab. The highlighted batch will have the letter added to it.
- If the site has been set as a GP site, the date (in the Letter Details pane on the right-hand side) when writing a letter defaults to 31/12/1899.
- If you close the Batch Letter Writer and go back into it without closing down Zedmed Clinical, the list of patients found in the Writing Letters tab will still be displayed. If you close Zedmed Clinical and re-open it, the list will have been cleared, and when you search for it again, any patients who have had letters written will appear in black again.


