Create an invoice for an inpatient covered by a health fund, charge for any gap, then submit a claim.
Important: Eclipse updates for Medicare Assignment of Benefit (AOB) changes
On 1 July 2026, new Medicare Assignment of Benefit (AOB) requirements come into effect and these changes impact the process by which a patient gives consent, or “assigns”, their Medicare benefit to the health fund. To comply with the changes, Zedmed's ECLIPSE billing will require selecting either Implied Assignment or Requested Assignment when submitting a claim. This update will be available in Zedmed v39.5, and covered in step 10 of this guide.
Considerations:
- A Patient Verification for online claims should be performed before ECLIPSE billing .
- The Payer can be the Patient or a Health fund. We recommend the Health Fund, so the fund appears as the payer on reports.
- BUPA ADF does not have an ELIPSE channel. Invoices must be sent externally to the organisation.
- To bill for both a surgeon and an assistant, create two invoices. To learn more, see Assist Doctor Billing.
To bill a patient and submit a fund claim:
- Go to Zedmed's Reception tab.
- If there is no booking in the Appointment Grid, select the Bill menu from the Patient Record.
If there is a booking, use the Appointment Grid or Office Waiting Room to right-click the patient and select Bill.
The New Invoice screen will open. - Review these fields:
- Payer - select the Health Fund (or the Patient).
- Branch - the Branch the user is signed into displays by default and is selectable if billing from the Patient Record. The invoice will display the doctor's provider number and the selected branch's letterhead.
- Doctor - ensure the treating doctor is selected.
- Referral Dr - has the relevant referral selected.
- Add the service items to the invoice.
If the Doctor Assigned Billing Codes field has item/s added by the practitioner, select Add All to add the codes.
To add manually, enter the item code into the Item# field, press Tab to populate the fields then select the Add button.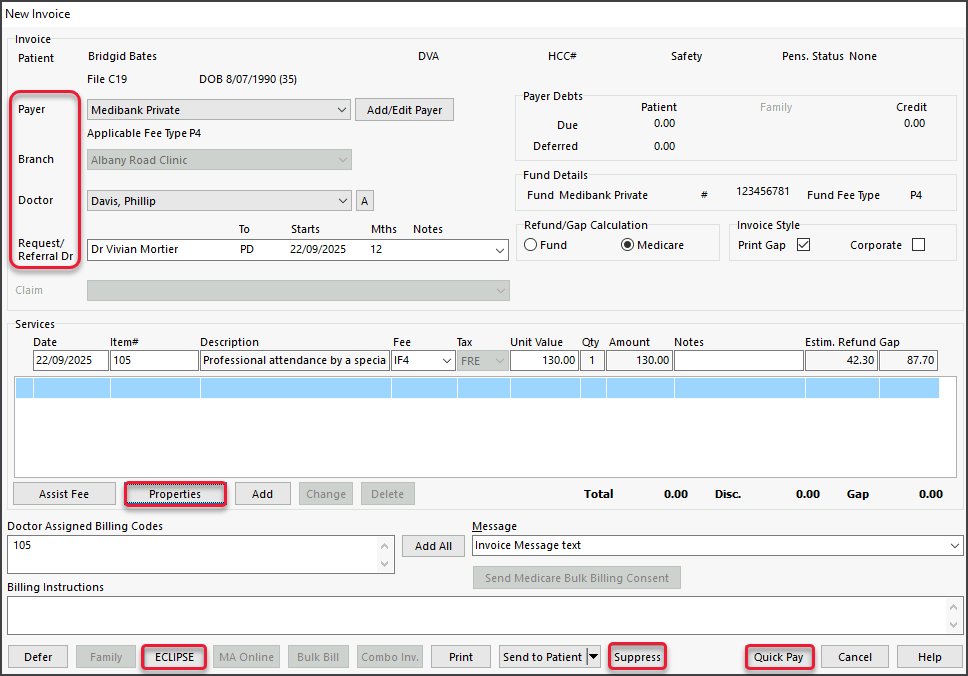
• To modify a service, select it and select Change. This will place the service into the editable fields.
• To delete a service, select it and select Change, then select Delete. - Select Properties:
- Select the Hospital/Site the patient attended and, if applicable, tick Is the patient admitted in the hospital.
If the site is configured as a Hospital, this box should be ticked by default. - Review relevant settings such as Patients seen and Indication flags.
- If the item is radiology or pathology, the LSPN and Specimen Collection Point fields may be automatically populated.
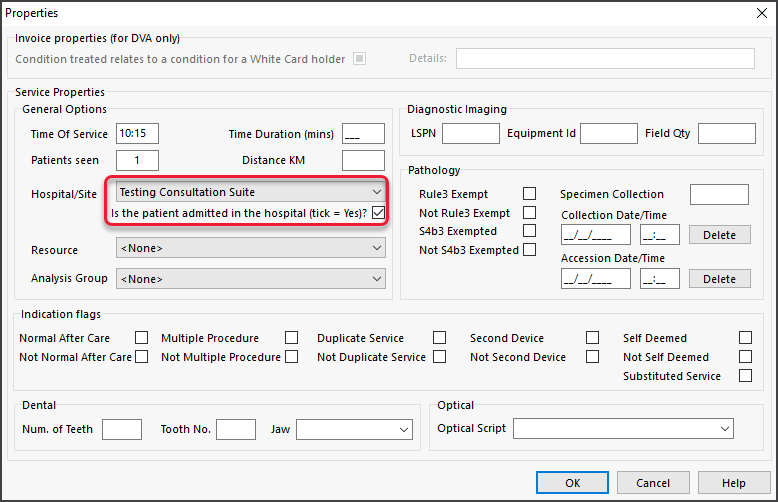
- Select OK to return to the New Invoice screen.
- Select the Hospital/Site the patient attended and, if applicable, tick Is the patient admitted in the hospital.
- Action Gap fee if applicable.
• If no Gap Fee, proceed to step 7.
• If Gap Fee, complete these steps, then proceed to step 7.- Select the Quick Pay button on the bottom right to open Quick Pay (screenshot below).
- Select Gap.
- Select a payment method.
- Select Add.

- Select the ECLIPSE button at the bottom of the screen.
Option: Select Suppress to review and submit the claims at the end of the day.
- Select Yes to the pop-up advising the invoice will be saved.
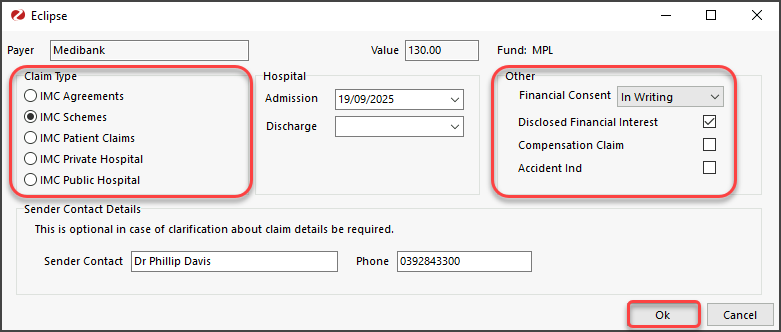
The Eclipse screen will open for review. - Review and update the Eclipse Screen:
- Add the Hospital Admission/Discharge date/s - admission date is mandatory.
- Under Other, make a selection for Financial Consent - this is mandatory.
- Check that the Claim Type is either IMC Agreements or IMC Schemes.
- The Claim Type will default to the setting in the Doctor Fund Schemes table.
- If the incorrect type is selected, correct it as shown in the Specialist section of the Eclipse guide before submitting
- If it is transmitted as a patient claim, the practitioner's cheque will go to the patient to bring in.
- Review the options under Other if the practitioner has Disclosed Financial Interest or if the claim is the subject of a Compensation claim (this will default depending on whether it’s an Agreement or Scheme).
-
Assignment of Benefits
To comply with the changes, Zedmed's ECLIPSE billing will require selecting either Implied Assignment or Requested Assignment when submitting a claim. This update will be available in Zedmed v39.4.-
Implied Assignment -An insurer arrangement applies to the service (e.g., gap cover agreements or MPPAs, etc.). This is an automatic assignment of the Medicare benefit to a private health insurer or approved billing agent. No explicit patient signature or request is required.
-
Requested Assignment - A health fund arrangement does not apply to the service (e.g., contracts relating to hospital accommodation, theatre fees, etc., but not medical services). A manual assignment request by the patient facilitated by the medical provider, hospital or organisation.

-
-
Select Ok to submit the claim.
-
You will get a response advising if the claim was successfully queued for sending. Each claim is sent individually.
If an error occurs, use Patient Record > Acc Enquiry to make any necessary changes to the invoice. - Select Print or Continue (to close the dialog).
Print will print the claim details, including any remittance advice for the patient.
Because this is for hospital billing, ECLIPSE will send the invoice to Medicare, where it needs to be approved before going to the health fund.


