Set up a Tyro terminal to process payments and Medicare claims in Zedmed. This process involves installing Tryo software (called an adapter) that communicates with the Tyro machine (called a terminal) and then configuring Zedmed to use Tyro.
Tyro Terminal Adapter setup
The Tyro Terminal Adapter (TTA) is software that's downloaded from Tyro and installed on each POS workstation that connects to a Tyro terminal. The setup process adds the Tyro Merchant and Terminal IDs to the adapter software then pairs the Tyro terminal to the Tryo Terminal Adapter.
The setup is explained below but the process is a service that Tyro provides for its customers. If you have not been set up, give them a call on 1300 01 8976 . To learn more, see the Tyro website, which includes the following helpful pages: support, Tyro user guide, Zedmed integration.
To configure the Tyro Terminal Adapter:
- Get the Merchant ID and Terminal ID for your Tyro terminal.
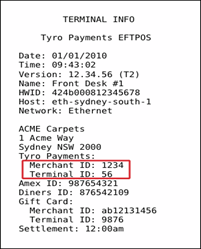
To locate this information:- Press the Menu key on the Tyro terminal's keypad.
- Scroll down to Configuration and press OK.
- Scroll down to Terminal Info and press OK.
- Go to the Windows Control Panel and select Tyro Terminal Adapter.
- Enter the Merchant ID and Terminal ID of your Tyro terminal into the corresponding fields.
- Select the Printing Location you want to use.

- Now on your Tyro terminal:
- Press the MENU button.
- Scroll down to Configuration and press OK.
- Scroll down to Integrated EFTPOS and press OK.
- Scroll down to Authorise POS and press OK.
- Enter your Tyro terminal's administrator password and press OK.
- Immediately perform steps 6 and 7.
- On the Tyro Terminal Adaptor Control Panel, select Pairing tab, then select Commence Pairing.
A pop-up window will open and show a pairing timer. - On the Tyro terminal, press START.
Once the pairing has completed, the timer will disappear and the pairing status will change to Pairing Key Set. - In the Tyro Terminal Adaptor Control Panel, select Verify Key to confirm the terminal is paired.


Practice setup
Tyro needs to be selected as the Integrated Eftpos / Easyclaim provider on one of the machines running Zedmed. This can be a workstation or server.
To set Tyro as the POS provider:
- Go to Zedmed's Management tab.
- Select Practice Setup then select Practice from the list.
- In the Integrated Eftpos/Easyclaim provider field, select Tyro.
- Select Automatically Process Tyro Bulk bill transactions if you want Zedmed to auto-download the report and payments from Medicare.
- Select Close to save and exit.


Workstation setup
Every workstation running Zedmed needs to have Tyro enabled to access the Tyro POS functionality.
To enable Tyro:
- Go to Zedmed's Utilities tab
- Select Third Party Links from the left menu.
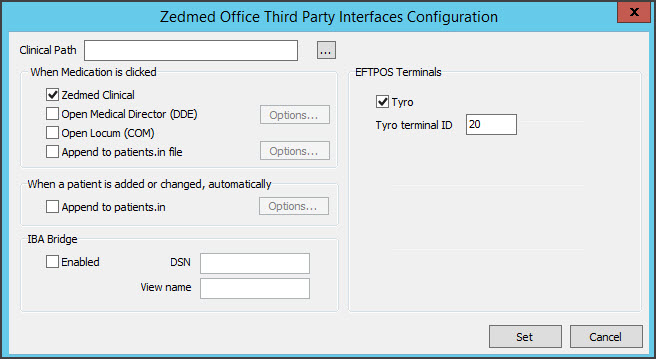
The Zedmed Office Third Party Interfaces Configuration screen will open. - In the Medicare Australia Online Claim section, select Enabled then select Tyro.
- Enter the Tyro terminal ID.
This number is provided by Tyro. - Tick the Tyro checkbox. This indicates that Zedmed is now configured to send and Process Claims as Easyclaims to Medicare via Tyro.
If Tyro does not have a tick, then patient claims will be sent to Medicare Australia online via normal MA online claim channels. - Select Set to save and exit.

Note: Tyro's Merchant ID and Terminal ID are set by the terminal and can be seen in the screenshot at the top of this article. These IDs are also used in Zedmed's Tyro configurations. The Tyro terminal ID should not be changed in Zedmed. If the practice uses more than one bank account for Tyro, a different Merchant ID needs to be set up for each account in Zedmed, as shown in the next section.
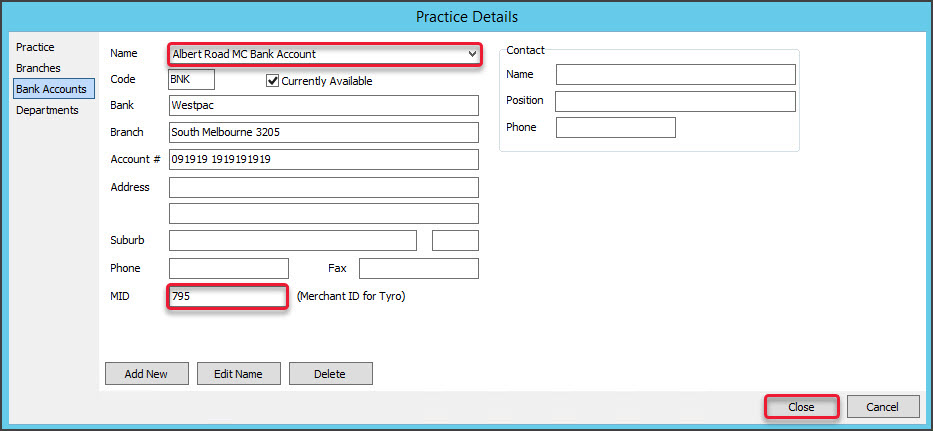
Multiple bank accounts setup
In Zedmed, multiple bank accounts can be set up for practice and each one needs to be configured for Tyro.
To enable Tryo for multiple bank accounts:
- Go to Zedmed's Management tab
- Select Practice Setup then select Bank account > Banklists.
The Practice Details screen will open. - In the Name field, select the bank account
- In the MID field, enter the Merchant ID.
Repeat steps 3 and 4 for each bank account. - Select Close to save and exit.