My Health Record (MHR) provides a secure online summary of a patient’s health information, which authorised Healthcare providers can view and update.
Zedmed can upload Prescriptions and CDA letters to My Health Record during a clinical encounter and an Event Summary at the end of an encounter. A Share Health Summary can be created at any time.
My Health Record (MHR) has a Practice Incentives Program (PIP), and only Shared Health Summary uploads count towards the quarterly requirements. For more information, visit digitalhealth.gov.au.
To learn how patients can manage their MHR and notifications, see the My Health Record FAQ.
Requirements
To update and access a patient's MHR information in Zedmed, the following is required:
- The practice must have its HPI-O loaded in Zedmed and a NASH certificate.
- The practitioner needs an HPI-I number.
- For referrals (CDA letters), Clinical Address Book addressees must have an HPI-I number and an HPI-O for their practice.
- The patient must be registered for MHR and have a valid IHI Number.
- To learn more, see the Zedmed My Health Record setup guide.
Practice Incentives Program (PIP)
There is a Practice Incentives Program (PIP) for Shared Health Summary uploads based on quarterly requirements. To meet the PIP requirements, a Shared Health Summary must be uploaded in full with all sections included.
The Shared Health Summary is manually run, and it is important to ensure that doctors meet their upload quota and follow the upload steps detailed in the Shared Health Summary section below.
To monitor the uploads, we recommend using the My Health Record Uploads report on a regular basis. This report shows how many Shared Health Summaries were successfully uploaded per doctor in a given time frame and is explained in the My Health Record reporting section below.
Authority to access MHR
A healthcare provider providing patient care does not need to seek prior permission before accessing the patient's MHR. My Health Record participation transitioned to opt-out in 2018, as per the MHR Act Schedule 1, Clause 9. Patients can opt-out and manage access to their MHR information. They can also hide or remove specific documents. To learn more, see Digitalhealth.gov.au>Privacy and Access.
Important: When a patient is opened in Clinical, Zedmed accesses their MHR, and patients with notifications on will receive an alert if it's the first time (or first time in 3 years) the organisation has accessed their record. To learn more, see the MHR FAQ.
Upload Consent
If a patient has not opted out of MHR, they can still prevent MHR uploads from Zedmed using the My Health Record Upload Consent tick box in Clinical's Patient Details (screenshot below). The box is ticked by default. If it is not ticked, no information will be uploaded from Zedmed. The tick box is reflected in the MHR Status shown in the demographic section (screenshot below), which must display Consent to Upload before information can be uploaded to MHR.
Removing the consent to upload is not the same as opting out of MHR. It does not prevent Zedmed Summary and History views from accessing MHR to update and display information already uploaded. The consultation is still added to the Past Consultations list, which can be used to upload an Event Summary if the Upload Consent box is ticked at a later date.
Upload Consent for a specific encounter
If a patient's status is Consent to Upload, BUT they don't want anything uploaded from the current encounter, select the MHR Automatic Uploading icon above the Summary View to toggle off uploads. Toggling off uploads stops any information from being uploaded from the Current Encounter.

You can tell the status of a patient's participation by the type of icon shown for MHR above the Summary View section of the patient's clinical record.
![]()
How information is uploaded
With Zedmed's default settings, CDA letters and prescriptions are uploaded during an encounter, and you are prompted to approve the Event Summary upload at the end of the encounter. A Shared Health Summary is created manually as required.
Upload settings
The MHR upload settings are configured in the Clinical Records menu: Tools > My Options > My Health Record tab. To learn more, see the My Health Record setup guide.

Upload options
This table shows how each upload option functions, and the dedicated sections below explain each data type.
| Data type | Setting | How it works |
| Medications | Auto upload (Default) | When you select Prescribe /Prescribe Electronically, the script information is automatically uploaded to MHR |
| Prompt | When you select Prescribe /Prescribe Electronically, there is a confirmation prompt to upload the script to MHR.  | |
| Referrals (CDA) | Send as CDA/eLetter | When you use select Write Letter in the referrals module, a CDA form will open to fill in and then Send. |
| Event Summary | Auto upload | When you end an encounter, an Event Summary will be automatically uploaded. A yellow banner will display during the encounter so you can review or modify the information. All items are selected by default.  |
| Prompt (Default) | When you end an encounter, a prompt will ask you to confirm the Event Summary upload. If you select No, you can still create an Event Summary from Quick Documents>My Health Record Summaries at a later date. All items are unticked by default. | |
| History View | Ticked (Default) | MHR information is added to the History View and can be toggled on and off by the Include MHR button. |
| Shared Health Summary | Manually created as required. | The form is opened from the Quick Documents menu then reviewed and submitted to MHR |


Medications
Prescriptions are uploaded during an encounter when you select Prescribe or Prescribe Electronically. By default, the upload happens automatically in the background. You can also enable a Yes / No prompt in the upload settings.
- When you create an Event Summary, you can tick the medication to add it to the content of the Event Summary.
- When you create a Shared Health Summary, all prescribed medications will be added and ticked, including those not uploaded during an encounter. They can be unticked as required.
When you upload a medication from the prescriptions module, it will appear in the Medication Summary in MHR.

All medications uploaded with the Event Summary or Shared Health Summary will appear under their respective category in All Documents. The Medicines View collates allergy and medicine information from different sources and providers, but the Summary Views > Medications tab may provide a better option to view this information.

Referrals, Specialist Letters and Results
GP Referrals and Specialist Letters
Referrals & Specialist Letters are uploaded to MHR whenever the CDA letter format is used, as explained in the Write a CDA letter guide.
- In the Referrals module, the CDA document is called a Specialist Letter or eReferral (GP), depending on the practitioner.
- The batch writer and Letter writer in quick documents cannot create CDA letters for MHR.
- For Write Letter to open a CDA format letter, the addressee must have their HPI-I number in the practice's Address Book.
- The Summary Views Referrals tab does not show the referrals uploaded to MHR by other organizations.
- When the CDA letter is uploaded, you can view it in the patient's MHR under the Specialist Letter or eReferral group.
Enabling CDA Referrals and Letters:
- The CDA format is enabled by the Send as CDA/eReferral tick box in the Referrals module (screenshot below).
- This box is ticked by default if the Default to send as CDA/eLetter tick box in the upload settings (Tools > My Options).

Results
Pathology and Radiology results are uploaded to MHR by the laboratory. Next to Order Test in the Referrals module is a tick box Do Not Send Report to MyHealth Record. This should be selected if you do not want the laboratory to upload the results.

Event Summary
Event Summaries capture information about healthcare events that are relevant to the ongoing care of an individual. An Event Summary may contain allergies and adverse reactions, medications, diagnoses, interventions, immunisations and diagnostic investigations. To learn more, see Digitalhealth.gov.au>what's in a record.
With the default setting, you will be prompted to create an Event Summary at the end of an encounter. Selecting Yes will open the Event Summary form so you can review and select the items you want to include. Once you are happy with the information, select Next to view the final form, then select Confirm Content and Upload to upload the information to My Health Record.
If the Event Summary is changed from Prompt to Auto Upload in the upload settings, there will be no prompt, and all items will be selected by default and uploaded when the encounter is stopped. There will also be a clickable yellow banner during the encounter if you record information using a clinical module, and selecting the banner will open the Event Summary with nothing selected, so you can select the items to be uploaded. You can also select Confirm Content and upload the Event Summary manually, even if the default was for an auto upload.
Please be aware of the following scenarios:
- If no information is recorded using the clinical modules, an Event Summary will not be created (you will not be prompted).
- Any modifications to an existing Event Summary will be uploaded with a different version number.
- The tick boxes for items in the Event Summary only determine if that information will be included within the Event Summary.
- Having no tick next to a referral will not undo the uploading of that referral (CDA letter) during the encounter.
- Having no tick next to a medication will not undo the uploading of a prescription during the encounter.

Important: When you select Click here to modify, all items in the Event Summary will be deselected when the summary opens, and only information that is selected will be uploaded. If you do not select Click here to modify, all information will stay selected and be uploaded when the encounter is ended.
Manually uploading at a later date
If you select Yes (using the prompt setting) to upload an Event Summary and then select Save draft when reviewing it, the Event Summary will be saved in the Summary Views > Documents under My Health Record Summaries with a red D icon. You can right-click edit the draft Event Summary to update and upload it.

If you select No to upload an Event Summary at the end of an encounter or Cancel after selecting Yes, the consultation will be saved in the Past Consultation screen under Quick documents > My Health Record Summaries > Event Summary. Select the consultation and click OK to create an Event Summary. You can then review and upload it. 
Shared Health Summary
This is a summary of a patient’s health status at a point in time, which can include problems, medications, allergies and adverse reactions, and immunisations. To learn more, see Digitalhealth.gov.au>what's in a record.
My Health Record (MHR) has a Practice Incentives Program (PIP), and only Shared Health Summary uploads count towards the quarterly requirements. If you upload a Shared Health Summary, it needs to be uploaded in full, with all four sections of the document included ( patient's current condition, medications, etc. at that point in time ), as this summary serves as a complete health snapshot for other clinicians.
For more information, visit digitalhealth.gov.au.
Each time a Shared Health Summary is run it includes the information of past Shared Health Summaries and any new clinical information up to the time the Summary is created. A Shared Health Summary cannot be modified once it's been uploaded. You can only delete and redo it.
To upload a Shared Health Summary:
- Open the patient's clinical record.
To learn more, see the find a patient article. - Select the Quick Documents icon shown below the red arrow in the screenshot below.
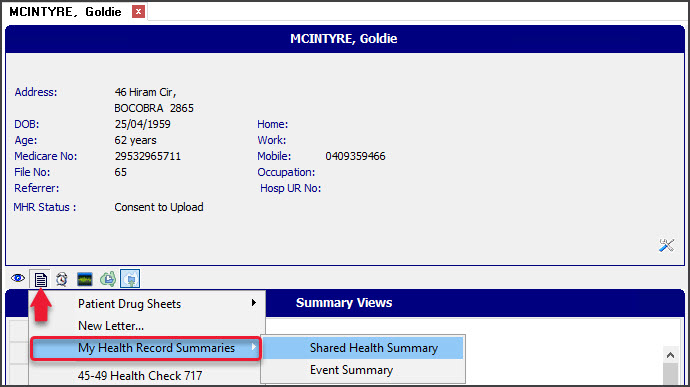
- Select My Health Record Summaries > Shared Health Summary.
The screen will open (screenshot below) and load a Zedmed form populated with data from the patient's Zedmed record. - Review the data to be uploaded:
- Review the items that have been selected.
Review items that we deselected in past encounters with the patient.
Removing a tick removes that item from the upload. - Check that the Allergies and Adverse Reactions section has an Agent selected or None Supplied is selected from the drop-down.
- Check that the Immunisations section has a selection or that None Known is selected from the drop-down.
- Review the items that have been selected.
- Select Next (preview).
If you receive an error, it will often be because not all the fields are complete or information is missing from the encounter. Until an error is resolved, the Shared Health Summary will not be uploaded or counted for the PIP.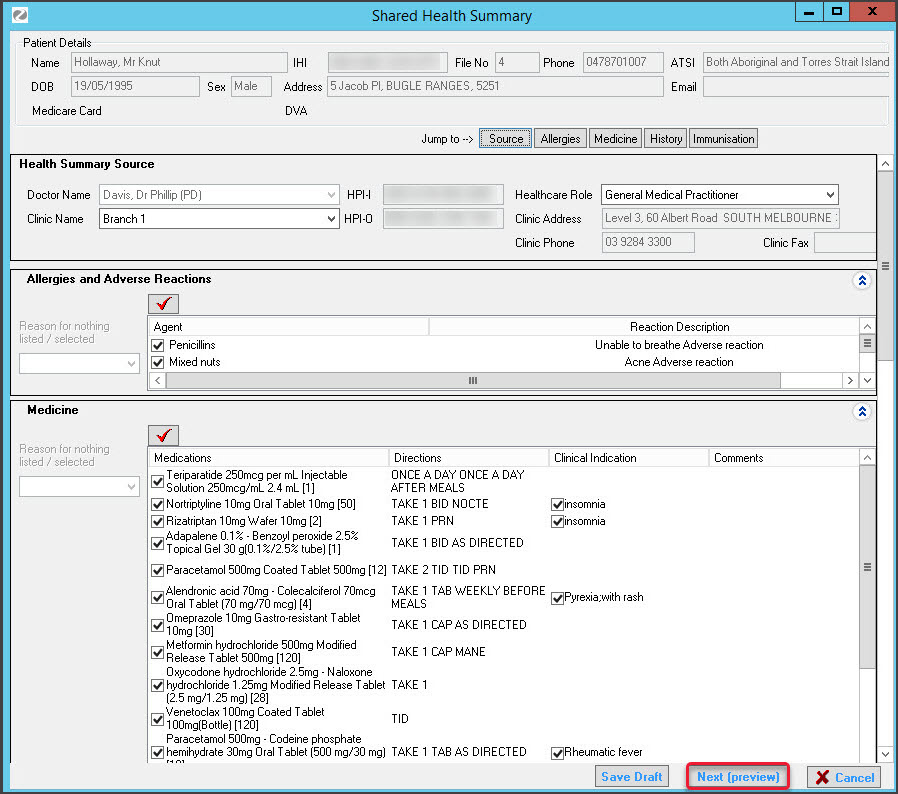
An example of an error that is known to prevent the Shared Health Summary from uploading is the Problem definition missing an Onset Date. If ICPC was used, this will appear in the Problem/Diagnosis section. If Free Text was used, it will appear under Other Medical History. The screenshot below shows where the Onset Date is set in the Problems module.
The Shared Health Summary report will open.
This provides a summary of the information to be uploaded into My Health Record. - Check the information.
- Select Confirm Content and Upload.
- If you check the Documents tab in Summary Views, you will see the upload under My Health Record Summaries. Once the information has been uploaded, the entry will turn from blue to black.


Summary View & History View
Clinical information uploaded to MHR, including information from other providers, can be displayed in the Summary Views and History View
History View
To view information added to the patient's My Health Record by other healthcare providers, toggle the Include MHR button on or off. Each MHR entry appears under a date, has a green tick next to it and can be selected to open the record.

MHR in Summary Views
The Include MHR icon in the Results, Immunisations, Allergies and Medications tabs toggle on and off to show any records uploaded by other healthcare providers. This important feature provides an easy way to get a comprehensive view of this clinical information.
- Each MHR entry appears by an Australia icon.
- Selecting an attachment link within a Diagnostic Imaging Report will open the scan or x-ray.
- When information from an encounter is uploaded to MHR, it will also appear in the usual Summary View tab.
- New entries in the Summary Views will appear as blue and turn black when they have uploaded to MHR.
To learn more, see the Results, Immunisations, Allergies and Medications Summary Views articles.

Viewing a patient's My Health Record
A patient's MHR is displayed using the My Health Record Documents UI, which contains tabs and filters to manage the information available.
Opening the MHR Documents UI
To view a patient's information:
- Open the patient's record.
To learn more, see the find a patient article. - Select the My Health icon above the Summary Views section.
OR
If the encounter is running, select the MHR icon from the Current Encounter menu. - The My Health Record Documents screen will open.


All Documents tab
The All documents tab with a 2-year date range is the default, and Refresh must be selected to download and display the records. The left pane contains the filters and search criteria used to locate specific information, and Refresh must also be used when applying these filters.
All Shared Health Summary, Event Summary, and CDA letters (Specialist Letter or eReferrals for GPs) are grouped here. There are also documents uploaded by other providers, such as discharge summaries from hospitals and records from pharmacists, and overviews of information from different sources. Pathology Overview and Diagnostic Imaging provide a useful way to see a patient's results.
A doctor can Remove documents they uploaded by selecting the document and then selecting the Remove Document button on the bottom right. In the screenshot below, it is greyed out as another provider's document is selected. A doctor can view removed documents by ticking the Remove box below the date (top left), then selecting Refresh. Only a patient can prevent their MHR documents from being viewed.

Viewing documents:
- Select a document, and a preview will appear in the lower pane.
- View Document opens the selected document with the Save Document option.
- SaveDocument saves a document to the patient's record under Summary Views > Incoming Documents.

Medications Summary | Pathology Report | Diagnostic Imaging Report
These tabs contain uploads of the patient's prescriptions and results. The results come from pathology and radiology providers, and the medications come from clinical encounters, as explained in the Medications section.
Restricted records & emergency access
Patients can restrict access to their records or specific documents using an access code, which they can choose to share with healthcare providers. Section 64 of the My Health Records Act defines situations where it may be permissible for a treating healthcare provider to use the Emergency Access function to access a patient's record without entering an access code. It is important to understand when this function can lawfully be used. To learn more, see Digitalhealth.gov.au > privacy and access and the OAIC resource.
If you try to open a record with an access code, the My Health Record Access Type dialog will prompt you to make a selection.
If the patient wants to provide access to their record, select Access Code and enter the code provided by the patient.
In an emergency situation, you can select Emergency Access in accordance with the legislation. This will allow the treating healthcare provider to access information in a patient's record without entering an access code. If a patient has enabled notifications in MHR, they will receive an email or SMS if Emergency Access is used to access their information.

My Health Record reporting
Tracking health record uploads
Zedmed's My Health Record Uploads report shows the number of Event Summaries and Shared Health Summaries uploaded to My Health Record.
To run the report:
- Open Zedmed clinical.
- From the menu, select Reports menu > Tracking Health RecordUploads.
The Tracking of My Health Record Uploads screen will open. - Select the settings for the information you want.
For a Shared Health Summary Report, the dates could capture the quarter being monitored for the Practice Incentives Program.
For Branch, use the report to monitor by Branch or by All branches. - If you selected Style Single line details: Select Screen to display the information or Print to print it out.
If you selected Style CSV File: Select Export. The report shows the number of reports uploaded by each doctor.
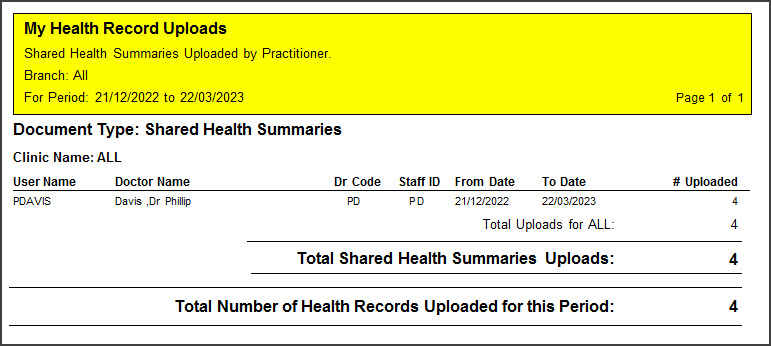
 The report shows the number of reports uploaded by each doctor.
View health record uploads for a patient
You can view all Event Summaries and Shared Health Summaries uploaded to a patient's My Health Record in Summary Views.
To view a patient's uploaded records:
- Go to Zedmed's Reception tab.
- Select Clinical Records, locate the patient, and open the patient's record.
- Select the Summary Views > Documents tab.
- Scroll to the My Health Record Summaries.
You will see a list of all Event Summary and Shared Health Summary reports that have been uploaded to MHR with a green P icon.
The Red D means the record is a draft that can be edited and uploaded.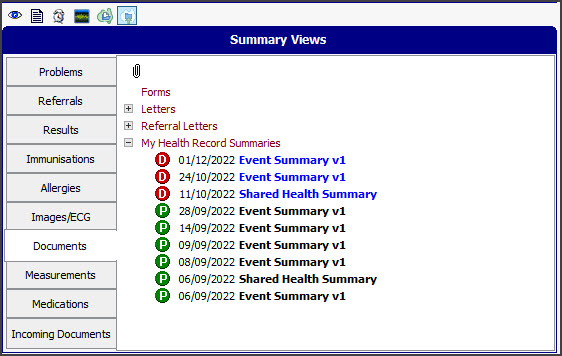

Lunch and Learn video
Zedmed has recorded a Lunch & Learn session to explain how My Health Record works and how to use it in Zedmed. We recommend watching this video to get a good understanding of the benefits and features available.