Review and action patient results from the Results Inbox. Actions include setting up a recall for the patient, sending them an SMS and assigning tasks to the nursing team. You can also review and action results using the Doctor's app.
Quickstart video
Useful Tips:
1) Display results beside the Inbox via Clincal > My Options: Results Inbox Layout = Left to Right (Zedmed v37 required).
2) Modify and create your own Action buttons as explained in our Customise Results Inbox guide.
Understanding the workflow
How results arrive
The Results Inbox receives results in three ways: electronically from laboratories, from staff who Scan hard copies and via the Attach Document option on the Summary Views > Results & Incoming Documents tabs. Files received via the Scan or Attach options require staff to designate the file as a Result or a Document. For electronically received files, this is done automatically.
For this guide, the term 'results' can apply to files designated as a Result or Document, as documents can include letters that accompany lab results and the outcomes of non-lab referrals.
What clinicians see
Incoming results for all patients appear in the Results Inbox and each result is automatically linked to the patient who had the test and to the doctor who created the referral. Nurses can see and monitor all results in the Results Inbox and manually link them to patients or doctors if required. Doctors see results for the referrals they have issued and results that do not have a doctor assigned. If a mistake is made and you need to change or assign the p[patient or doctor linked to a result, see the Assign or Reassign results guide .
What clinicians can do
Once a result has been reviewed, the Actions buttons at the bottom of the inbox are used to initiate the follow-up, for example, booking an appointment, sending the patient an SMS or having a nurse call the patient. There are buttons for specific actions (configured by the practice) and an 'Update Result' action button that allows the clinician to manually initiate any possible follow-up. To learn more, see Quick Actions & Update Results.
When an action is taken, the result's status is automatically updated from (I) Initial to (P) Pending. When no further actions are required, the status is manually changed to Complete and the result will disappear from the Inbox. To learn more, see Status Types.
Example of a workflow
- A patient gets a referral for a blood test from Dr. Davis.
- The patient goes to the lab and gets the blood test.
- The lab sends the results electronically to the clinic (received by the Zedmed server).
- The blood test arrives in the Results Inbox, and Dr. Davis can see it (because he is the referring doctor).
- Dr. Davis selects the Update Result Action button and uses it to send a message to a nurse/patient to make an appointment.
- The patient comes in and Dr. Davis opens the results in the patient's Summary Views and explains them.
- Dr. Davis changes the blood test status to Complete, and they are removed from the Results Inbox.
Results status types
All results have a status assigned to help manage their workflow. The status types are (I) Initial, (P) Pending and (C) Complete.
- (I) Initial—no one has looked at the results. They arrive in the Result Inbox and Patient Summary View with this status.
- (P) Actioned - results that have been looked at and are awaiting further action.
- (C) Complete - means no further action is required. Results were discussed with the patient or did not need to be.
In the Results Inbox - when an action is taken for a result with status (I) Initial, it is automatically updated to (P) Pending. The only manual status update that can be made is to Complete, which will remove it from the Results Inbox. To add it back, you would go to Summary Views and manually change it back to P or I.

In a patient's Summary Views Results tab, all 3 status types will appear, and the doctor can manually change a result to one of them.

Navigating the Results Inbox
The Results inbox is used to manage patients' results in one place, and ensure they are quickly assigned to a patient and action by a practitioner. You can right-click results and documents to access many of the options described in this guide.
Opening the Results Inbox
Go to Zedmed's Reception tab and select Clinical Records, then select Results Inbox from the clinical menu.

Viewing the results
The information shown for each result includes:
- Status - a red I (initial) icon means the result has not been actioned.
- Result Type - Will show Results (Pathology or Radiology) or Document (a letter from a hospital, specialist or provider).
- Message - comments added to actioned results like a message to a nurse to call a patient + a note that they are coming in.
Opening a result
Select a patient and their results will appear in the Result View section.

Quick Action buttons (preconfigured)
You can configure buttons for specific follow-up actions. When you click one of these buttons, its action will be immediately applied. Zedmed comes with Quick Action buttons, and the practice can create their own under the Results tab in Global Options.
Examples of quick action buttons:
- Send to patient - Uses Secure Send to send a copy of the results of the patient and Cc practitioners.
- Routine Appointment - The result is sent to the nursing staff inbox so a nurse can make an appointment.
- Urgent Appointment - Result sent to the nurses to make an urgent appointment. An urgent flag is added to the first column.
- No Action Required - No action is required and the results will be marked as complete.
- Mark Result Complete (the doctor has completed the follow-up.) The results will be removed from the Inbox.
- Patient Notified - The doctor has spoken to the patient. You will then be prompted if you want to select Complete.
- Summary Views > Results are also supported by Secure Send.

Update Result button
This option opens the Update Results screen, which can be used to initiate a follow-up action.
Recommended steps for updating results:
- Review the Audit trail section to check what, if anything, has been done with this result.
- Check the Next Appointment section to see if the patient has an appointment.
- Follow up on the result using any of the 5 actions explained below the screenshot: Call or SMS the patient, forward the result to another clinician to follow up, add to your To Do list or book an appointment.
- If the patient was contacted, select the Patient Notified button and the date will be recorded above the button.
- If no further action is required, right-click the result and select Mark Document Complete.
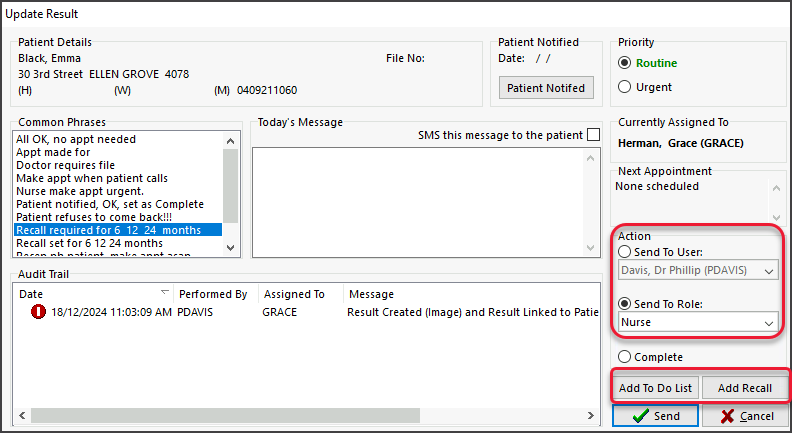

Result update options
1) Call the patient using the phone number displayed.
2) SMS a patient who has a mobile phone displayed:
- Select SMS this message to the patient (tick box).
- Compose a message by selecting from Common Phrases or typing into Today's Message box.'
- Select the Save button to send the SMS.
The Send button in the screenshot above will display Save when SMS is selected.
3) Send the results to someone to follow up:
- Compose a message by selecting from Common Phrases or typing into Today's Message box.
- Under Priority, select Routine or Urgent.
- Select Send To User and select the user - or - select Send To Role and select a role like Nurse.
If you send to a role, everyone with that role will see the result. - Select Send.
4) Add a follow-up action to the doctor's To-Do List:
- Select Add To Do List to open the To Do List.
- Select Add to List.
- Fill in the Add to List information and select OK.
5) Add a Recall to get the patient back for an appointment:
- Select the Add Recall button to open the Recalls screen.
- Select New then select the Recall Type from the drop-down list.
- Select the Maturity Date for the patient to come in on.
- Select OK, then OK on the Recalls screen. The nursing team will be sent the request.
Display setup
By default, the Results Inbox displays the selected result below it. Zedmed v37 and later allows you to display the results beside the Results Inbox.
To enable this, from Clinical, select Tools > My Options and select Left to Right.
