Zedmed's Online Appointments (OLA) allows patients to book their own appointments from a practice's website. The OLA interface will include your practice logo and allows patients to choose from the doctors, Appointment Types and locations that are made available. This guide explains how to add this information and enable Online Appointments.
Quick setup video
When setting up OLA for the first time, we recommend following the quick setup video, which covers the minimum steps required.
We also have the steps in this video as a quickstart guide.
Step 1 - Branch setup
Requirements
- Zedmed v35.7 or later. Zedmed v38 or later for document/referral uploads
- An HPI-I number or a Practitioner ID for each participating practitioner.
- Biographic information is also needed for each practitioner, and photos are recommended.
OLA is configured separately for each branch. Ensure that the steps in this section are performed for each branch.
To set up each branch:
- Select Practice Setup > Branches.
The Practice Details screen will open with the Branches tab selected. - In the Name field, select the branch you are configuring OLA for.
- Review the following settings:
a) Available Online
The branch is made available for OLA when this box is ticked. Until then, the branch will show 'Not Available' in OLA.
Do not tick this box until you are ready to go live with OLA. Complete the other steps in this guide first.
b) Can Cancel Online Appointments
If you tick this box, patients can cancel their appointments up to the appointment's start time. Ticking the box applies the cancellation buffer in hours, as configured in the Online appointment Details (shown below).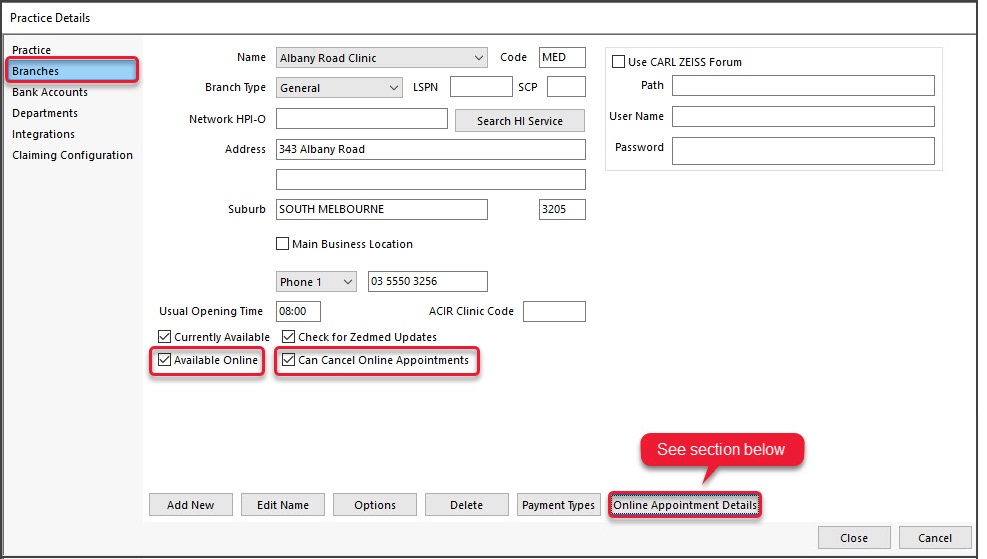
- Select the Online Appointment Details button.
- Referral Upload Email (Zedmed v38 and later)
Enter an email address to receive documents provided by patients making appointments. To learn more, see Document Requests.
This email address should be monitored and Referrals added to the patient's record. - Cancellation buffer
The optional setting allows you to set a time buffer (in hours) within which the patient cannot cancel or change an Online Appointment. If they try, a message will advise that the appointment cannot be altered. Set the number of hours for the Cancellation buffer (hours) in Office, for example, '2'. Requires Zedmed v38.8 or later. - Doctors Name Display (Zedmed v28 and later)
This optional setting allows you to determine how doctors are ordered in OLA. If this feature is used, it overrides the default order, which is determined by the order of doctors in the Appointment book.
• Use the arrows to move doctors in the Doctor display sequence.
• Use the Up/Down arrows to set the order you want doctors to appear in OLA.
These changes take up to 30 minutes to update on the practice website.
- Fill in the Contact numbers, Fee Information and Opening hours.
These changes will take 1 hour to update on the practice website.
The screenshot below shows how this information is displayed in OLA.


Step 2- Doctor's setup
There are three places to enable a doctor, as shown in Parts 1, 2 and 3 below.
Part 1: Doctor Details
The Doctor Details screen is where you enable each doctor for Online Appointments and add information about them. Medical Interests and Language will become selectable options for the patient to filter the doctors shown in Online Appointments.
To set up a doctor for Online Appointments:
- Go to Zedmed's Management tab.
- Select Practice Setup > Doctors > Find Treating Doctors.
The Find Doctor Details screen will open. - Find and open the doctor.
- Select the Available Online tickbox to make the doctor's schedule available in OLA.
- Required information in Doctor's Details, or their appointments will not appear:
- A valid title.
- A valid name.
- A valid Doctor Code.
- A valid HPI-I number - or - a Practitioner ID if the practitioner does not have an HPI-I.
- Information must be entered in the Qualification field
- Information must be entered into the Biographic Information sections (select the button to open the sections).
- Fill in the Qualification section with the information you want to appear in OLA. Use a comma between each item.

- Use the Booking time buffer field to enter a value in minutes.
This will restrict the available appointments sent to the Online Appointments (OLA) by only allowing appointment slots that begin after (Booking Time + Buffer) and preventing bookings close to the current time. Requires Zedmed v37 and later. - Select Biographic Information
Biographic Details screen.
Medical Interests & Languages Spoken
Enter this information and separate items with commas, because they are used as filters.
The doctor's profile picture
Use the Load Image button to add a photo of the doctor, with the following considerations:
• The photo's height and width must be no larger than 800px.
• The photos must be 24-bit (32-bit is not supported).
• Use a square photo cropped to the face without the shoulders for the best results.
Meeting these requirements may require editing software or a free site like https://www.resizepixel.com/ - Select Close to save your changes.
We recommend monitoring the terms used or providing guidelines to avoid variations of the same interest/language.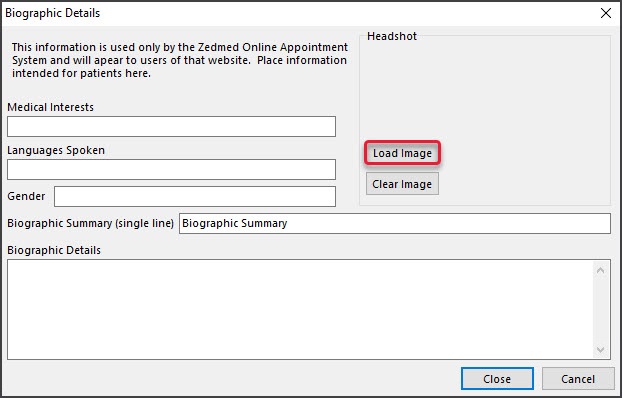
These changes will take 1 hour to update on the practice website.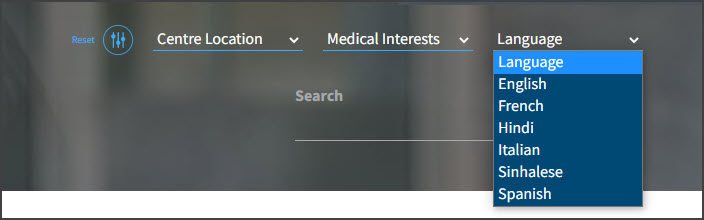


Part 2: Doctor's schedule
The sessions in each doctor's schedule must be enabled for OLA, even if the doctor has been selected in Appointment Types.
To set up a doctor's schedule for Online Appointments:
- Go to Zedmed's Management tab.
- Select Practice Setup then Appointments > Schedules.
The Set Schedules for Doctor or Resource screen will open. - In the Doctor field, select the doctor who is using Online Appointments.
- In the Schedules section, select the schedule entry.
- In the Sessions section, select the day.
- Select the Available Online tick box.

- Messages.
This option adds a message to a session, which will be displayed when a patient selects an appointment time during that session.
To enable a message, tick the box next to it. To learn more, see Using Messages. - Important: check that all active schedules have been reviewed and the session made available as required.
- Repeat all of these steps for each doctor.
- Select Close to save and exit.

Part 3: Enable Doctors Appointment type
In the Appointment Types setup, tick Available Online next to the doctor's name as shown in step 5 in the section below.
Step 3 - Appointment Types setup
Each Appointment Type must be enabled for OLA, and each doctor must be made available for each Appointment Type.
To enable up Appointment Types for OLA:
- Go to Zedmed's Management tab.
- Select Practice Setup then Appointments > Appointment Types.
The Appointment Types screen will open. - In the left-hand pane, select an Appointment Type to be made available for OLA.
The Appointment Type will appear in the Type Name field. - Select Available Online.
- Respond to the prompt asking if you want to make all doctors available:
- Selecting Mark as Unavailable will leave doctors in the Available Online column unticked.
You can then manually choose the doctors accepting Online Appointments. - Selecting Mark as Available will select all doctors in the Available Online column.
- Selecting Mark as Unavailable will leave doctors in the Available Online column unticked.
- Under Available to, select who can book an Appointment: New or Existing patients or both.
Use the up/down arrow to change the order of Appointment Types on the left pane.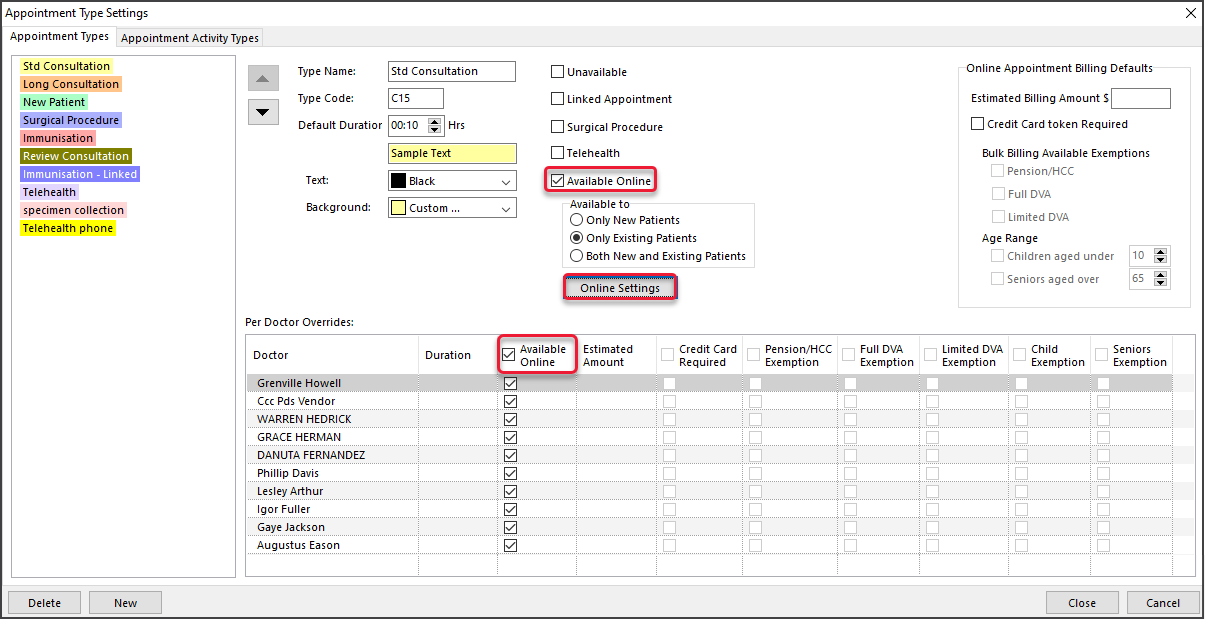
Appointment Types in OLA are listed in the order they appear here.- Select the Online Setting button. (This option requires Zedmed v39 or later).
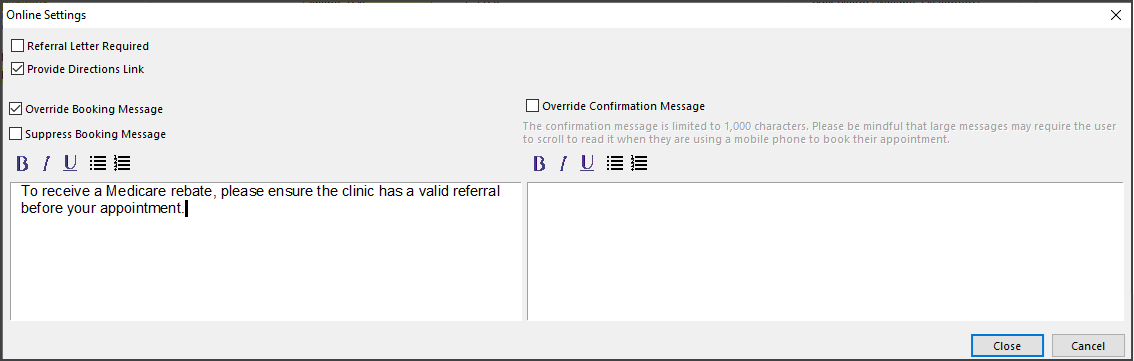
- Select Referral Letter Required to prompt patients to upload a document for this Appointment Type.
This option presents a 'click here to upload' step that the patient can skip. - Review Provide Directions Link (ticked by default).
Unticking this option turns off the clinic address and directions displayed when the patient confirms their appointment. - Message overrides for this Appointment Type.
Use the text boxes to display a custom message when the patient makes a booking (left pane) and when they confirm a booking (right pane).- Override booking Message: Will override all custom messages added by doctors at the session level (for this appt type).
- Suppress Booking Message: Disables any Booking Messages.
- Override Confirmation Message: Replaces the default booking confirmation message with this custom message. Untick to disable.
- Select Close to save your changes
- Repeat the steps for each Appointment Type.
- Select Close to save and exit.

The Online Settings screen will open.
Optional: Appointment Grouping
If the practice has many Appointment Types, some or all of them can be grouped so the patient chooses an Appointment Category, then an Appointment Type. For example, if there are 2 types of Telehealth Appointments, you could create a group so the patient taps Telehealth, and then selects the specific Appointment Type: Std Telehealth or Long Telehealth. Note: this feature requires Zedmed v39 or later.
Important: Any groupings in multi-database setups must match exactly across the Zedmed databases.

To add an Appointment Group:
- Open Appointment Type Settings.
- Select the Online Appointment Groups tab.
- Select Default - any Appointment Types in here are not grouped.
- Untick the Appointment Types that you want to group.
If you do not do this, the Appointment Types will appear at the top level and in the group.
- Select the New button.
- In the Description, type in a group name.
- Tick the 'Appointment Types' to be grouped under this new category.
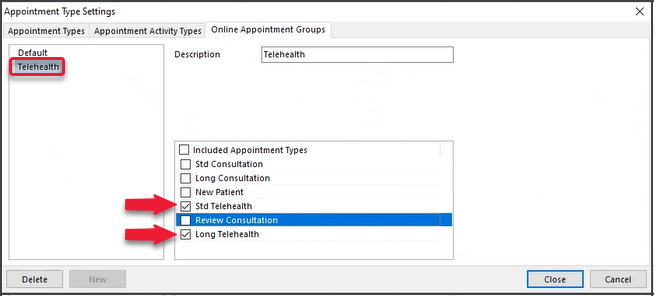
- Select Close to save and exit.
- Open your OLA page and check that the changes were made.


Optional: Booking Messages
Practitioners can add messages that will appear for all bookings. The practice can add messages for specific Appointment Types, which will override any messages defined by a practitioner.
Practice messages for Appointment Types
To add a message to appear for all practice bookings for a specific Appointment Type:
- Open Appointment Type Settings.
- Select the Online Settings button.
- Tick Override Booking Message.
- Type the text into the field provided.
- Select Close to save.

Practitioner messages for scheduled sessions
Create a set of messages that can be enabled on a per-practitioner-session basis.
Considerations:
- The practice should create a standard set of messages.
- All messages are saved and can be used by other doctors.
- If you select multiple messages, they will be appended to the same message dialog.
- There is no character limit, but too much text can push the message beyond a phone's screen size.
- Selectable hyperlinks are not supported.
Adding Messages:
- Select Practice Setup > Appointment > Schedules.
- Select a doctor.
- Select the session to add the message to.
- Select the Messages button to open the Schedule Messages screen.
- Select the Add button to open the Editor (or Edit to update an existing message).
- Type the message text.
- Select Close to save the message.
You now have a message that can be applied to any doctor's schedule. - Tick the box next to the message to apply it to the selected schedule.
- To add the message to other schedules:
- Select the schedule.
- Select the Message button.
- Tick the box next to the message.
- Repeat for each doctor.
The message will display when a patient selects an appointment during that session.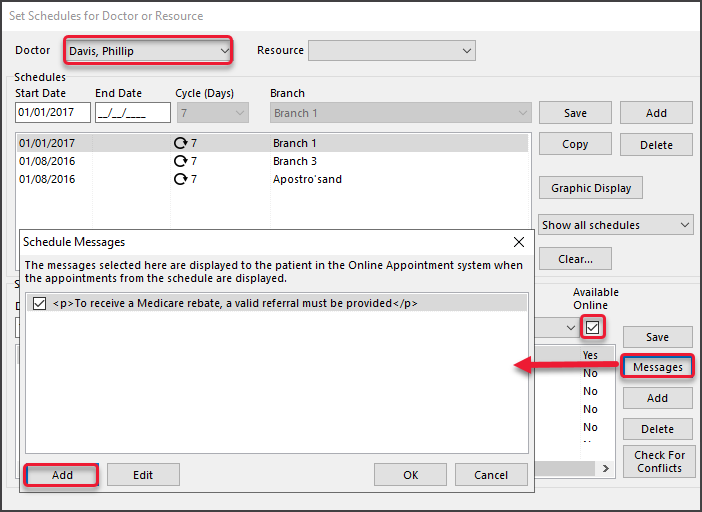

Patent Responses
- Patients must confirm they understand or accept the message.
- Selecting No, Cancel takes the patient to the previous step. Selecting Yes, Continue will create the appointment

Testing the setup
Once the setup has been completed, it should be tested when Online Appointments is live on your website to ensure it functions as intended. This will also help you understand a patient's booking process.
To learn more about using OLA, see our guide for patients.
The recommended checks are:
- Select each branch to check their details display ( contact number, hours, information).
- Select each doctor's details to make sure they are displayed.
- Make a test booking. To proceed further, you will need to provide some test patient information.
- Check the booking appears in your Zedmed Appointment book.
- Reconcile the booking to the patient in Zedmed using the Processing Online Appointments guide.
You only reconcile a patient's booking to their record in Zedmed the first time they make an Online Appointment.
Blocking specific patients
Practices can block existing patients from booking appointments using OLA.
To enable this feature, open the patient's record and tick the box next to Block patient from online bookings.
Requires Zedmed v38.7 or later. Applies to existing patients with OLA accounts that were reconciled to their patient records.
 This is what the patient will see in OLA,
