Use the Waiting Room to manage patients as they attend the practice and ensure they are billed correctly. You can also quick attend walk-ins and doctors can hide patients they have seen.
Quickstart video
Using the Waiting Room
The Waiting Room is used in conjunction with the Appointment Grid to manage patient visits and initiate payments.
Waiting room workflow example
- Patient arrives at reception.
- Open the patient from the Appointment book (right-click patient and select Patient Details).
- Do an Online PV check to confirm the patient is eligible for Medicare claims.
- Return to the Appointment book (select Appointments from the patient record menu).
- Right-click the patient in the Appointment book and select Attend to put them into the Waiting Room.
- The patient has their consultation and returns to reception.
- From the Waiting Room, right-click the patient and select Bill.
- Raise an invoice using information provided by the doctor and process the payment.
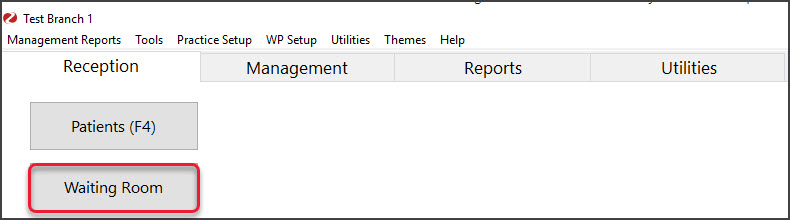
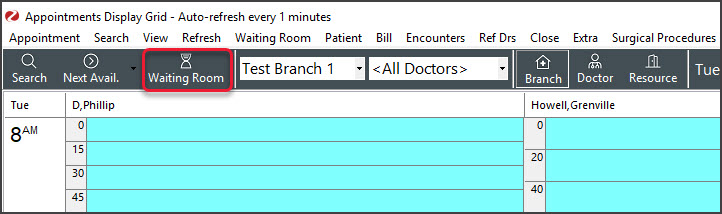
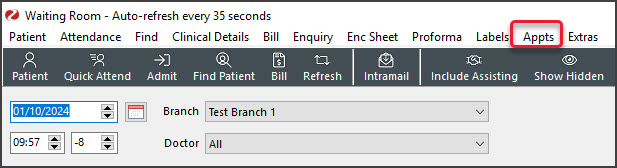
How to open the Waiting Room
- Open the Waiting Room from Reception - select the Waiting Room button.
- Open the Waiting Room from the Appointments book - select the Waiting Room icon.
- Open the Appointment Book from the Waiting Room - select Appts from the text menu.


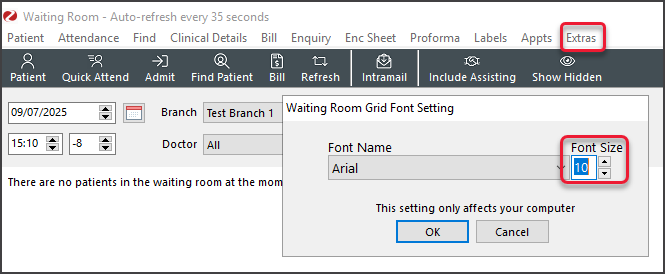
Change the font size
Some users may find the font size too small. To increase it:
- Select Extras > Change Grid font.
- Choose the size and font.

Right-click actions for Waiting Room patients
- Open a patient record
Right-click and select Patient. Select Waiting Room from the top of the Patient Record to return to the Waiting Room. - Complete a Patient Verification.
Right-click and select Patient. Select the PatientVerification button on the patient's record to check their eligibility for claims. - Bill a patient
Right-click and select Bill. This opens the Account Payer Selector and the New Invoice screen. - View attendance details
Right-click and select Attendance Details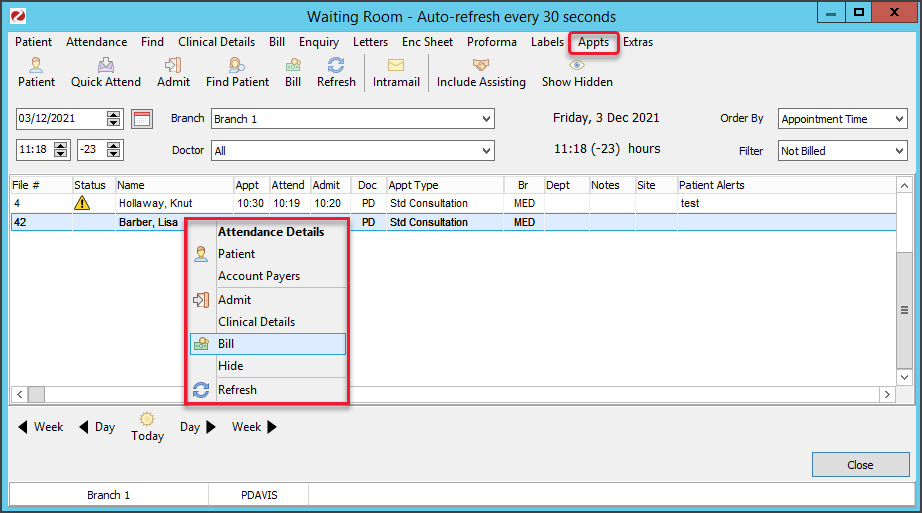

Navigating the Waiting Room
By default, the Waiting Room opens on the current day and shows all patients who have been attended and not billed. Patients are displayed in order of their appointment time or arrival time. Unbilled patients as far back as the Default lookback setting are shown . When a patient is billed, they are removed from the Waiting Room.
Time and lookback
These are located below the date. The lookback determines how long an unbilled patient is shown for. We suggest setting the lookback to 23 in the Branch Setup. By selecting 23, you will see patients waiting to be billed when you start Zedmed the next day.
Important menu items
- The Branch field shows the branch you are logged into, and you can select other branches or all branches.
- The Doctor field shows All by default and you can use it as a filter to only show a specific doctor's patients.
- Order by defaults to Appointment Time. Select the drop-down to review or select the other options.
- Filter - The default is Not Billed. This is an important setting and helps ensure that all patients are billed because they will show up in the Waiting Room until they are billed.
Important columns
- Status column displays an icon if there is a patient alert. It will show $ if the patient has paid.
- Patient Alerts column shows details of alert indicated in Status column.
- Appt column shows the time the appointment was booked for.
- Attend column shows the time the patient was attended (When they arrived and were added to the Waiting Room).
- Admit time is when the doctor opened the patient in Clinical. If a time is shown, reception knows the doctor's with a patient.
- Appt Type comes over from the appointment book and shows the type of appointment the patient is booked in for.
- BR code is the branch code and allows you to see what branch the patient is attending if all branches are displayed.
- Notes field shows the attendance notes that the doctor or reception entered.
To review all the menus and options available, see the Waiting Room screen article.
Quick Attend/walk-in
Clinics that accept walk-in patients can attend the patient without them having a prior appointment.
To quick attend a patient:
- Select Quick Attend from the Waiting Room screen's top menu.
This will open the Patient Search screen.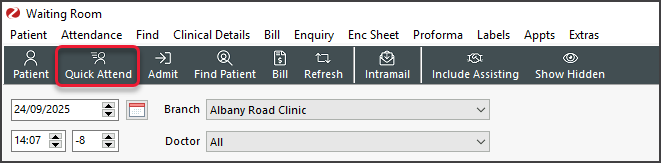
- Locate the patient and open their record.
To learn more, see the find a patient's record article.
The Attendance Details screen will open. The Doctor field will default to Doctor, Unknown. The doctor will be whoever is available to see the patient. - Select Close.
- The patient will be added to the Waiting Room.
The DOC column will show "???". Doctors will see this and the first to admit the patient will have their code under DOC.

Hide a patient
You can hide a patient so they don't show up in the Waiting Room. Reception may want to hide a patient that is being used for training or is not to be billed. To hide a patient, right-click them and select Hide. To show all hidden patients, select Show Hidden from the top menu.

Delete a patient
You can delete a patient from the Waiting Room if they have left before seeing the doctor. To delete an attendance, double-click the patient to open the Attendance Details and select Delete. Where possible, appointments should be cancelled and an appropriate reason selected. This information will be included in the patient's appointment history.
