ECLIPSE is used to submit inpatient health fund claims.
There are several screens in Zedmed that need to be updated before you can use ECLIPSE and each is explained in this guide.
Branch setup
To enable ECLIPSE for each branch:
- Go to Zedmed's Management tab.
- Select Practice Setup, then select Branches from the list. This will open the Practice Details screen.
- Select the branch that is going to use ECLIPSE in the Name field.
- Select the Options button to open the Branch Options screen.
- Select ECLIPSE on the bottom left. If you have already been billing to Medicare, this will already be ticked.
Repeat Steps 3-5 for any other branches that will use ECLIPSE. - Select Close on the Branch options and Practice Details screens to save any changes.

Hospital setup
Each site where the specialist sees patients needs to be added to Zedmed. For hospitals, you will also need their Facility ID. A Facility ID (or Location ID), a unique, identifying number for that hospital. You can get this number by calling the hospital.
To add a hospital:
- Go to Zedmed's Management tab.
- Select Practice Setup, then select Visit Sites / Hospitals from the list.
This will open the Site Details screen. - Select New to clear the fields.
- Enter the Site name, then select Yes to the save pop-up.
- Select a type.
If the type you need is not there, select Add Type and enter the type name. - Enter an address and phone number.
- Enter the Facility ID.
This is the hospital's Medicare provider number. - If you will be billing for imaging items, enter the hospital's LSPN number.
Once the site name has been saved, it cannot be changed.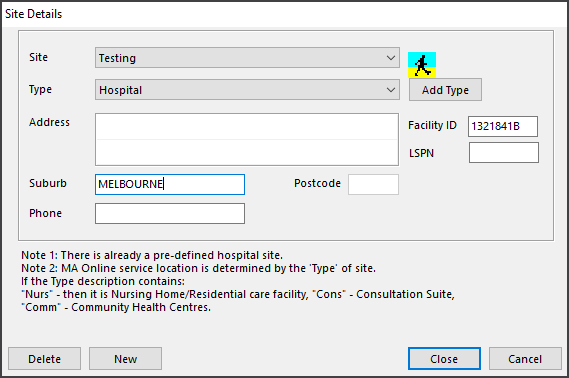
- Select Close to save and exit.

Treating specialist setup
Specialists need to be linked to each Health Fund set up in Zedmed, or the claims will be sent to the patients.
To set up a specialist for ECLIPSE funds:
- Go to Zedmed's Management tab.
- Select Practice Setup, then select Doctors > Find Treating Doctors.
- Enter the specialist's code into the Dr. code to display the Doctor's Details.
- Select ECLIPSE Fund Schemes.
The screen will display the funds set up in Zedmed. - Tick a fund to make it active for the doctor.
- Use the Claim Type arrow to choose IMC Agreements or IMC Schemes.
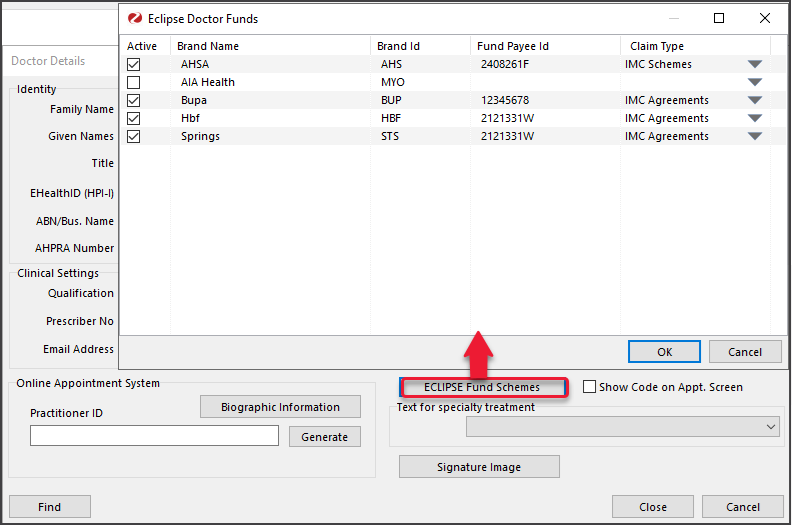
- Select OK to save and exit
- Repeat for the doctor as required.

The other settings are optional and explained in further detail on the Doctor details page.
If the doctor is a locum
In the Employment section of the Doctor Details screen, select New, then select the doctor they are locum for. This will allow the locum to use ECLIPSE using the details of the doctor for whom they are a locum. The payment will be made to that doctor. To learn more, see Setting up a locum doctor.
Note: The Fund Payee ID is a unique number provided by a health fund to identify a doctor, group of doctors or practice to that fund. Not all funds have their own Payee ID and some use the Provider Number instead. The Fund Payee ID controls the Bank details for the deposit.
Health fund setup
There may be times when you need to add a new health fund to ECLIPSE.
Before adding the payer, make sure you have set up their Item Fee Codes. To learn more, see the fees articles.
To add a health fund:
- Go to Zedmed's Management tab.
- Select Debtors > ECLIPSE Fund Participants.
This will query Medicare Australia and produce an up-to-date report of the currently accredited health funds and their Brand IDs, which are required when you add health funds through Debtors/Account Payers.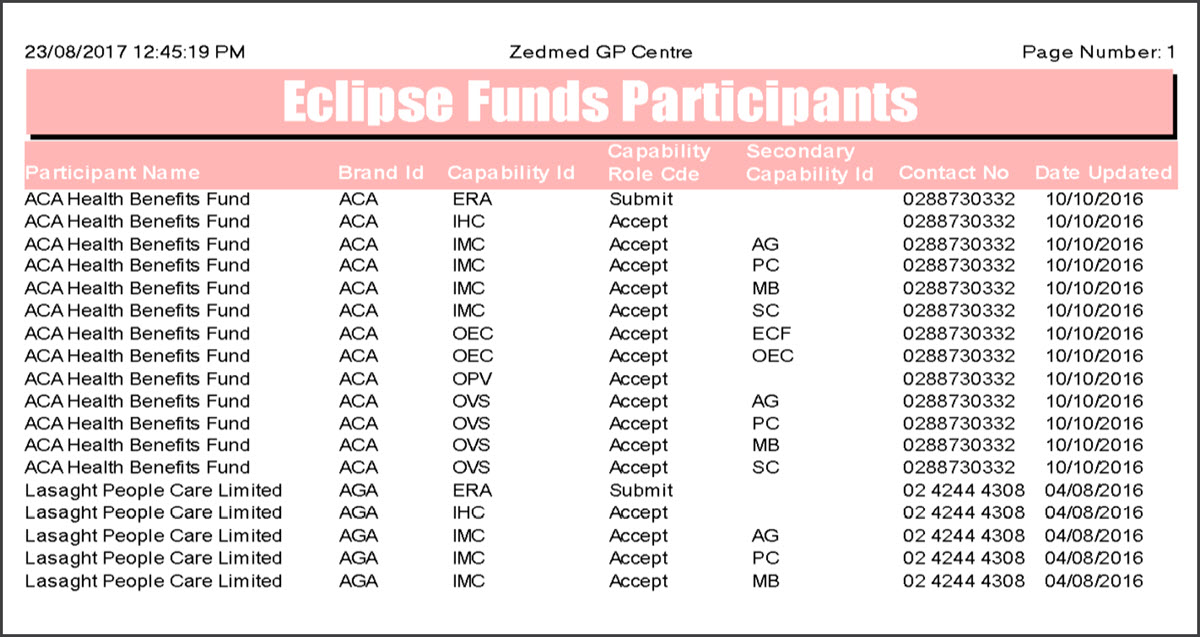 Important: You will need to contact the funds that are most relevant to your practice to establish agreements or schemes with them. If you already have this in place, you may still need to advise the funds of your intention to use ECLIPSE.
 - Locate the health fund you want to add and note its Brand ID.
Not all Health Funds use ECLIPSE.
If the health fund is not in the report, you will need to submit claims for that fund manually. - Return to Zedmed's Management tab.
- Select Debtors > Account Payers.
This will open the Find Account Payer screen. - Check if the payer already exists by entering the health fund's name into the Name (Brand) field and selecting Find.
- If no payer is found, a dialog will ask if you want to create a new one by selecting Yes.
- If a payer with a similar name is found, select New to create a new payer.
- If the payer is found, select Select. Then confirm the details and select Close to save and exit.
Selecting Yes to New will open the New Account Payer screen.
- Fill in the following fields for a new account payer:
- In the Name (Brand) field, enter the health fund's name.
- In the Brand ID field, enter the health fund's brand ID. This is the ID from the report.
- From the Category field, select the fund's category.
- From the Default Fee Type field, select the fee schedule.
If the fee is not listed, see the Create a fund fee article. - Fill in any other fields at your discretion.
- Select Close to save and exit.


Patient's payer setup
Add a health fund to a patient's record using one of these two methods:
- Adding a health fund with the patient as the payer.
- Adding a health fund with the fund as the payer.