
Set up bank accounts in Zedmed to support the Payment Gateway. This uses the API password created by the bank account owner (e. g., the doctor's) Tyro eCommerce account.
Requirements
The practice or doctor must have a Tyro eCommerce Account. To get an account:
- Send Zedmed a Payment Gateway application.
- Zedmed will arrange for Tyro to send the applicant an eCommerce registration.
- Once complete, Zedmed will email the practitioner/PM a confirmation and API creation instructions.
- Enter the API passwords in the steps below.
Configure the Bank Accounts in Zedmed
Add the practice or practitioners' Tyro eCommerce information to their bank account in Zedmed.
Perform the following checks:
- You have the bank account owner's Tyro Merchant ID (MID).
- You have the bank account owner's Tyro Integration API password. To learn more, see the Create API password guide.
- You have the bank account owner's Tyro Reporting password. To learn more, see the Create API password guide.
- Check that each doctor has the correct Bank List selected in Doctor Details to ensure bank accounts are assigned correctly.
Perform the following steps:
- Select Practice Setup > Practice.
- Select the Bank Accounts tab.
- Select the bank account Name from the drop-down.
This is the bank account for the user whose eCommerce account the Tyro passwords are being copied from. - Under Payment Gateway:
- Enter the MID in the format Tyro_XXXXXX.
- Paste the Tyro Integration API password from the account holder's eCommerce account.
- Paste the Tyro Reporting password from the account holder's eCommerce account.
- Enter 0% into the surcharge field. From 1 October 2026, patients cannot be charged for using a payment card.
- Select Test Connection to confirm you entered the correct passwords.
If these steps failed, check the MID and passwords against the correct eCommerce Account. - Close to save and exit.
Repeat these steps for each bank account.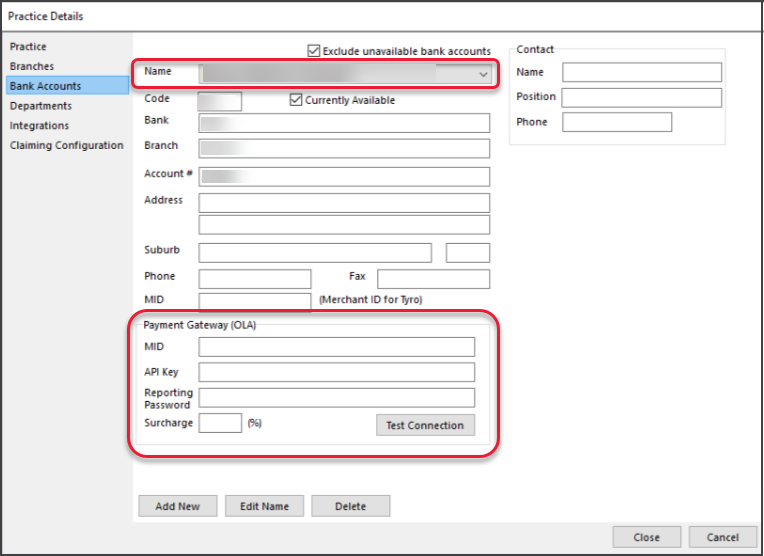
Select Appointment Type options (only if using OLA)
Configure the payment card options supported for each practitioner by Appointment Type.
To configure Payment Gateway Availability:
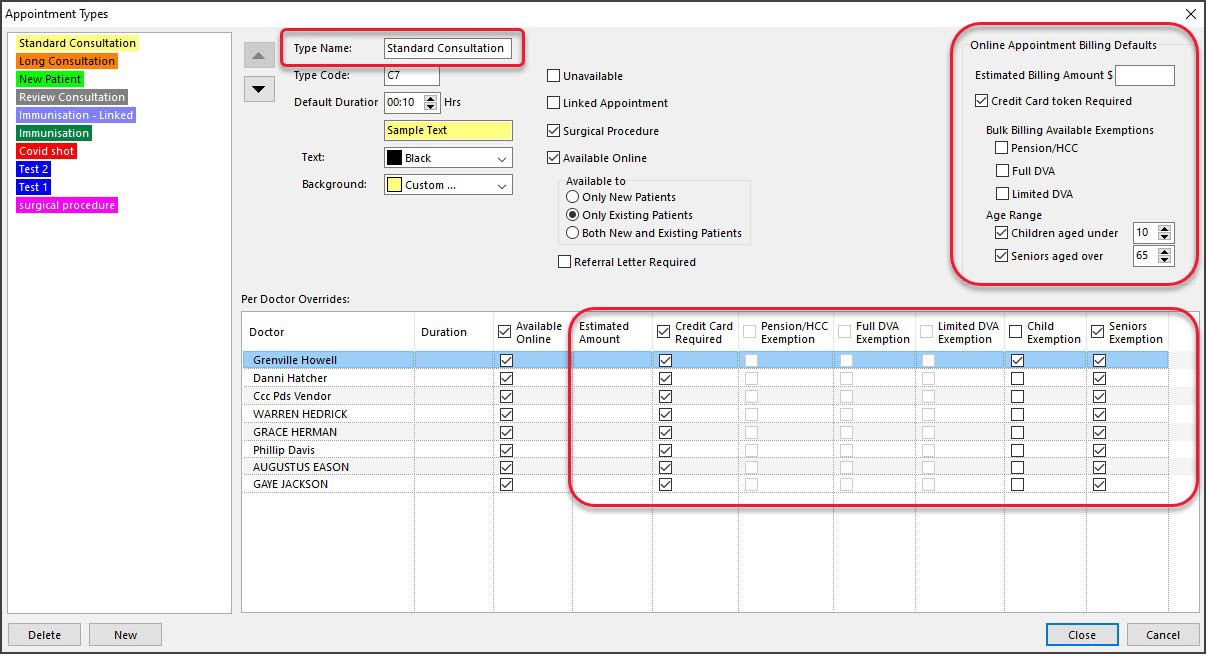
- Open Appointment Types (Practice setup>Appointments).
- Select the first Appointment Type to configure.
- Tick Credit Card token required.
Payment options will be available for each practitioner.
Remove the Credit Card Required tick for practitioners who don't want patients to provide card information. - Estimated Billing Amount (optional).
This field allows the practice to display the estimated appointment cost when the patient books an appointment.- To display the estimated appointment cost when an appointment is booked, enter the amount.
- If a doctor has their own appointment cost, enter it into the Estimate Amount field next to the doctor.
- If these fields are blank, no message will be displayed.
- Bulk Billing exemptions.
Tick the box by the allowed exemption for pension and DVA card holders. They will not be asked for payment details in OLA.
At the Yes/No prompt:- Select Yes if the exemptions apply to the entire practice, and all doctors will be ticked.
- Select No if it is per doctor, and tick the names of the doctors accepting the exemptions.
- Age Range exemptions.
Tick the box and enter the age range to exempt qualifying patients from being asked for payment details OLA.
E.g enter 10 if the child must be 9 or younger and 65 if the patient must be 66 or older.
At the Yes/No prompt:- Select Yes if the exemptions are for the whole practice and all doctors will be ticked.
- Select No if it is per doctor, and tick next to the names of doctors accepting the exemptions.
- Select the next Appointment Type Name that uses Payment Gateway and repeat the steps above.
- Select Close to save and exit.
Customise SMS text (optional)
Reception can send SMS messages to patients to request credit card information for Payment Gateway (ePayment billing). Requires Zedmed v39 or later.
The text for patients with upcoming appointments and those with no appointments differs and is customisable.
To see the messages or change them:
- Select Practice Setup > SMS configuration to open this screen.
- Select the ePayment SMS tab.
- Select either 'With Upcoming Appointment' or 'No Upcoming Appointment'.
- Make any required text updates.
- Check the characters remaining. If you exceed the number, it will take 2 or more SMS messages to send the text.
- Select Close to save and exit.
-
Viewing the SMS in the Message Manager. In this example, the practice has changed the text.


Important: Zedmed estimates an average of 85 characters for the Payment Gateway link, but this varies depending on the clinic name length. Zedmed automatically deducts 85 characters from the 160-character limit to estimate how many characters remain before a second SMS is required. Practices should check how many SMS messages were used to send the final message and adjust the wording accordingly.