This guide covers the options available to change what is shown in the Zedmed Appointment Book and what the different booking icons mean.
Appointment icon explanations
The following icons are used to indicate the patient's status.
| Icon | Description | Explanation |
| Green tick (left) | Patient has been attended to the Waiting Room. | |
| Red folder + cross (right) | The patient's IHI is unavailable. | |
| Green folder + tick | The patient's IHI is available. | |
| Cloud icon | The patient made the appointment via Online Appointments. | |
| Cloud icon with + | A patient's first Online Appointment needs reconciling. | |
| Credit card | Credit card provided. | |
| File folder | File pulled & patient not attended. Replaced by a green tick when attended. | |
 |
Phone icon | Patient replied YES (green tick) to reminder SMS. Replaced when attended. |
 |
Yellow dollar | An invoice has been raised. Replaces the attended tick. |
| Green dollar | An invoice has been receipted. Replaces the attended tick. | |
| Grey dollar | An invoice has been voided. Replaces the attended tick. | |
| Camera + green tick | Telehealth appointment. Camera changes to a green tick when attended |
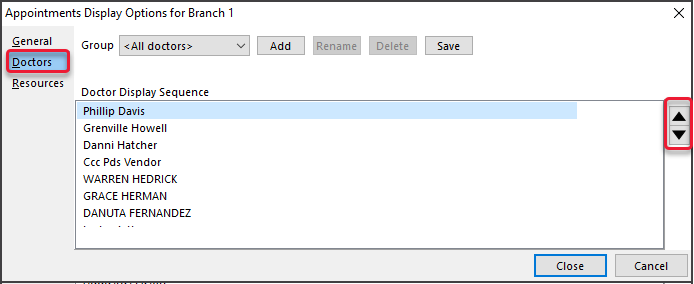
Practitioner order
You can change the order in which practitioners appear from left to right. Applies per branch.

- In the Appointment Grid, select View > Options.
- Select the Doctors tab.
- Select the practitioner and use the up or down arrow to move them.
- Select Close to save and exit.

Viewing options
The Appointments Display Options screen is used to change how appointments are displayed.
To change the display options:
- Go to Zedmed's Reception tab.
- Select Appointments.
The Appointments Display Grid screen will open. - Select View > Options.
The Appointments Display Options screen will open on the General tab.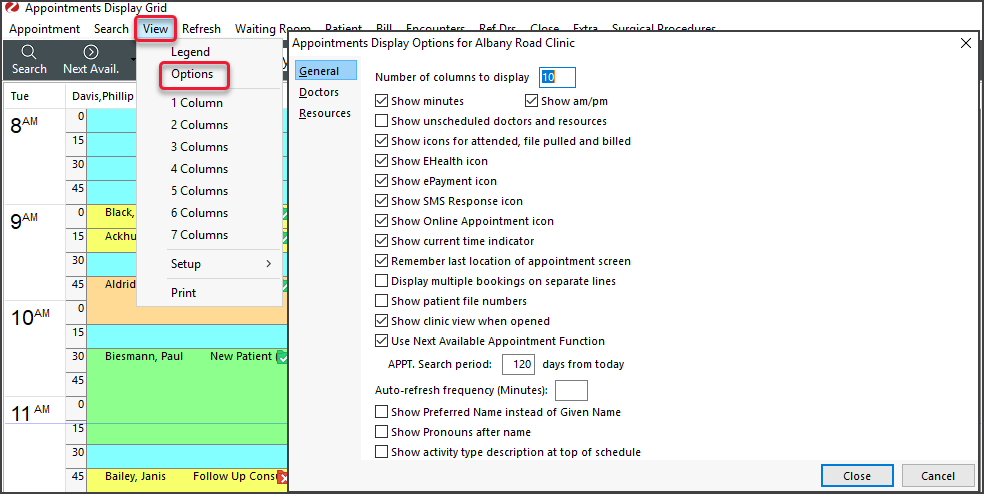

View options in the General tab:
- Number of Columns to Display
This controls how many doctors' and resource columns will be shown in the Branch View. More doctors can be working on one day than the number of columns set, but the extra doctors will need to be seen using the scroll bar at the bottom of the display window. Up to 20 doctors' columns can be shown in the Branch view. - Show Minutes
This turns on/off the "minutes" that show between each doctors column. If all your doctors work on the same time slot (say 10 minutes), then you can have more space for each column by turning off the display. - Show AM / PM
Change the time view on the left-hand column from 24-hour time to 12-hour time, e.g. 2:00 pm instead of 14:00. - Show Unscheduled Doctors and Resources
If a doctor is not working on a particular day it is debatable whether to show a column for them. In a manual diary, a column would appear with a line through it. If you have, say, 7-8 doctors that work at the practice, but only 4-5 on any one day, suppressing the blank columns (non-working days) will improve the appearance of the Branch Display and the width of each doctor's column. - Show Icons for attended and file pulled
When a patient has been marked as attended, either the colour of their time slot can be changed (often to a green colour), or else a "tick" icon can be placed against the slot. Similarly, a "file pulled" icon can be shown. - Show Multiple Bookings on Separate Lines
Multiple bookings on a one-time slot can either be shown concatenated on one line across the page or starting on separate lines. - Show Patient File Numbers
Practices that use numeric filing systems generally like to be able to see file numbers on the screen to help with pulling files, whereas those that file alphabetically do not. - Show Clinic View when Opened
The normal view for a multi-doctor practice may be the Branch Surgery view with several columns, one for each doctor. However, in their consulting rooms, doctors may just want to see their own bookings for a day or a week at a time. De-activating this option re-displays the Appointments screen, on opening it, how it was last seen – in other words, it memorises the settings that applied before. This means that a doctor will only get their own patients, but a receptionist will be returned to the Branch, multi-doctor view, if that was what they were in last time they left the appointment screen. - Use Next Available Appointment Function
Once this option is flagged, also set the default search period underneath. Now, you are ready to search for the next available appointment slot by clicking on Search, Next Available time, selecting the appropriate criteria, e.g., doctor, morning or afternoon, appointment type, etc. Search. - Show Preferred Name instead of given name & Show Pronouns after name.
These options are available in Zedmed v37 and later.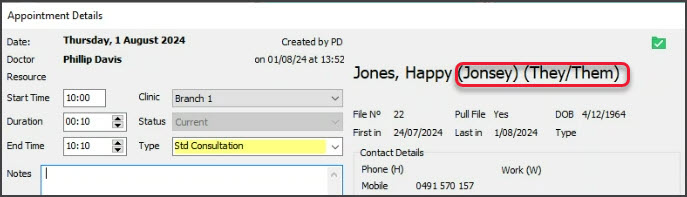
- Show activity type description at top of schedule (Zedmed v38.7.2 and later)
Displays the Activity Type's name in the earliest free spot in a block of scheduled time.

View options in the Doctors tab:
- Doctor Groups
It is sometimes convenient to see a subset of the working doctors on a day, e.g., just lady doctors or those with O&G qualifications. You can create and name a doctor group and then add doctors to it. One doctor can belong to several different doctor groups.
- Doctor and Resource Display Sequences
Controls in what order doctors appear in the Branch View. It is usually best to have the senior or full-time doctors on the left side (top of the list) and the part-timers and locums towards the right side of the screen (bottom of the list). Doctors will always be displayed before Resources (from left to right on the screen).
Custom colours
You can set the colours for unavailable slots and unscheduled times in the Appointment Book.
To change a default colour:
- In the Appointment Book, select View > Legend.
- Select the colour to change next to the Legend.
- Select a new colour from the Set Colours dialogue, then select OK.

