Send patients SMS confirmations and reminders for their appointments. The reminders can be sent manually or scheduled to go out automatically.
Requirements
Practice requirements
The Set up SMS article explains the following requirements: an account with ZedSMS and ZedSMS configured for the practice in Zedmed.
Patient requirements
A patient must have a mobile number in their patient record. For appointment reminders, they must also have Allows SMS is ticked on the Appointment Details screen for the appointment. Allow SMS is ticked by default if Default Appointment SMS is ticked in the patient's record.

2-way SMS replies
Zedmed can be configured to allow patients to reply Y/Yes or N/No (not case-sensitive) to SMS reminders to confirm or cancel an appointment. Zedmed can auto-cancel appointments when an N or No is received. The Appointment Book will reflect the response with a phone icon and a cross or tick. To learn more, see Managing SMS messages.
Appointment confirmations
SMS confirmations for new bookings are sent if Send Confirmation SMS is ticked on the Appointment Details screen.
Send Confirmation SMS is ticked by default for Online Appointment (OLA) bookings, so SMS notifications are sent whenever a patient books online. For manual bookings, Send Confirmation SMS needs to be selected. It is not ticked by default.
The message's content is defined in the Appointment Confirmation Message field.

Appointment reminders - scheduled
Schedule SMS reminders for selected appointment types to go out at a specified time and a set number of days before the appointment. The schedules are set up in the Management tab > Practice setup > SMS Configuration> Schedule tab
These automatic reminders are set up for the practice, and the steps are documented in the Schedule reminders guide.
Appointment reminders - manual
You can manually send out SMS reminders by selecting the criteria for who will receive the reminder then selecting send.
The message's content is updated using the Modify SMS Text button.
To manually send SMS reminders:
- Go to Zedmed's Reception tab.
- Select Daily reports then Appointments.
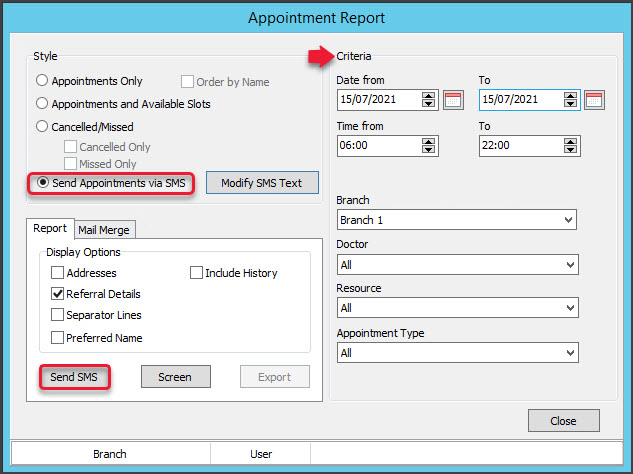
The Appointment Report screen will open. - Select Send Appointments via SMS.
This will update the screen so it can be used to configure and send SMS reminders. - Use the following criteria to determine who is to receive the reminder:
- Set the Date from and To. Reminders are sent to all patients with appointments in this date range.
- Select the Branch the appointments are at. The default is the branch you're logged in at.
- Select the Doctor or Resource (not both) the appointments are booked under. The default is all doctors.
- Select the Appointment Type that the reminders will be for. The default is all appointment types.
- When you're satisfied with the message's criteria, select the Send SMS button.
 If you get the message "No appointments match the criteria you have selected" when selecting Send SMS or Screen.
One of the following may apply:- SMS messages have already been sent for appointments matching the selected criteria.
- There are no appointments matching the criteria.
- The appointments that match the criteria are not set to Allow SMS.
- The patients do not have a mobile phone number in their patient records.
The Appointment Report can also be used to modify the text used in the messages. The modifications are made using the Report and Mail Merge tabs and the Send Appointments via SMS option.
Check if notifications were sent.
You can check if SMS reminders were sent using both the Message Manager and the Appointment Listing report.
Message Manager
The Message Manager allows you to filter all SMS communications by specific criteria, including Confirmed or Cancelled responses to messages sent to the patient.
To learn more, see the Message Manager guide.
Appointment Listing report.
To check SMS notifications:
- Go to Zedmed's Reception tab.
- Select Daily reports then Appointments.
The Appointment Report screen will open. - Select the branch.
- Select the date range you want to check.
- Select the Screen button.
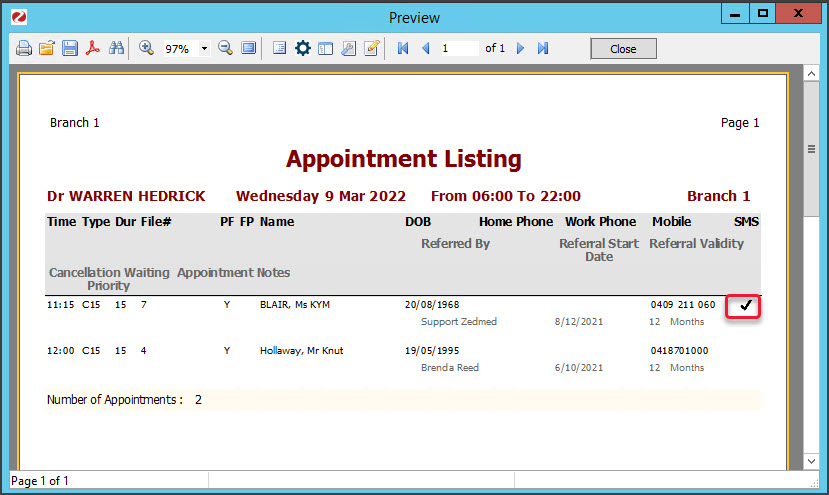
The Appointment Listing report will open, showing all appointments in that date range. - Review the report.
The SMS column will have a tick for each patient sent a reminder.
Select Close to save and exit.
You can also check what message a patient was sent by opening their patient record and selecting the message tab.

 If you get the message "No appointments match the criteria you have selected" when selecting Send SMS or Screen.
