Zedmed's Heidi AI integration uses voice input to generate AI-enhanced clinical notes and consultation transcripts. Before it is added to a patient's file, all generated content can be reviewed and manually edited. Requires Zedmed v38.
Zedmed provides an integration to Heidi AI. For assistance with Heidi, please visit the Heidi Support page and Heidi FAQ.
Considerations
Heidi must be set up first
To enable Heidi in Zedmed and create a subscription, follow the steps in the Heidi AI setup guide.
Microphones
You will need a microphone to capture the voice input. If you want to record audio of a patient talking, you will need a microphone that can capture audio from the room (in-person) or your device's speakers (telehealth). This is best achieved with an external microphone that can capture audio from the patient in the room or from your speakers. Some Practitioners have reported success with an Elgato Wave microphone or a Razer Seiren. We recommend using a microphone of good quality and within your budget.
Microphones on-prem
The first time Heidi is used, a microphone access prompt will open beside the Heidi widget. Respond Yes to allow access. If No is inadvertently selected, visit the FAQ page section "Why doesn't my microphone work?"
Microphones with Zedmed Cloud
1. The first time you use Heidi AI, select Allow in the browser microphone dialogue.
2. Each time you use Heidi AI, click the Microphone icon in the cloud menu to turn it blue (on).
Note: If you accidentally click Block, see the unblock instructions in the Cloud FAQ..

To optimise microphone use, we recommend selecting Remember device settings within the Preferences > Audio & Video menu.
Managing multiple patients
If multiple patients are open in Clinical, Heidi's widget shows the selected patient and only applies to that patient. It is, therefore, important to have the correct patient selected when recording. If you swap the patient while recording, the recording will stop.
Display
Due to the screen space required, Heidi requires a minimum of 1360x768 at 100% Scale (1920 x 1080 recommended).
Adding clinical notes
Heidi AI creates a session for each patient, and any information added to Heidi for that patient will be accessible for 24 hours after the first recorded input.
To add clinical notes:
- Open a patient record or Admit the patient.
The patient's name will appear in the Heidi widget. - Start the encounter if the patient was not Admitted.
The encounter needs to be running to add the notes to the patient using the Push function. - Expand Heidi AI using the upper-right arrows.
- Select Start visit.
The widget show the recording status and duration.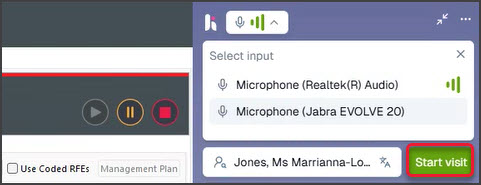
- Record your clinical observations for the consultation using the microphone.
- When you have finished recording, select the recording status field.
Heidi will stop recording and show the available templates.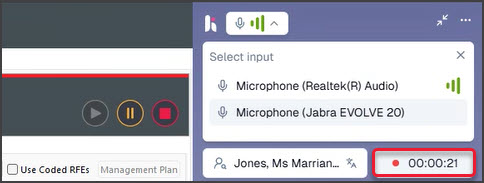
-
Select the Template you want to use.
Templates determine how the information is structured. Learn more.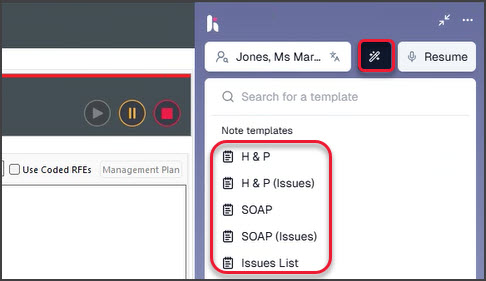
- Heidi will display the AI-generated notes (created from your input).
- Select the level of detail (Optional).
The default is Goldilocks - just right. - Review the notes and manually edit them if required.
• Select the Transcript button to check the original transcript the AI Note is based on.
• Select the Resume button to add more notes. If you selected Push notes before pushing the resume, the notes will be added again if you select Push notes, including information already added. - Select Push note.
The AI transcript will be added to the clinical notes section of the patient's clinical record.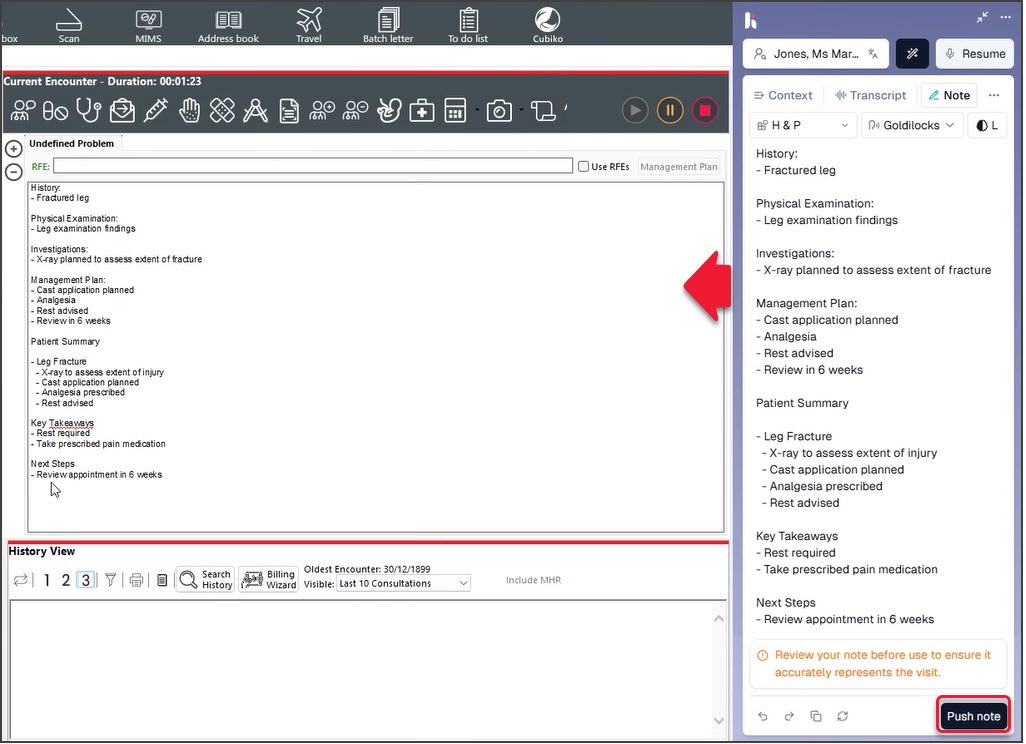


Adding clinical notes to a letter
The clinical notes created by Heidi AI can be added to a letter using the Selectable Encounter Notes merge field.

- Open the letter template with the Selectable Encounter Notes merge field.
- When prompted, select the Problem/RFE to add the notes. Selecting the timestamp will not add the notes.
The letter will open with the clinical notes.
Heidi Webinar
This is a recording of the public Heidi AI webinar presented on 8 May 2025.