Zedmed allows you to change the functions performed by the Quick Action buttons in the Results Inbox to match your practice workflows and roles. This guide explains which buttons can be changed and the steps required to perform those changes. Changes to Quick Action buttons will be reflected in the Doctor's App.
PDF Quick Reference: Custom Speed Buttons.pdf
Buttons that can be edited
The Results Inbox has two views, one seen by staff with Full Rights and another seen by staff with Limited Rights. Each of these views has different sets of buttons called Speed Buttons, some of which can be customised.
Full Inbox Rights
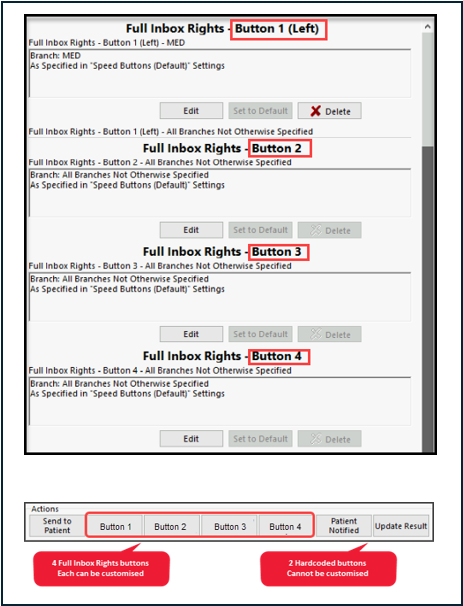
Users with Full Inbox Rights to the Results Inbox see a row of 7 Speed Buttons, and the 4 default 'action' buttons can be customised. The image below shows the 4 default buttons.

When you use the Edit feature, shown below, the 4 Edit Buttons fields correspond to the first 4 Actions buttons. The other 3 buttons are hard-coded and cannot be customised. However, the Update Result button can have the Sent to and Default action changed as explained in the next section.
Limited Inbox Rights
Staff with a limited level of access will only see 3 buttons, and the first 2 buttons can be customised. Limited Inbox access is commonly used for staff who scan letters, attach patients etc.
When you use the button Edit feature, shown below, the last 2 Edit Buttons fields correspond to the first 2 Actions buttons.

How to edit buttons
Zedmed allows you to make minor changes to some defaults and perform customisations of specific buttons.
To open the Results settings:
- From Clinical Records, select Tools > Global Options.
- Select the Results tab, then the Results tab again.
Update an existing button
The Update Result button and the first 2 default buttons, Routine Appointment and Urgent Appointment, can have some specific settings changed using the left pane in the Results editor.

Customise a button
As shown in the section above, some Speed Buttons can be renamed and given new functionality.
To customise a button:
- Select Edit on the Speed Button you want to customise.
The Edit Pre-Defined Action screen will open. - Use the fields provided to change the functionality.
- Select OK to save and exit.
- Test the button to confirm it works as intended.

Change the results inbox refresh
By default, the Results Inbox checks for new referrals every 5 minutes and instantly displays referrals reassigned within the practice. You can disable the auto-refresh so that new results are only received when you press the refresh icon in the Results Inbox. You can also set a refresh time for results reassigned within the practice.
To change the update settings:
- Go to Zedmed's Reception tab.
- Select Clinical Records.
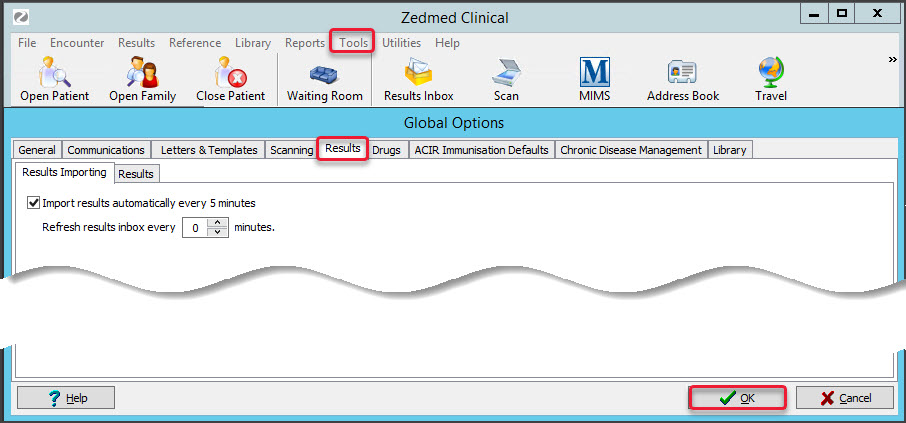
The Zedmed Clinical console will open. - Select Tools > Global Options from the top menu.
The Global Options screen will open. - Select Results.
The Results Importing tab will be selected by default. - Make the required changes.
- To update the Results Inbox with manual refreshes, deselect Import results automatically every 5 minutes.
- To set a refresh interval for results reassigned within the practice, enter a refresh rate into the field provided. 0 means the refresh is constant so there will be no delay.
- Select OK to save and exit.

Download locations
Patient results are often downloaded using software provided by a pathology or radiology service. For Zedmed to access the results, they need to be downloaded to \\Servername\Zedmed\Download|\\Servername\Zedmed\Download] - using the correct server name. As every program is different, we can't give exact instructions on how to set the software's download path, so please refer to your software provider.
While not necessary, we recommend that each pathology/radiology provider downloads to a separate folder. This can make it easier to diagnose download problems. We suggest creating a folder on the server called c:\Zedmed\Download\Lab1 with subfolders inside it for each lab.
The Zedmed Users and the Zedmed Windows Services (located on the Application Server: Medipak CRS, Zedmed Office HI Service and Zedmed Clinical Service) must all have access to where the results are being downloaded from. Please make sure the Windows Services are logged on as a domain account with access to the result directories.