Create a customised invoice for a practitioner that includes their own header and footer information. This is useful if the practitioner is not an employee and/or is paid directly into their own bank account.
Video guide
Step 1 - Enable customised invoices
The step enables the use of custom invoices at a branch. Once enabled, customised invoices will be used for practitioners that have them, and the branch invoice will be used for practitioners who do not.
To enable customised invoices:
- Go to Zedmed's Management tab.
- Select Practice Setup > Branches.
The Practice Details screen will open. - In the Name field, select the branch.
- Select the Options button.
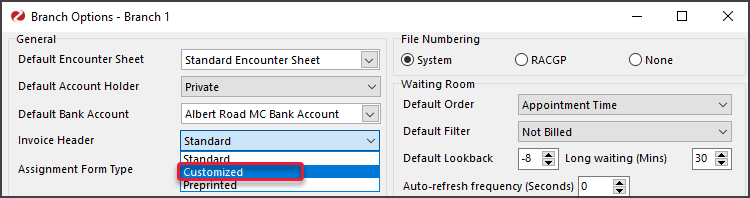
The Branch Options screen will open. - Select Customised in the Invoice Header drop-down field.
- Select Close to save.
- Repeat the steps for each branch as shown in step 3.

Step 2 - Add a practitioner's custom text/image
This step adds the header, footer and image (banner) to be used in the practitioner's invoices.
- Select Practice Setup, then Doctors > Find Treating Doctors.
The Find Doctor Detail screen will open. - In the Dr Code field, select the doctor's initials.
- Select the Invoice Header/Footer button.
The Invoice Editor will open.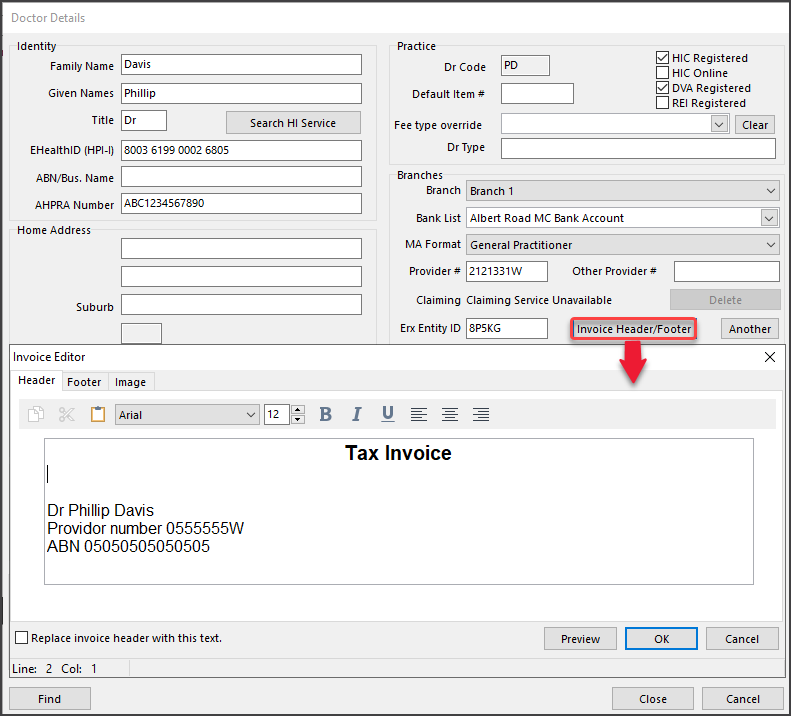
- Enter the practitioner's custom header text.
What to enter
Because the default header is being replaced, ensure the invoice still contains the required information for a tax invoice.-
Enter the custom Text into the default Header text box
How to enter the text
• Use the editor's format and alignment options to set the font, size, position, etc.
• Use your keyboard's space bar to move text to the right (no tab).
• Test-adjust what is entered so the invoice displays and prints as intended. - Tick the "Replace invoice header with the text" option on the bottom left.
-
Enter the custom Text into the default Header text box
- Header Option: Add a banner image to the header instead of custom text ( Zedmed v39 and later).
The image must be a JPG with a maximum size of 147px x 714px and will be used in place of the custom header text.
- Select the Image tab.
- Select Upload to locate and select the image.
Cloud users will need to upload the file to Temporary Files first. - Tick "Replace invoice header with this image" on the bottom-left.
- Select Preview to check that the image displays as intended.
- Select OK to save.

- Enter the practitioner's custom footer text.
- Select Invoice Footer.
The Invoice Footer Editor will open - Enter the practitioner's custom footer text.
This will often be remittance advice and payment information. You should check the branch footer text for guidance. - Select Enable Custom Invoice Footer for this branch to use the footer for receipts and in the Account Inquiry screen - not just the original invoice.

- Select Invoice Footer.
- Select Close to save and exit.


Step 3 - Add an invoice message (optional)
You can use the Invoice Message field to further customise an invoice for a branch. This is the yellow box on the lower part of the invoice and can contain information you want to stand out. It is not for a specific practitioner but it can be used to add important information.
To add an Invoice Message:
- Go to Zedmed's Management tab.
- Select Practice Setup > Branches
The Practice Details screen will open. - In the Name field, select the branch.
- Select the Options button.
- Select the Invoice Message button.
The Invoice Message field will open. - Enter the message you want to appear.
For example - 'TAX INVOICE' if this is not in your header. - Select Show on Invoice Reprint if you also want the Invoice Message to appear on invoice reprints.
Step 4 - Check the invoice
View and print a test invoice to ensure it displays as intended.
We recommend checking:
- The invoice information matches the selected practitioners (if you are setting up multiple practitioners ).
- The invoice is correct for each branch (if you have multiple branches).
- The invoice meets the requirements for a tax invoice (check with the accounting staff/specialist if you are unsure).
