If you have received a notification from PRODA that your NASH Certificate is expiring, you need to install a new certificate. NASH certificates are required to create connections to online patient services, including My Health Record and ePrescribing.
A My Health Record certificate expiry notification in Zedmed is another indication that your certificate needs to be updated.
If you use eRx, Zedmed will need to update your eRx configuration after the certificate has been installed.

Zedmed Cloud customers
Only perform Steps 1 and 5, then email the new certificate to support@zedmed.com.au for the certificate to be installed.
Step 1 - Download a new NASH Certificate
To download a NASH PKI Certificate, see Services Australia's information page. Once you have the certificate, proceed to step 2.
Digital Services Australia contacts:
- For PRODA inquiries, call 1800 700 199 (option 1) or email proda@servicesaustralia.gov.au
- For NASH inquiries, call 1800 700 199 (option 2) or email ebusiness@servicesaustralia.gov.au
Step 2 - Load the practice NASH Certificate
To load the certificate:
- Go to Zedmed's Reception tab and select Clinical Records.
The Clinical Records screen will open. - Select Tools > Global Options.
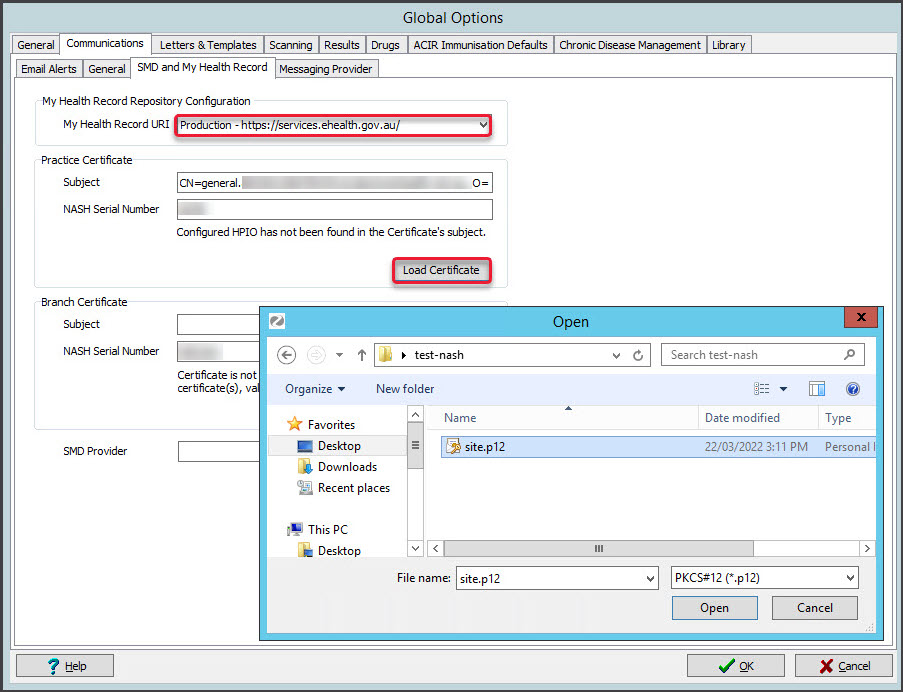
The Global Options screen will open. - Select the Communications tab.
- Select the SMD and My Health Record tab.
- Ensure that the My Health Record URI is set to Production.
- In the Practice Certificate section, select Load Certificate.
- Navigate to where the certificate is located and select the 'site.p12' file
- Select Open.
- Enter the PIC into the password field.

If you get the error "The form Address is empty" see the troubleshooting section below. - Select OK.
It will then say the certificate has been successfully imported. - Select OK.
It will then enter the information into the 'Subject:' and 'NASH Serial No:' fields. - Select OK.

Step 3 - Load NASH Certificate for each branch
This step is only if the practice has registered branches in PRODA as separate entities. When a branch is a separate identity, it will be provided with its own NASH certificate which must be added to Zedmed. Repeat the steps below for branches with their own NASH certificate.
To add the NASH certificate:
- Log into Zedmed at that branch the certificate is for.
To do this, select the branch from the login screen or use F3 to switch branches. - On the Reception tab, select Clinical Records.
The Clinical Records screen will open. - Select Tools > Global Options.
- Select the Communications tab.
- Select the SMD and My Health Record tab.
- In the Branch Certificate section, select Load Certificate.
- Navigate to where the certificate is located and select the file.
- Select Open.
- Enter the PIC into the password field and select OK.
It will then say the certificate has been successfully imported.
- Select OK.
It will then enter the information into the 'Subject:' and 'NASH Serial No:' fields. - Select OK.
Step 4 - Configure the Practice Settings
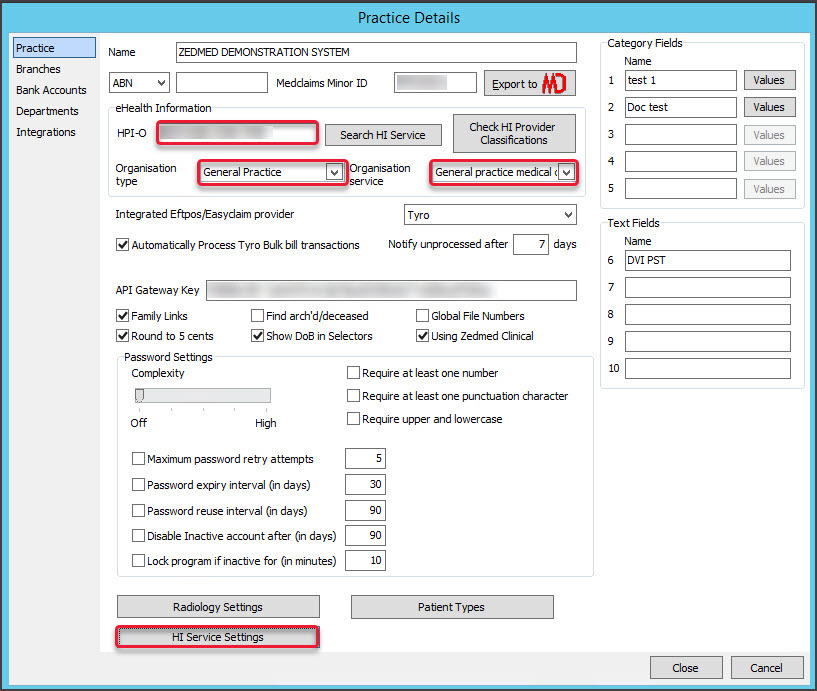
Update the Practice Setup with the Organisation Type and Service.
To update a practice's details:
- Go to Zedmed's Management tab.
- Select Practice Setup > Practice.
The Practice Details screen will open with the Practice tab selected.
The HPI-O should already be entered as part of the HI Service setup. - From the drop-down list, select the required option within the Organisation type and Organisation service fields.

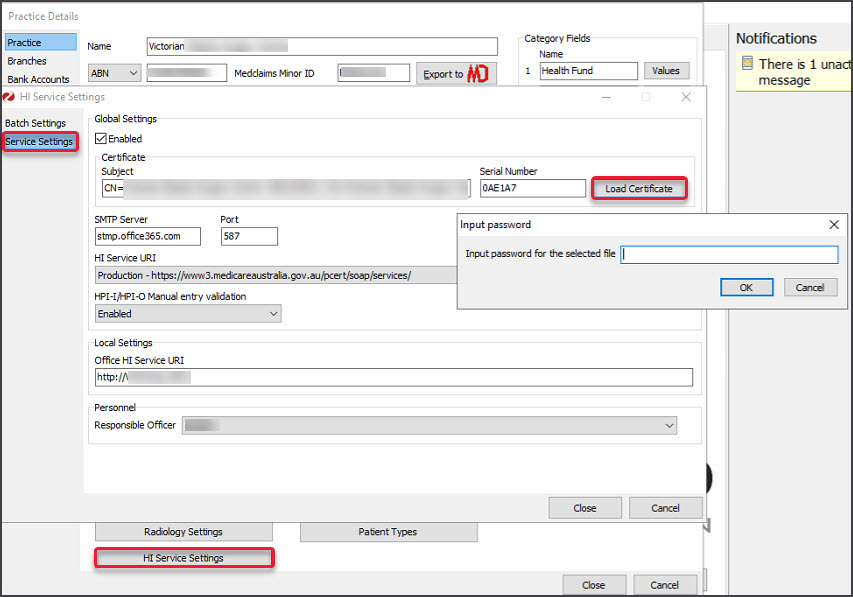
- Select the HI Service Settings button at the bottom.
The HI Service Settings screen will open. - Select Service Settings on the left menu.
- Select the Load Certificate button.
- Navigate to where the certificate is located and select the file.
- Select Open.
- Enter the PIC into the password field.
- Select OK.
It will then say the certificate has been successfully imported. - Select Close to save and exit.

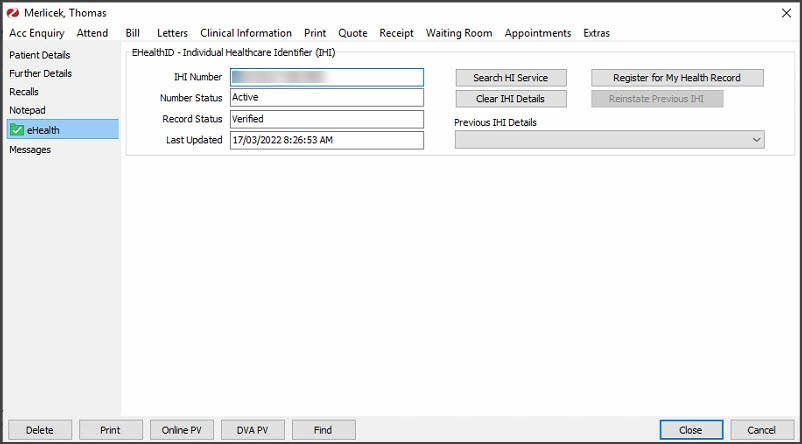
Now when you look up a patient their eHealth will show as green and you can search the HI Service.
Step 5 - Contact Zedmed if you are registered for eRx
Practices that use eRx will need Zedmed Support to update their eRx configurations in Zedmed. Call 1300 933 000 or email support@zedmed.com.au and ask for your eRx configuration to be updated for the new certificate.


