This guide is for customers upgrading to Zedmed v35 from an earlier version. This upgrade is performed manually on your database server and automatically on the client workstations. For customers requiring full Zedmed installation, support will perform this for you as part of the customer onboarding process.
Requirements
Review the following requirements before performing the upgrade:
- A user account with administrator privileges must be used to perform the upgrade.
- Zedmed must be installed before using the upgrade file.
- You must reboot the Zedmed database server before starting the upgrade.
- If Zedmed Support is assisting you, have the upgrade file downloaded on your server before the support session starts.
- The .Net Runtime 4.7.2 is required on the server.
- If the clinic is using MIMS, you need to use MIMS January 2021 issue and above.
- The server you are installing Zedmed on MUST be running Windows 10 Pro or Windows Server 2008 R2 or later with TLS 1.2 installed and enabled. These operating systems are supported for existing customers, but we recommend running Windows Server 2016 or later.
- For customers already using Windows 10 Pro, we recommend upgrading to Windows Server 2016 or later.
Important: Customers performing upgrades may have Zedmed Server installed on Windows 10 or Windows Server 2008 R2. We strongly recommended all customers use Windows Server 2016 or later, which is a requirement for new customers. This is especially important for Windows 10 because security updates regularly interfere with some elements that Zedmed Server needs to operate and this can cause significant downtime. Contact your IT Support to perform the Windows operating system upgrade and Zedmed Support on 1300 933 000 if you have any questions.
Step 1 - Get the upgrade file
For the Zedmed v35 upgrade, Zedmed Support will email you a link to download the upgrade file. Download the file to the Zedmed Server you will be upgrading so that the file is ready to use.
The upgrade file is normally accessed by logging into the client portal. For Zedmed v35, we are providing the install file on a per-customer basis to ensure the correct upgrade credentials are included and the correct process followed as our customers migrate to the new Medicare Web service model.
Step 2 - Back up the current database
Before upgrading Zedmed, we strongly recommend backing up your current database. This is to prevent data loss in the unlikely event that something goes wrong during the upgrade.
Below is our recommended procedure. If you're not confident performing it, contact your IT provider.
To back up your database:
- Log into the Zedmed database server.
- Stop any 3rd party services that link to Zedmed, like hotdoc and pencat.
- Stop the following Zedmed services:
- Zedmed Office HI
- Zedmed Clinical
- Zedmed API Service
- Medipak CRS
- Firebird Server
- Make a copy of these Zedmed folders:
- Zedmed
- ZedmedData
- ZedmedServer
- Make a copy of the database file Security.fdb.
The file is located in C:\Program Files \Firebird\Firebird_2_5. - Start the following Zedmed services:
- Firebird Server
- Medipak CRS
- Zedmed API Service
- Zedmed Clinical
- Zedmed Office HI
Step 3 - Run the upgrade
You can now run the upgrade file that you downloaded earlier. Reboot the server if you have not done so; you will be prompted to during the upgrade process.
Note: the following steps are performed on the Zedmed database server. The upgrade file will be on the server, and you will have logged in using an account with administrator privileges.
To run the Zedmed upgrade:
- Right-click the ZedmedUpgrade .exe file.
- Select Run as Administrator.
- Select Yes if you get a Windows User Account Control warning.
- Select Run anyway if you get a Windows protected your PC warning.
You will need to select More info on the warning first. - Select Yes to confirm you have rebooted the server.
If you have not rebooted, select No, reboot your server, then restart the upgrade.
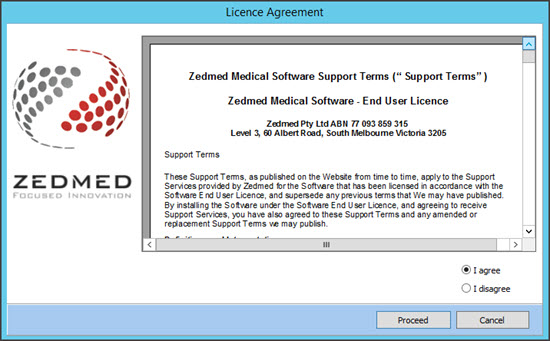
If it's been longer than an hour since the server rebooted, you’ll be prompted to reboot. If the server has been sitting idle, select Yes, otherwise select No, reboot and restart the upgrade process. - Read the Zedmed Medical Software Support Terms.
- Select I agree then select Proceed.
 The Zedmed Office and Clinical Upgrade screen will open.
 - Select Perform Zedmed Upgrade.
- Select Yes to confirm you want to upgrade.
Once the upgrade starts, do not interrupt the process until the Information dialog confirms that the upgrade was successful.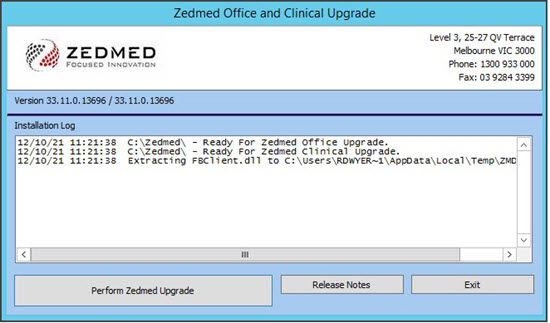 Errors: if there are any errors, Zedmed will automatically roll back to the previous version, and you can contact Zedmed support to investigate and resolve the issue.
 - When the Information dialog confirms the upgrade was successful, select OK.
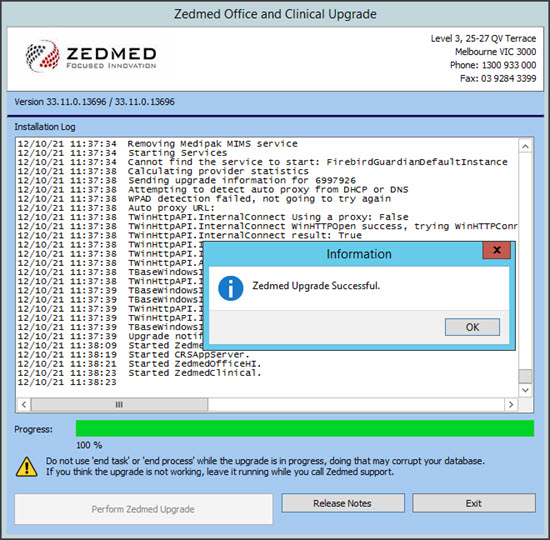 The upgrade is now complete.
 - Select Exit to close the UI.
- Respond to the dialogs that follow. They will advise you of additional, optional steps like performing a database optimisation and a reboot. These post update tasks are expanded on below.
 The Zedmed Office and Clinical Upgrade screen will open.
 Errors: if there are any errors, Zedmed will automatically roll back to the previous version, and you can contact Zedmed support to investigate and resolve the issue.
 The upgrade is now complete.
Post update tasks
After a successful upgrade, we recommend that you:
- Reboot your server if prompted to by a dialogue.
- Test Zedmed by logging in, opening Zedmed Office and Zedmed Clinical, and testing some workflows.
- Perform a database optimisation if you have upgraded from a feature release (for example, version 33 - 34) or if you have missed several smaller upgrades. To learn more, see the section below.
- If you are upgrading to Zedmwed v35, you will also need to perform the post-upgrade steps detailed in the Zedmed v35 upgrade guide.
Optimising the database
If you’re performing a feature update to a new version number or have missed several smaller upgrades, you should optimise the Zedmed database. The optimisation can take some time, and all users must be logged out of Zedmed before it starts.
To optimise the database:
- Open Zedmed.
- Select the Utilities tab.
- Select DB Optimisation.
- Select Yes to confirm the users have logged off.
- Select Yes to the User Account Control warning.
The Zedmed Database Optimisation Utility will open. - Select Optimise All.
- Select Yes to the Confirm dialog.
- Select Yes to the database connections warning.
The optimisation will start.
Select Exit when it has finished. The users can now log back in.

Updating client workstations
All that’s required to update Zedmed on client workstations is to open the application. The change of version will be detected, and the application will automatically prompt you to upgrade by selecting OK.
If you encounter any errors during this process:
- Close Zedmed.
- Right-click the Zedmed shortcut on the desktop.
- Select Run as administrator.
If you are not able to do this or are prompted for a password, contact your IT provider for assistance.
For a terminal server environment – If the client did not update, log into the terminal server as a full administrator, then run Zedmed\PUpdate2.exe using right-click > Run as Administrator. This will ensure the update ran with elevated privileges, and that the existing exe and dll files copied from the database server replaced the files on the terminal server.