This guide explains how to upgrade to Zedmed v35. There are important tasks to perform just before and immediately after the upgrade, and these tasks are explained in detail below. Use the Upgrade Checklist provided by Zedmed to ensure all the steps are completed in the correct order.
Important information:
- Some upgrade tasks will link to more detailed guides and there are also migration videos to help.
- Before starting the upgrade, ensure you have completed the upgrade preparations.
- If you encounter problems performing the upgrade, refer to the upgrade troubleshooting guide.
Requirements
Before starting the upgrade, you will have:
- Held invoices so there are no batches waiting for payments (as explained in the pre-upgrade checklist).
- Received the Upgrade Checklist from Zedmed Support.
- Received the Zedmed v35 installation file and practice credentials for MWS from Zedmed Support.
- The server you are upgrading Zedmed on MUST be running Windows 10 Pro or Server 2008 R2 or later with TLS 1.2 installed and enabled. This will have been checked earlier as explained in the Preparing for the Zedmed upgrade guide.
Important: If you have more than one Zedmed server/database (for example, you practice from more than 1 site) you will need to upgrade each database with its own credentials.
Pre-upgrade checks
Perform the pre-upgrade checks listed in the Upgrade checklist, including:
- Check there are no batches waiting for a reply in Batch Enquiry.
- Check there are no batches waiting for a reply in Tyro Easy Claim Bulk Bill Inquiry.
- Check there are no batches waiting for a reply in the ECLIPSE Claims store.
- Check there are no unallocated/unreceipted payments.
- Check Medicare's been advised not to pay any held invoices that have been voided.
- Check MA Online & Tyro for private patients payments have been paused.
- Check no entries are waiting to be sent in AIR (Australian Immunisation Register).
- Check you have a backup of previous (historical) batch reports if required.
- Check you have the Practice credentials (Client ID and Client Secret codes).
Notify Medicare if any held invoices are voided.
If you have voided a held invoice, ensure that you contact Medicare and advise them not to pay the invoice. This needs to be done before you transmit the invoices in step 5 below. When you try to reconcile your first payments after the upgrade, Zedmed will not be able to reconcile a payment if Medicare has paid for an invoice that is voided in Zedmed. This means all invoices covered by that payment will need to be manually receipted.
Zedmed Upgrade
Upgrade to Zedmed v35 by running the v35 installation file you were given by Zedmed Support.
To learn more, see the Zedmed v35 upgrade guide.
Post-upgrade tasks
After the upgrade, perform the tasks in this section in the order given, and check off each task on the Upgrade Checklist as you complete them.
The first 3 tasks 1) practice registration, 2) doctor registrations and 3) connection check) are explained in this video.
1. Register the practice for Medicare claims
The practice needs to be registered to make claims using Medicare Web Services in Zedmed. This is done by entering the Client ID and Client Secret provided by Zedmed, into Zedmed's Claiming Configuration tab in the Practice Details screen.
To learn more, see the Register practice for Medicare claims guide.
2. Register the doctors for Medicare claims
The practice needs to register each doctor so they can make claims using Medicare Web Services in Zedmed. This registration is performed in the doctor's record, where there are new Claiming options.
To learn more, see the Register doctors for Medicare claims guide.
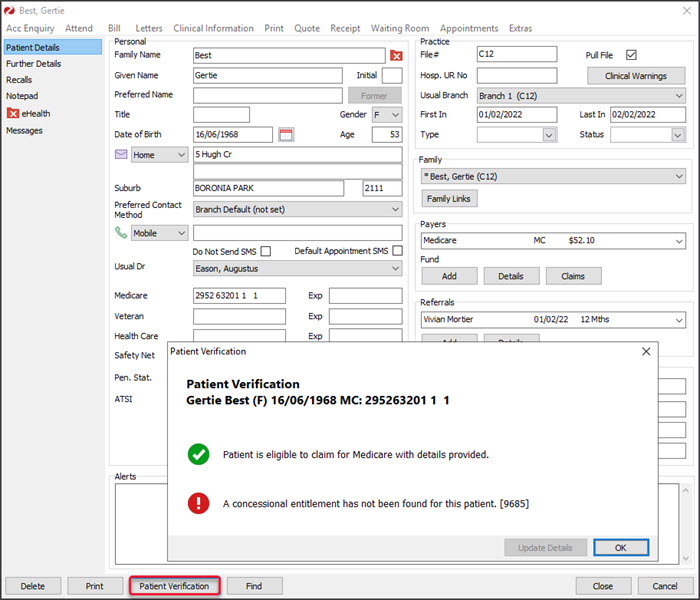
3. Check the connection
Perform a patient verification to check Zedmed's connection to Medicare Web Services. The Online PV button is named Patient Verification in Zedmed v35 and it's used to check Medicare, Healthcare card, DVA and Health fund entitlements.
To check the connection:
- Open the record of a patient with a Medicare card.
- Select Patient Verification.
- Select a doctor in the Patient Verification pop-up.
- Select OK.
- Confirm you have received a response back from Medicare.

4. Give the Claims function to the payment processors
To have access to the Claims Status screen the user must have the Claims function added to the account or the security role used to give them access to Zedmed. To do this you will need to open the role used to assign access and add the Claim Process Function. Any users with that role will then be able to open the Claims Status screen
To learn how to assign this access see the Claims and payments access article.
5. Transmit held Medicare and DVA bulk bill invoices
Submit the Medicare and DVA bulk bill invoices that were held in the lead-up to the migration using the new Claim Status screen's Transmit Claims function. Invoices raised after the upgrade will also appear the Claim Status screen but they are automatically transmitted.
Note: If you have voided any held invoices, ensure you've asked Medicare not to pay those invoices. Zedmed will not be able to reconcile a payment received for a voided invoice, and all invoices covered by that payment will need to be manually receipted.
To learn more, see the Held invoice processing guide and video.
6. Complete held ECLIPSE invoices
Process the ECLIPSE invoices that were suppressed in the lead-up to the migration. These invoices need to be sent individually from the Account Enquiry screen in the Patient Record.
Note: If you have voided any held invoices, ensure you've asked Medicare not to pay those invoices. Zedmed will not be able to reconcile a payment received for a voided invoice, and all invoices covered by that payment will need to be manually receipted.
To learn more, see the Held invoice processing guide and video.