Zedmed Cloud practitioners use Zedmed Companion, an online portal, to facilitate Telehealth consultations. This portal runs in your web browser and allows you to easily monitor Telehealth patients who are waiting and to initiate Telehealth sessions.
- First time you use Telehealth in the Cloud - set up Zedmed Companion as shown in the Zedmed Companion Setup guide.
- Each time you use Telehealth in the Cloud, open Zedmed Companion a web browser: https://companion.tele-health.systems/
- Each time you use a new device or browser, you will be prompted to allow access to the camera and the microphone.
Quick-start version of this guide (a 1-page printable).
Guide for using Copy URL (instead of Zedmed Companion)
Zedmed Companion quickstart
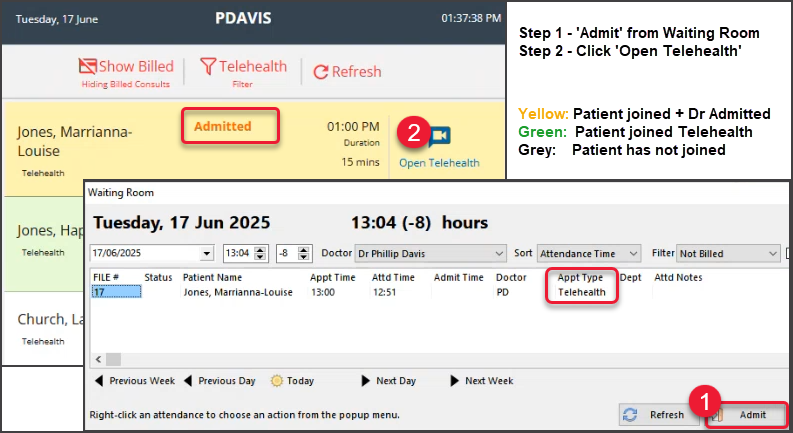
Appointments have three status types:
- Grey - (patient has appointment) has not tapped Join (you cannot start a Telehealth consult).
- Green - (patient is waiting) - the patient tapped Join on their phone, which Attends them to the Waiting Room.
- Yellow - (encounter started)- you have Admitted the patient and started the Clinical encounter.
Run encounter in 2 steps:
- Step 1 - Select Admit in the Zedmed Waiting Room. The patient's status will go from Green to Yellow.
Option - You can also do this by opening the patient record and manually starting the encounter. - Step 2 - Select Open Telehealth in Zedmed Companion. Telehealth will open and display the waiting patient.
Detailed steps to perform a consult
- In Zedmed Companion, check who your next patient is and that they show as Green (they have tapped join).
- In the Zedmed Waiting Room, select and Admit the patient.
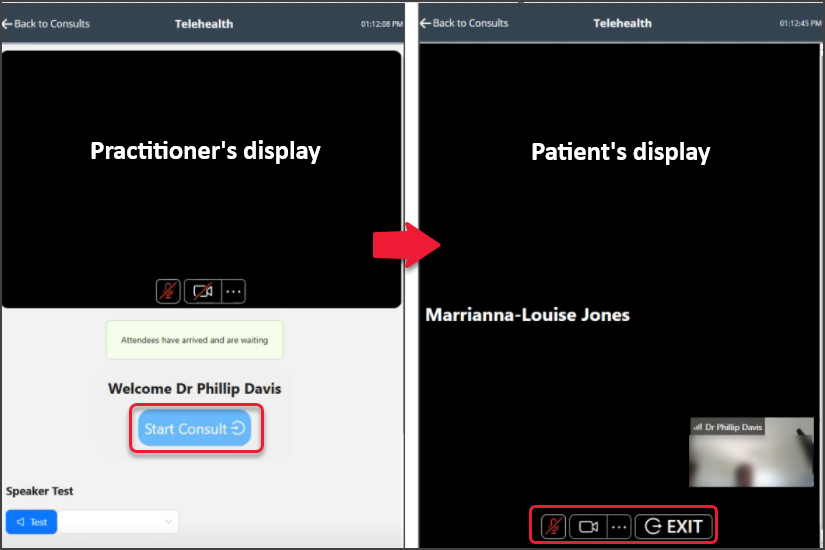
The patient's Clinical Record will open, starting the Current Encounter. - In Zedmed Companion, select the Open Telehealth icon next to the patient.
Telehealth will open inside the Zedmed Companion webpage. - Select Start Consult.
Telehealth connects and displays the patient (screenshot below).

- Enable the Camera and microphone using the icons. (bottom of the screen).
The 3-dots by the camera icon are used to select a specific cameras if required (extermal/internal) -
Conduct the consultation.
If there is a disconnection, select Re-Join to resume the Telehealth consultation. -
Select Exit when the consultation has ended.
The patient will be removed from Zedmed Companion once they have been billed.


Zedmed Companion options:
- Filters - Choose between All appointments and Telehealth appointments only.
- Tele Waiting - Show only patients who have arrived (opened the link and clicked Join).
If they leave, they will change to Telehealth appointments. - Show Billed - Includes patients who have been billed (The Waiting Room is checked for this status).
- Refresh - Zedmed Companion refreshes the patients shown every minute, or when the Refresh button is selected.
Switching Clinics
Zedmed Companion supports multiple clinics, allowing practitioners to switch between each clinic's Waiting Room.
To change clinics:
- Select the icon on the top right.
- Select the Clinic from the list shown.
Zedmed Companion will now show the Waiting Room for that Clinic.
To add another clinic, see the last section in the Zedmed Companion setup guide.
